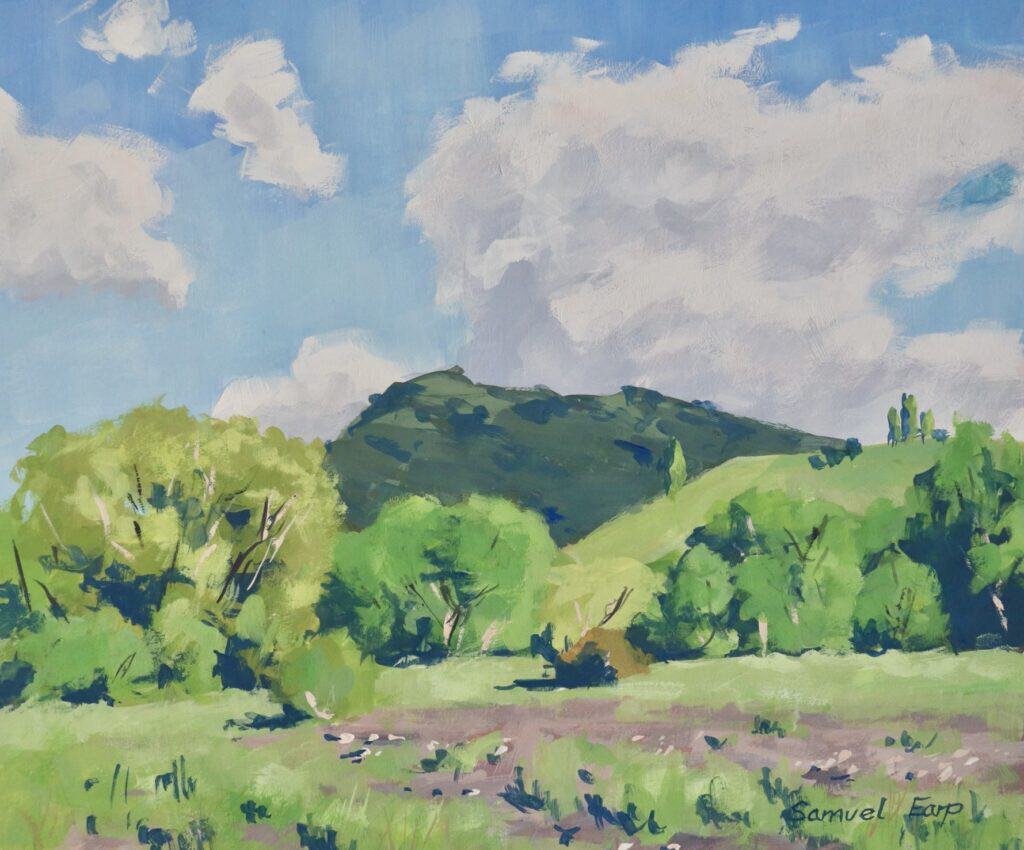
Have you ever found yourself captivated by a stunning landscape painting on social media, only to discover it was created with gouache? You’re not alone. As an artist who’s passionate about landscape painting, I’ve recently been drawn into the vibrant world of gouache, and I’m excited to share my journey with you.
In this article, I will show you how to paint a landscape in gouache.
Why Gouache is Perfect for Landscape Painting
Gouache, a water-based medium that combines the best qualities of watercolor and acrylic, has been gaining popularity among artists for good reason. Its versatility, rich pigmentation, and unique properties make it ideal for capturing the essence of landscapes. Whether you’re a beginner or an experienced painter looking to try something new, gouache offers a world of possibilities.
What You’ll Learn in This Guide
In this article, I’ll walk you through my process of creating a beautiful landscape using gouache. We’ll cover:
- The basics of gouache painting and its advantages for landscapes
- Techniques for creating depth and dimension in your scenes
- Color mixing strategies to achieve vibrant, natural hues
- Tips for handling gouache’s unique properties
- Step-by-step instructions for painting a landscape from start to finish
Who Am I?
I’m Sam, a landscape artist with years of experience in various mediums. My passion lies in capturing the beauty of nature on canvas, and I’m here to share my knowledge and inspire you to create your own gouache masterpieces.
Whether you’re looking to start your gouache journey or enhance your existing skills, this guide will provide you with valuable insights and practical techniques. So, grab your brushes and paints, and let’s explore the wonderful world of gouache landscapes together!
Getting Started: Essential Materials for Gouache Landscape Painting
Before we dive into the painting process, let’s talk about the essential tools you’ll need to create your gouache landscape masterpiece. As with any art form, having the right materials can make a world of difference in your painting experience and the final result.
The Painting Surface: Your Foundation
For this landscape painting, I chose high-quality watercolor paper, approximately 10 inches by 12 inches. Watercolor paper is ideal for gouache because it can withstand multiple layers of paint without buckling. Its texture also adds a lovely, subtle grain to your finished piece.
The Palette: Colors That Bring Nature to Life
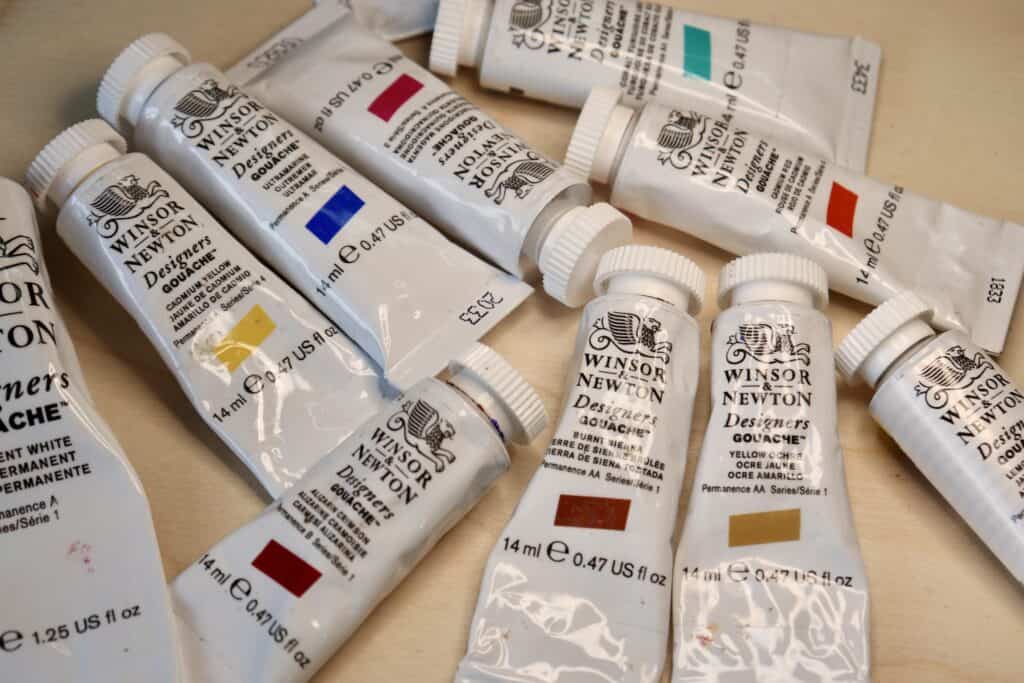
Gouache paints come in a wide array of colors, but for landscapes, I find the following selection provides a versatile base:
- Titanium White: For lightening colors and creating highlights
- Burnt Sienna: A warm, earthy brown perfect for soil and tree trunks
- Yellow Ochre: Ideal for golden fields and autumn foliage
- Lemon Yellow: Bright and fresh for sunlit areas and spring greens
- Vermilion: A vibrant red-orange for sunset skies or fall leaves
- Ultramarine Blue: For skies, water, and shadows
- Crimson: For rich, deep reds in flowers or autumn scenes
- Viridian: A cool green essential for lush vegetation
Remember, with gouache, you can mix these colors to create an infinite palette that captures the nuances of your landscape.
If you would like more information on which gouache paint brand to use then check out the blog post article link below:
The Tools: Brushes and Accessories
To apply your gouache with precision and style, you’ll need a variety of brushes:
- #18 and #12 synthetic short flat brushes: Perfect for broad strokes in skies and large areas
- #2 evergreen Eggbert brush: Ideal for details and blending
- #2 Shiraz rigger brush: Excellent for fine lines like tree branches or grass
Don’t forget these additional essentials:
- Masking tape: To create clean edges around your painting
- HB pencil: For sketching your initial composition
Pro Tip: Invest in Quality
While it might be tempting to opt for cheaper materials when starting out, investing in good-quality gouache paints and brushes will significantly improve your painting experience. Higher-quality materials often provide better coverage, smoother application, and more vibrant colors.
Setting Up Your Workspace
Before you begin, make sure you have a clean, well-lit workspace. Gouache dries quickly, so having a water source nearby and a palette for mixing colors is crucial. I also recommend keeping a few paper towels or a clean cloth on hand for wiping brushes and correcting mistakes.
Now that we’ve covered the essentials, you’re ready to embark on your gouache landscape journey. In the next section, we’ll dive into the exciting process of planning and sketching your composition. Get your materials ready, and let’s start creating!
Preparing the Paper
Before diving into the painting process, it’s crucial to prepare your workspace and materials properly. Start by securely taping your watercolor paper to your easel or work surface. This simple step is vital for several reasons:
- It prevents the paper from warping when wet.
- It creates clean, crisp edges around your painting.
- It provides a natural frame for your composition.
To tape your paper
- Center the watercolor paper on your easel or table.
- Cut four strips of masking tape, slightly longer than each edge of your paper.
- Carefully apply the tape to each edge, overlapping slightly at the corners.
- Press down firmly to ensure a good seal and smooth out any air bubbles.
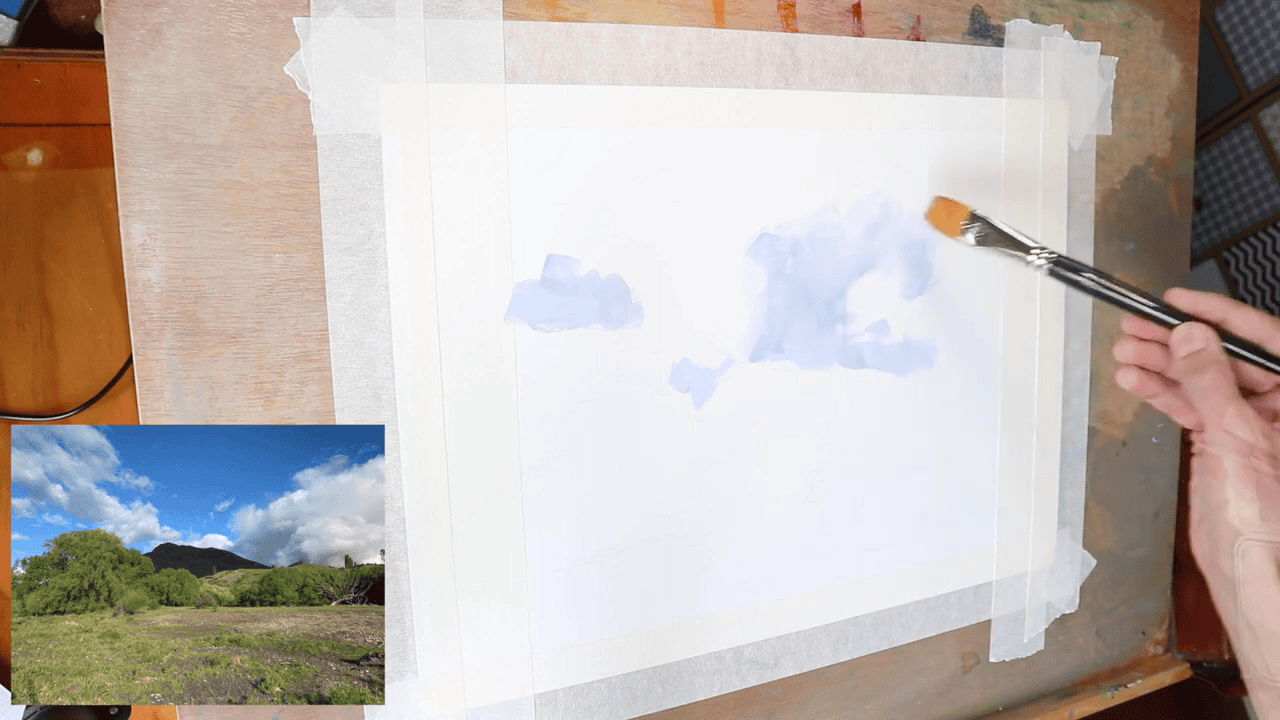
For best results, use artist’s tape, which is gentler on paper and removes cleanly. If you plan to frame your work, consider leaving a small white border around your painting area.
Once your paper is secured, ensure your workspace is clean and well-lit. Gather all your materials – paints, brushes, water, and palette – before you begin. Gouache dries quickly, so being prepared will help your painting process flow smoothly.
With your paper taped and materials ready, you’re now set to begin sketching and painting your landscape. This preparation sets the stage for a successful and enjoyable painting experience.
Step-by-Step Painting Process:

Sketching: Laying the Foundation of Your Landscape
The journey of a thousand brushstrokes begins with a single pencil line. Sketching is a crucial first step in creating a successful gouache landscape. It allows you to plan your composition, establish the main elements of your scene, and create a roadmap for your painting process.
Why Sketch?
- It helps you visualize the final painting
- Allows you to experiment with composition before committing to paint
- Provides a guide for your painting process
Sketching Technique
I start with a light touch using an HB pencil. The key is to keep your sketch loose and gestural – you’re aiming for a basic outline, not a detailed drawing. Remember, most of this sketch will be covered by paint, so don’t worry about perfection.
Focus on:
- Main shapes: Outline the major elements of your landscape (hills, trees, buildings, etc.)
- Horizon line: This helps establish perspective
- Points of interest: Mark where your focal points will be
Tips for Effective Sketching
- Keep your lines light to avoid indentations in the paper
- Use basic shapes to represent complex objects
- Think about the rule of thirds when placing key elements
- Consider the flow of the composition – how will the viewer’s eye move through the painting?
Don’t Overdo It
Remember, the sketch is just a guide. You don’t need to include every detail – that’s what the paint is for. The beauty of gouache is its opacity, which means you can easily paint over or adjust your initial sketch as you work.
As you sketch, try to envision how the light and shadows will play across your landscape. This will help guide your painting process later on.
With your sketch complete, you’ve laid the groundwork for your gouache landscape. In the next section, we’ll dive into the exciting world of color as we begin to bring our landscape to life with paint.
Building the Foundation: Establishing Dark Values and Shadows
Starting with Shadows: The Key to Depth
Just as in oil painting, I begin my gouache landscapes by establishing the darkest values and shadows. This approach helps create depth and sets the stage for the lighter elements that will follow.
Painting Cloud Shadows
To create the subtle shadows cast by clouds, I use a carefully mixed palette:
- Ultramarine blue: For coolness and depth
- Burnt sienna: To desaturate and add warmth
- A touch of crimson: For richness
- Titanium white: To lighten and create the right value
I apply this mixture as a thin wash, taking advantage of gouache’s quick-drying nature. This allows me to build layers and add thicker paints over the initial wash, creating depth and texture in the sky.

Capturing the Essence of Willow Trees
Shadows Within the Foliage
For the intricate shadows within the willow trees, I create a custom mix:
- Ultramarine blue
- Yellow ochre
This combination produces a dark value with a subtle green cast, perfectly capturing the shadowed areas of the foliage. As the painting progresses, I add darker accents by layering more paint, enhancing the trees’ three-dimensional feel.
Creating Depth with Background Elements
Painting Distant Hills and Trees
The background hills play a crucial role in establishing depth in the landscape. I use a palette similar to the tree shadows, but with slight variations:
- Ultramarine blue
- Yellow ochre
- Titanium white
- A hint of lemon yellow
This dark value for the distant hills serves to emphasize the lighter values of the willow trees in the foreground, creating a striking contrast that draws the viewer’s eye.
Pro Tip: Layering in Gouache
One of the joys of working with gouache is its versatility in layering. Unlike watercolor, gouache allows you to apply opaque layers over previous washes. This technique is particularly useful for adjusting values and adding details as your painting develops.
By starting with these darker elements, we’ve laid a strong foundation for our landscape. The interplay of these shadows and dark values will make the lighter, sunlit areas pop, bringing life and dimension to our scene. In the next section, we’ll explore how to build upon this foundation, adding mid-tones and highlights to realize our gouache landscape fully.
Bringing the Sky to Life and Understanding Values
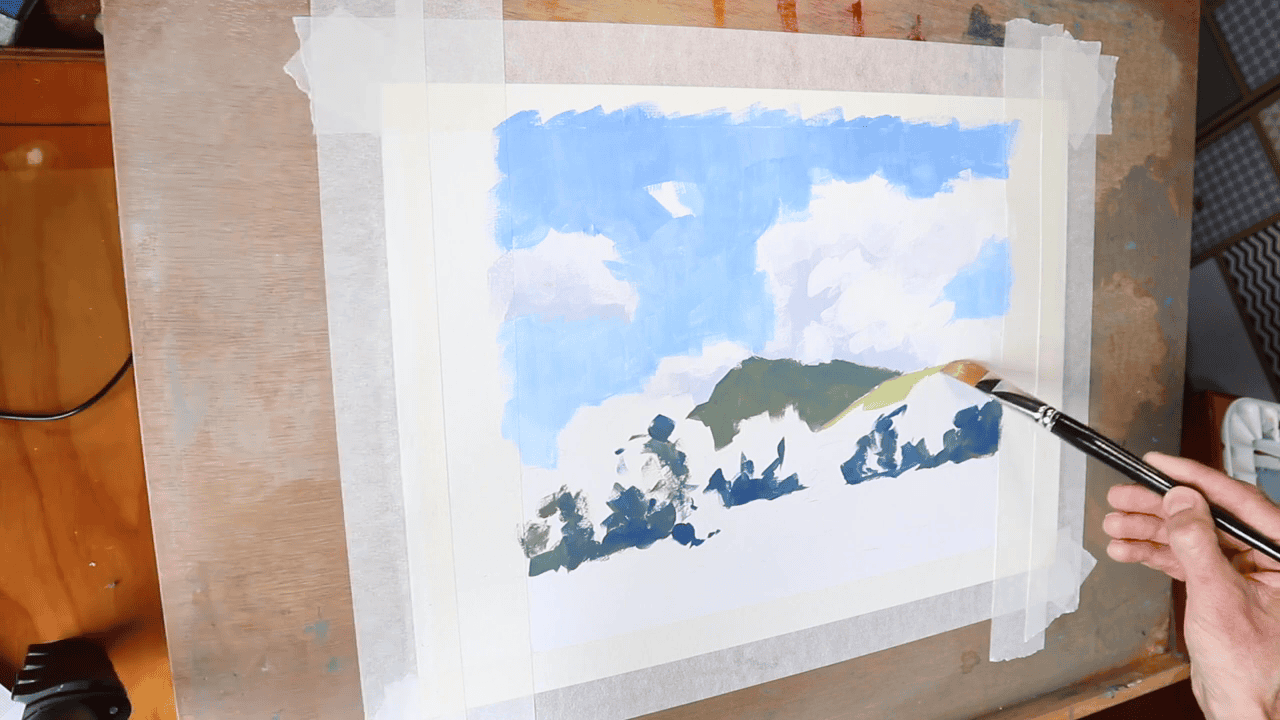
Painting the Sky: Setting the Atmosphere
The sky often sets the mood for a landscape painting. To create a vibrant yet realistic sky, I use a carefully chosen palette:
- Ultramarine blue: For the base sky color
- Titanium white: To create clouds and adjust the sky’s value
- A touch of viridian: To add depth and variation
I start by working on the sky and clouds, which are the furthest elements in our scene. This approach allows me to establish the atmosphere and overall tone of the painting from the beginning.
The Importance of Values in Landscape Painting
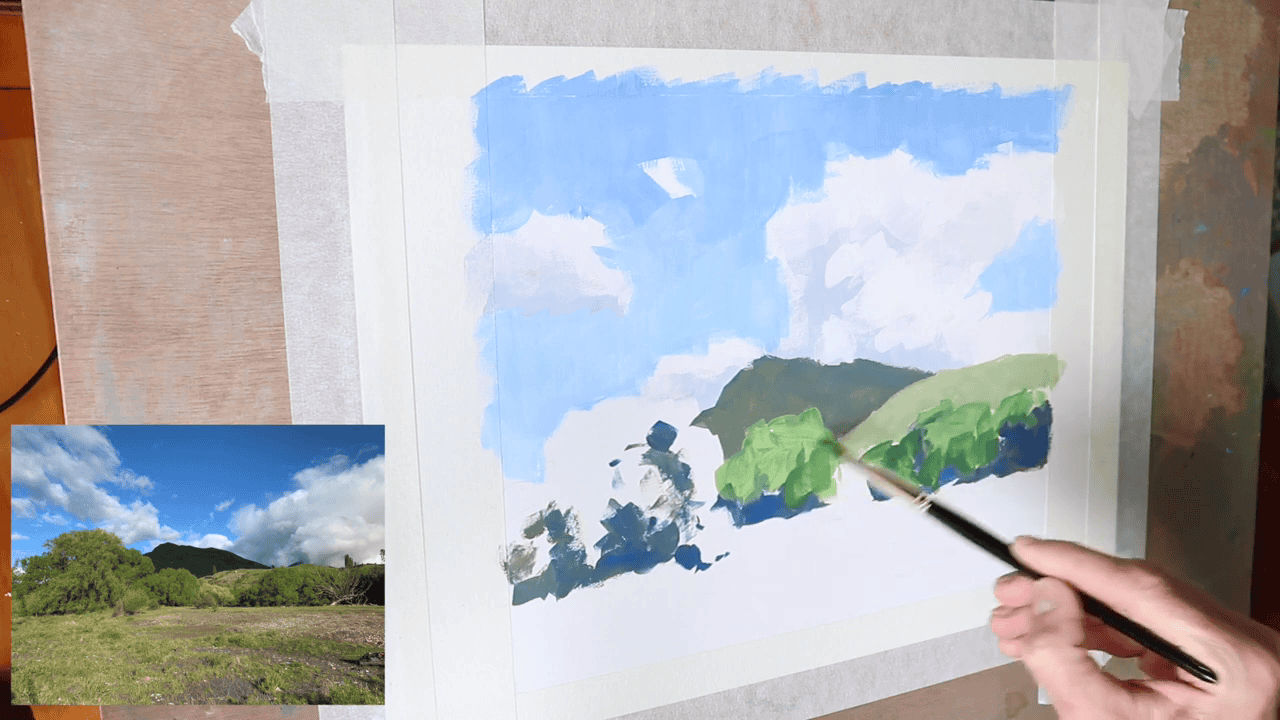
What Are Values?
Values refer to the lightness or darkness of colors in your painting. Understanding and accurately representing values is crucial for creating depth and realism in your landscape.
The Value Gradient in Landscapes
In landscapes, there’s a natural progression of values from foreground to background:
- Foreground: Contains the highest contrast – the darkest darks and lightest lights
- Middle ground: Moderate contrast
- Background: Lowest contrast – darks are lighter, and lights are darker
This gradual reduction in value contrast as objects recede into the distance is key to creating a sense of depth in your painting.
Adding Depth with Color and Detail
Once the basic values are established, it’s time to focus on adding color and detail to bring the landscape to life.
Creating Natural Greens
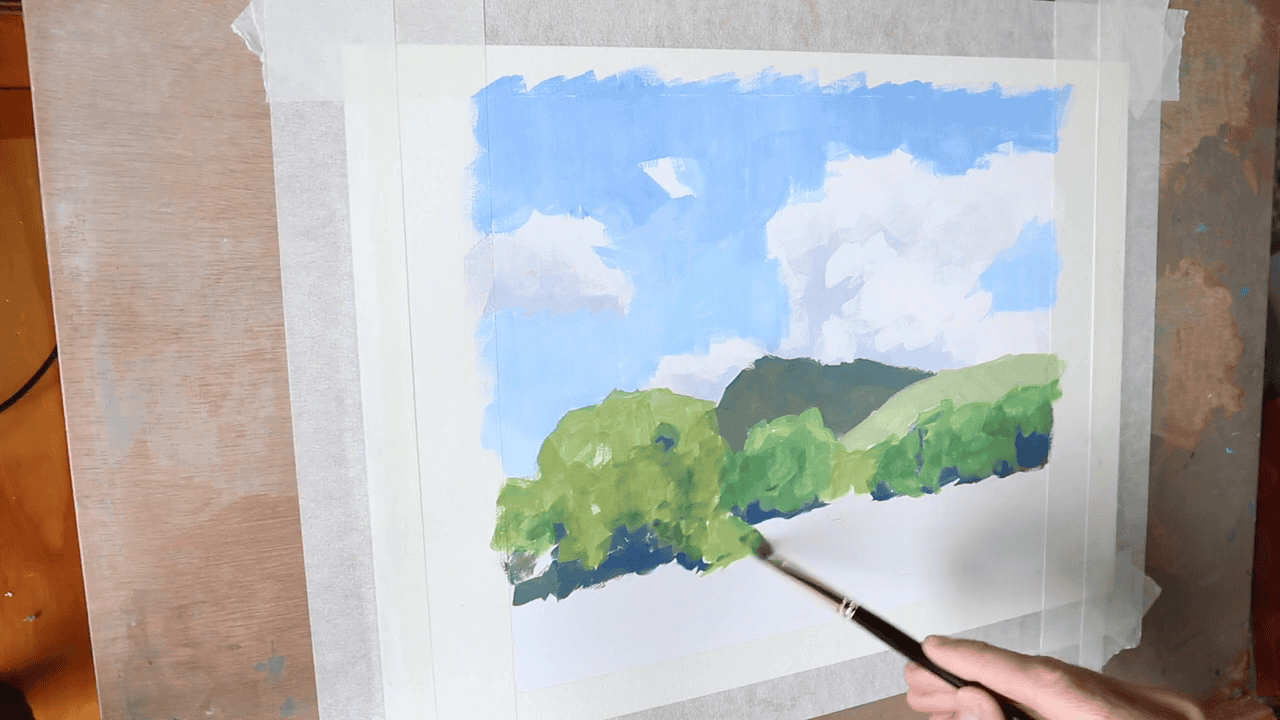
For the foliage, I mix a vibrant green using:
- Yellow ochre
- Lemon yellow
- Ultramarine blue
To adjust the value, I add titanium white for lighter areas. For a more natural, organic look, I incorporate a bit of vermilion to slightly desaturate the green.
Layering Texture and Detail
With my color mixes ready, I begin adding texture and detail to the trees and other forms in the landscape. This process involves:
- Applying base colors
- Adding highlights and shadows to create form
- Layering in fine details like individual leaves or branches
Pro Tip: Working from Background to Foreground
By starting with the sky and distant elements and gradually working forward, you can more easily create a sense of depth in your painting. This technique allows you to:
- Establish the overall atmosphere
- Ensure proper value relationships between different elements
- Build up layers of detail, with the most detailed elements in the foreground
Remember, gouache’s opacity allows you to make adjustments and add details at any stage of the painting process. Don’t be afraid to revisit areas and refine them as your landscape develops.
In the next section, we’ll explore how to bring your foreground elements to life, adding the final touches that will make your gouache landscape truly shine.
Bringing Your Landscape to Life: Details, Texture, and Depth
Crafting a Realistic Foreground
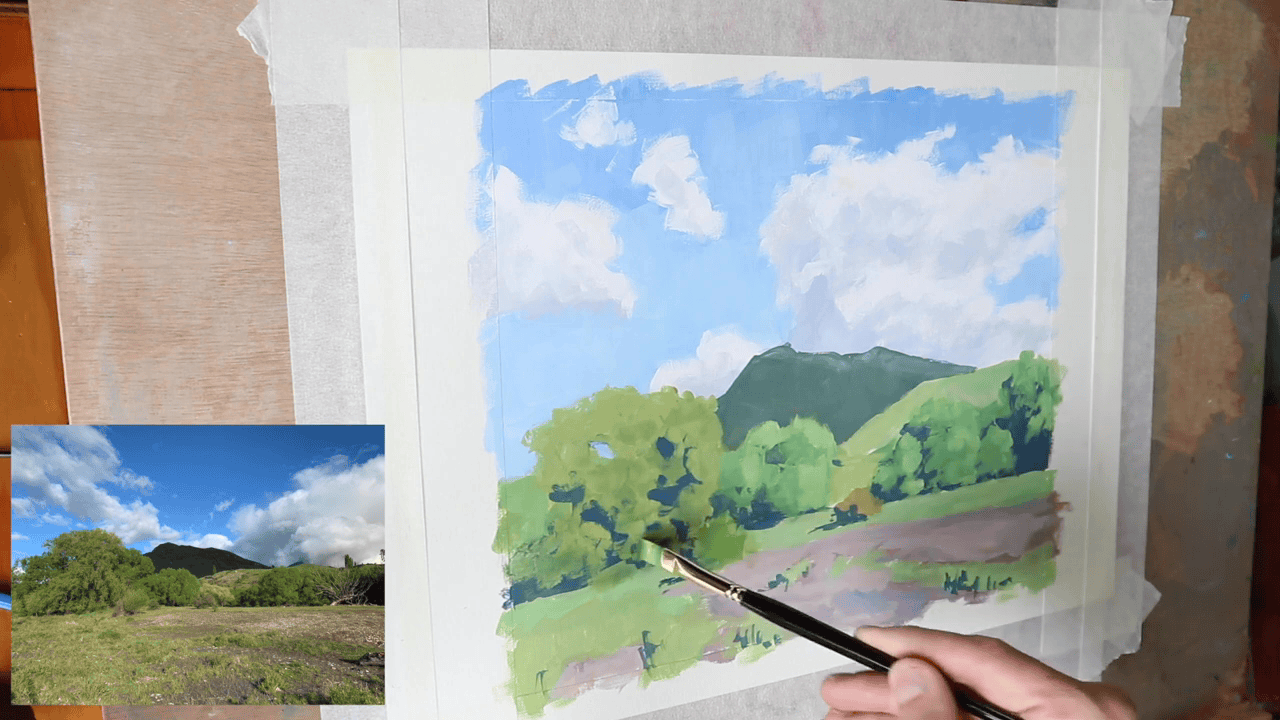
The foreground is where your landscape comes alive, offering the most detail and contrast. To create a compelling foreground:
Painting Mud and Dirt
I use a mix similar to the cloud shadows but with adjustments:
- Increase the ultramarine blue content
- Darken the overall value.
This creates a rich, earthy tone that grounds the composition.
Adding Lush Grass
For the grass, I start with the willow tree green mix, then:
- Lighten with titanium white for sun-touched areas
- Add lemon yellow for a fresh, vibrant look
Mastering the Art of Green
Greens can make or break a landscape. Here’s how I create a varied and natural palette:
Intensifying Greens
- Add a small amount of viridian to your base green mix
- Adjust with lemon yellow for brightness or yellow ochre for warmth
- Incorporate vermilion to create more muted, olive tones
This variety prevents your greens from looking flat or artificial.
Creating Depth with Layering Techniques
Gouache’s versatility shines in its ability to be layered. After initial washes:
- Apply thicker paint for texture, especially in clouds and sky
- Use synthetic short flat brushes for broader strokes
- Build up layers gradually for a rich, dimensional effect
Capturing the Essence of Willow Trees
Willow trees add character and focal points to your landscape. To paint them effectively:
- Use an evergreen Eggbert brush for fine control
- Paint shadows and darker accents within the foliage
- Remember: Trees often have some of the darkest values in a landscape due to internal shadows
Pro Tip: Occlusion Shadows
Occlusion shadows, formed when light is blocked within dense foliage, create depth in trees. Pay attention to these darker areas to make your trees look three-dimensional.
Balancing Detail and Impression
While adding details, remember:
- Focus most detail in the foreground and areas of interest
- Gradually reduce detail as elements recede into the distance
- Use varied brush strokes to suggest texture without overworking
By carefully crafting your foreground, mastering greens, and utilizing layering techniques, you’ll create a gouache landscape with depth, texture, and visual interest. In our final section, we’ll discuss the finishing touches and how to critique your own work for future improvement.
Highlights and Final Details: Bringing Your Landscape to Life
Sculpting Tree Forms with Light
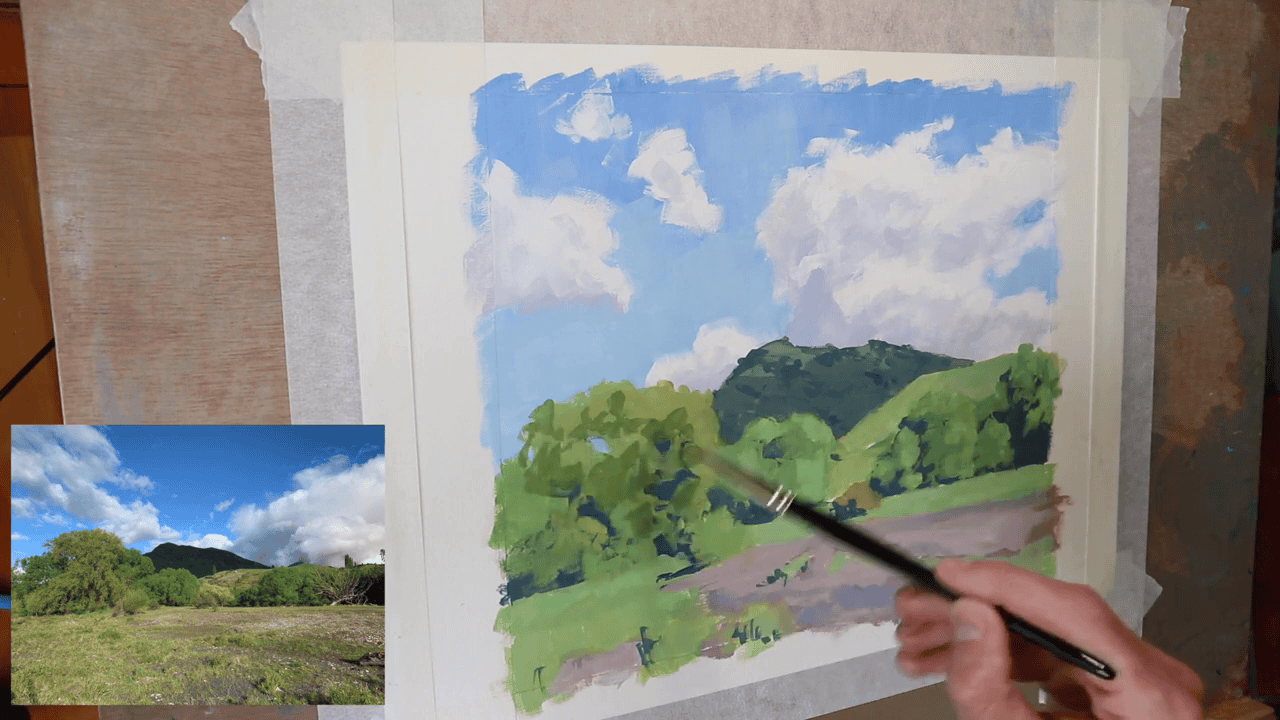
The key to realistic trees lies in how light interacts with their form. To achieve this:
- Identify where direct sunlight would hit the tree canopies
- Add highlights to these areas using a lighter version of your green mix.
- Gradually build up these lighter values, layering carefully for a natural look.
Remember: The lightest values are often the final touch, providing that spark of life to your painting.
Crafting a Dynamic Foreground
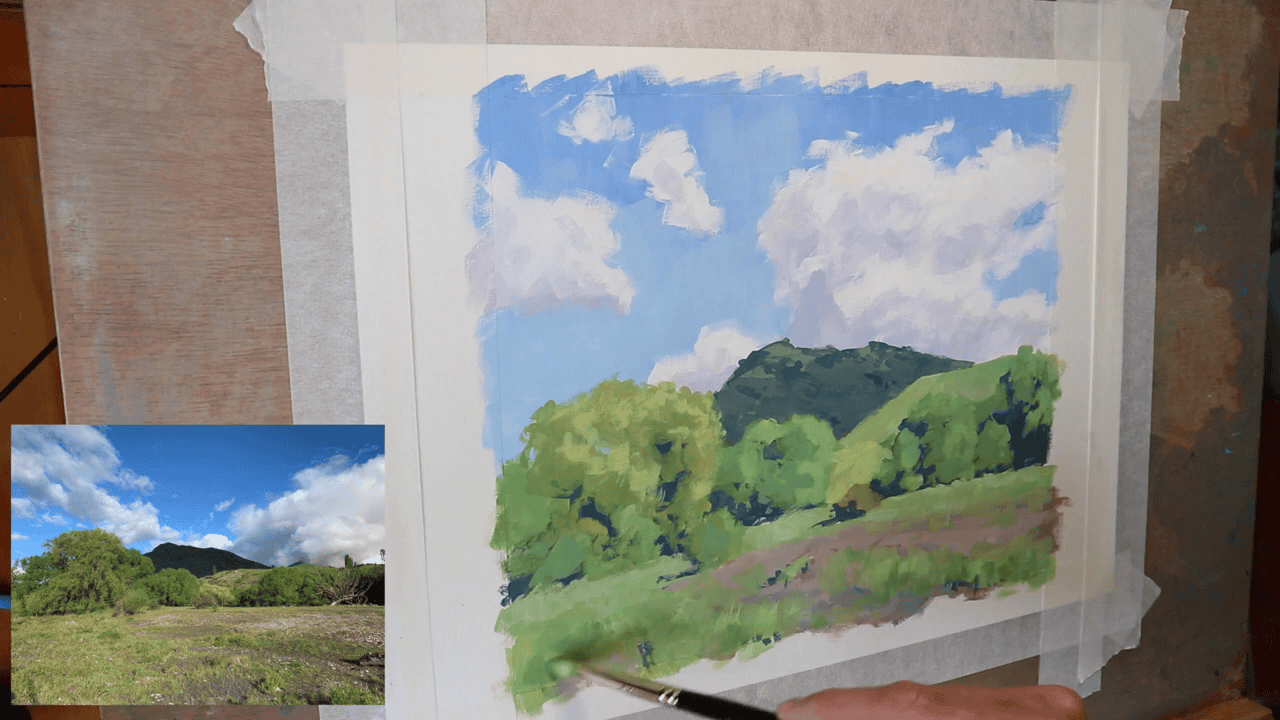
The foreground is your viewer’s entry point into the painting. Make it count:
Realistic Grass Techniques
- Use vertical brush marks to mimic the natural growth of grass
- Vary the length and direction slightly for a more organic feel
- Incorporate subtle color variations to suggest different types of vegetation
Pro Tip: Observe how grass grows in nature. It’s rarely uniform, so don’t be afraid to add some “wildness” to your strokes.
Adding Structure with Branches and Stems
Fine details like branches can add crucial structure to your landscape:
For Darker Branches:
- Mix ultramarine blue and burnt sienna for a near-black tone
- Use the Shiraz rigger brush for precise, thin lines
For Lighter Branches:
- Blend yellow ochre, burnt sienna, and titanium white
- Adjust the mix to create various shades, simulating how light hits different parts of the branch
Technique Spotlight: Using a Rigger Brush
The Shiraz rigger brush is perfect for these fine details:
- Hold it like a pencil for maximum control
- Use light pressure for thinner lines, more pressure for thicker ones
- Practice making continuous, flowing strokes to create natural-looking branches
Balancing Act: Detail vs. Overall Composition
As you add these final touches, keep stepping back to view your painting as a whole:
- Ensure that details enhance rather than overwhelm the composition
- Check that your focal points are still drawing the eye
- Make sure the overall value structure of your landscape remains intact
Final Touches
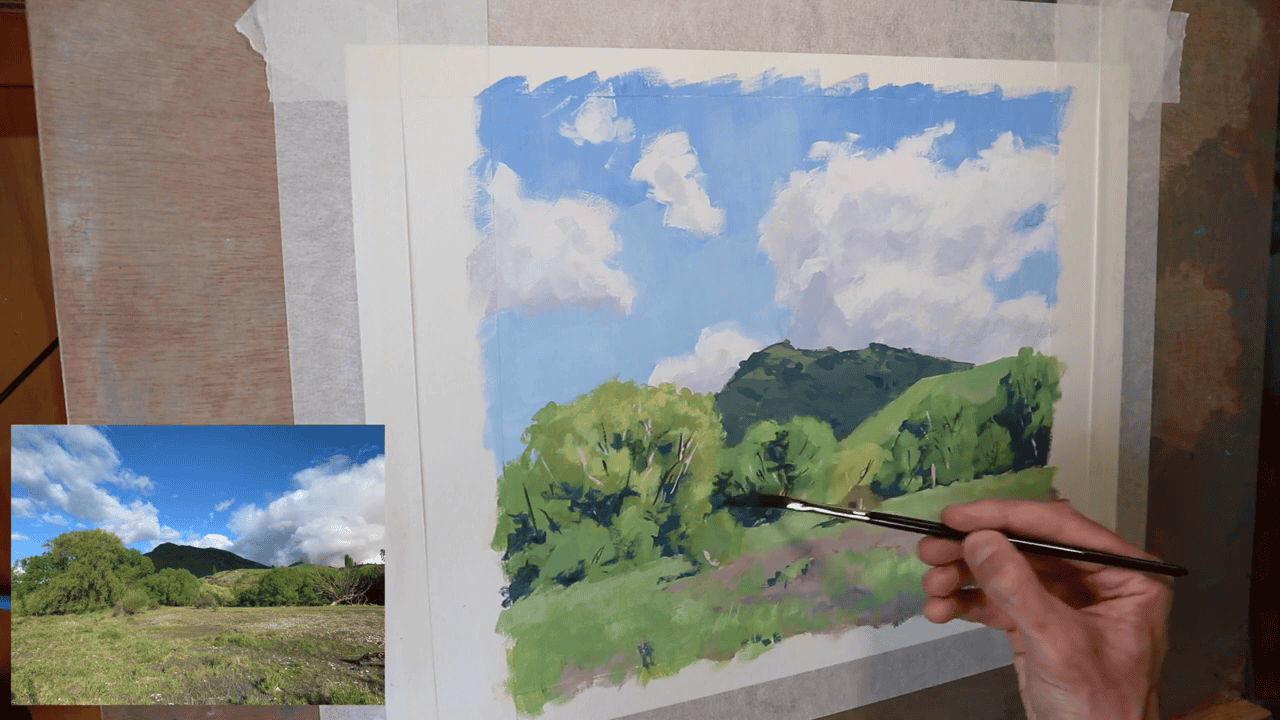
Consider these last steps to polish your painting:
- Add a few strategically placed highlights to create points of interest
- Soften any edges that appear too harsh
- Reinforce shadows if needed to maintain depth
By carefully adding these highlights and final details, you’re not just completing your painting – you’re bringing it to life. Each thoughtful brushstroke adds to the story your landscape tells, creating a rich, immersive scene that invites the viewer to explore.
Final Thoughts on Gouache Painting
The Versatility of Gouache: An Oil Painter’s Perspective
As primarily an oil painter, I’ve found gouache to be a refreshing and versatile medium. It offers several unique advantages:
- Natural-looking colors without the strong odors associated with oils
- Quick drying time, allowing for rapid layering and reworking
- Compact and travel-friendly setup, perfect for painting on-the-go
The Expressive Nature of Gouache
“One thing I really love about gouache painting is you can really be loose and impressionistic with it.”
This quality of gouache allows artists to capture the essence of a landscape with bold, expressive strokes, much like in oil painting. The opacity of gouache, combined with its ability to be thinned for washes, provides a wide range of techniques to explore.
Pro Tip: Removing Masking Tape
To protect your finished painting when removing the masking tape:
- Gently pull a small section of tape away from the paper
- Press this exposed sticky side onto another surface (like your table)
- Pull the tape parallel to the paper’s surface, not upwards
This technique reduces the tape’s adhesion, preventing damage to your watercolor paper.

Embracing the Gouache Adventure
Why Gouache Might Be Your New Favorite Medium
- Accessibility: Easy to set up and clean, perfect for spontaneous painting sessions
- Versatility: Works well for both detailed studies and loose, impressionistic pieces
- Forgiving Nature: Mistakes can be easily corrected due to its opaque quality
- Vibrant Results: Produces rich, matte finishes that photograph beautifully
Continuing Your Artistic Journey
Painting landscapes with gouache opens up a world of creative possibilities. Whether you’re a seasoned artist or just beginning, gouache offers a unique blend of convenience and expressiveness that can enhance your artistic toolkit.
To further develop your skills:
- Experiment with different paper textures and brands of gouache
- Try plein air painting to capture the immediacy of outdoor scenes
- Combine gouache with other mediums for mixed media explorations
Remember, every brushstroke is a step forward in your artistic journey. Embrace the process, enjoy the medium, and let your creativity flow with gouache!
Thank you for joining me on this gouache landscape adventure. Here’s to many more beautiful paintings in your future!
Thanks for reading!
