Have you ever felt stuck with your landscape paintings, struggling to capture that perfect balance of light and shadow? You aren’t alone. That moment when you step back from your canvas, brush in hand, and realize something isn’t quite right is a familiar frustration for artists at every level. The good news? A simple shift in your approach can transform your entire painting process.
In this comprehensive guide, I’ll show you how to harness the power of painting dark values first, a game-changing technique that has revolutionized my landscapes and helped countless artists unlock their true potential.
This method isn’t just another painting tip; it’s a fundamental shift in how you approach your canvas that will help you create more dramatic, realistic, and compelling landscapes.
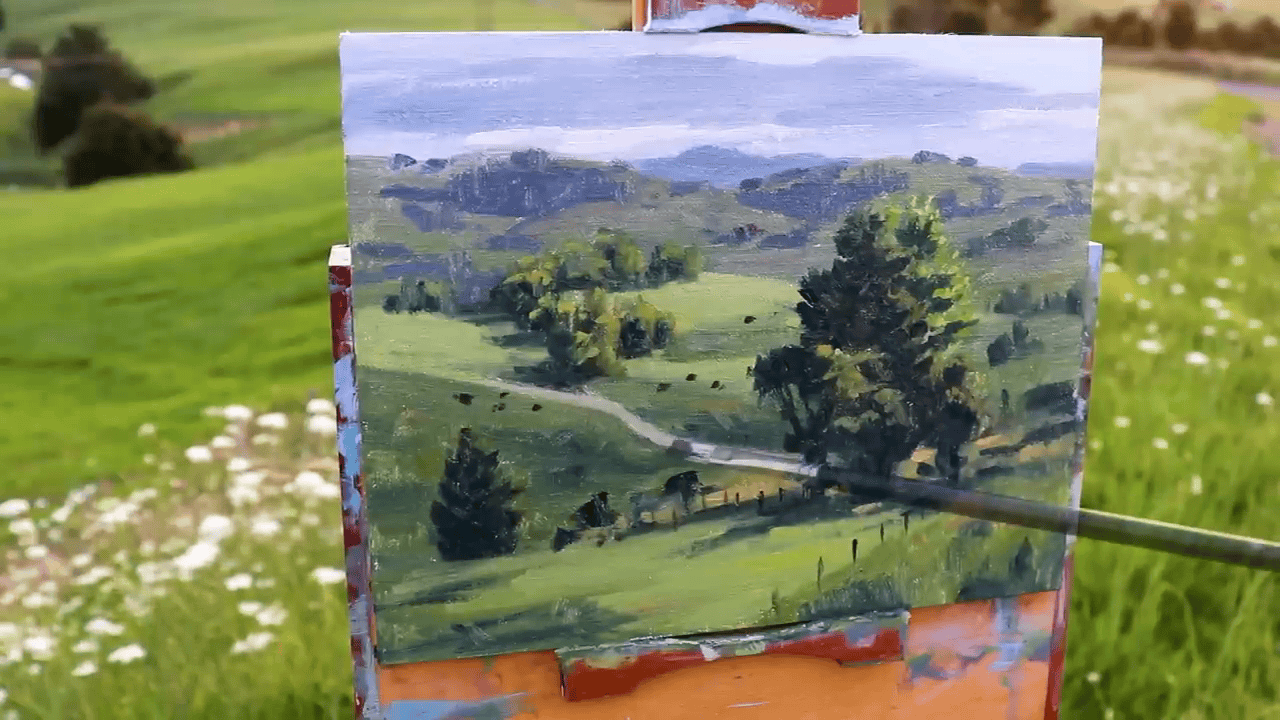
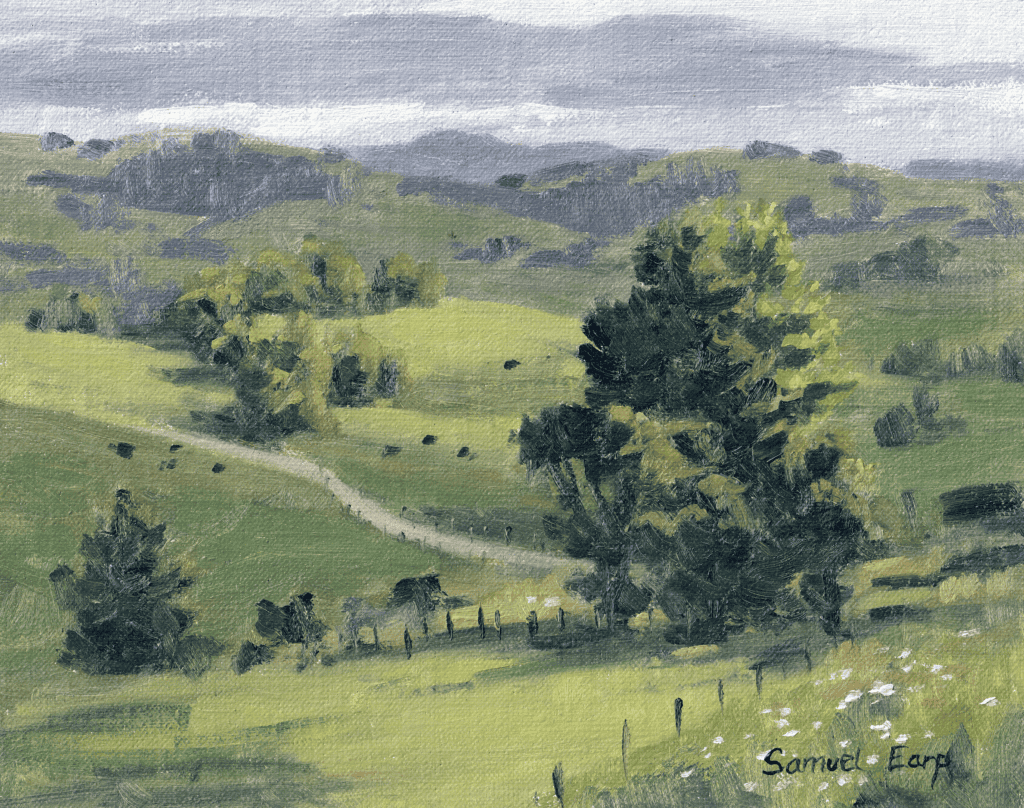
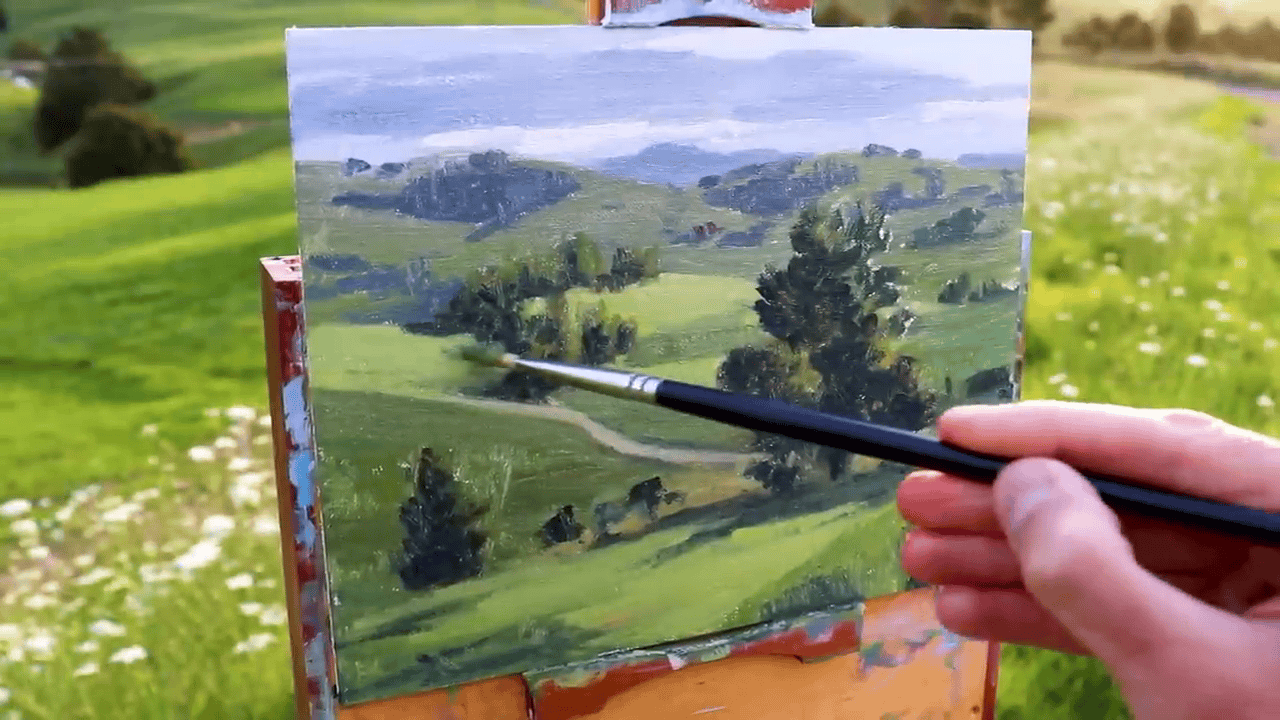
In this article I will demonstrate the concepts in the landscape painting above which I painted outdoors (en plein air). Even though this is a plein air painting, I use the same concepts and techniques in my studio.
Reference Photo
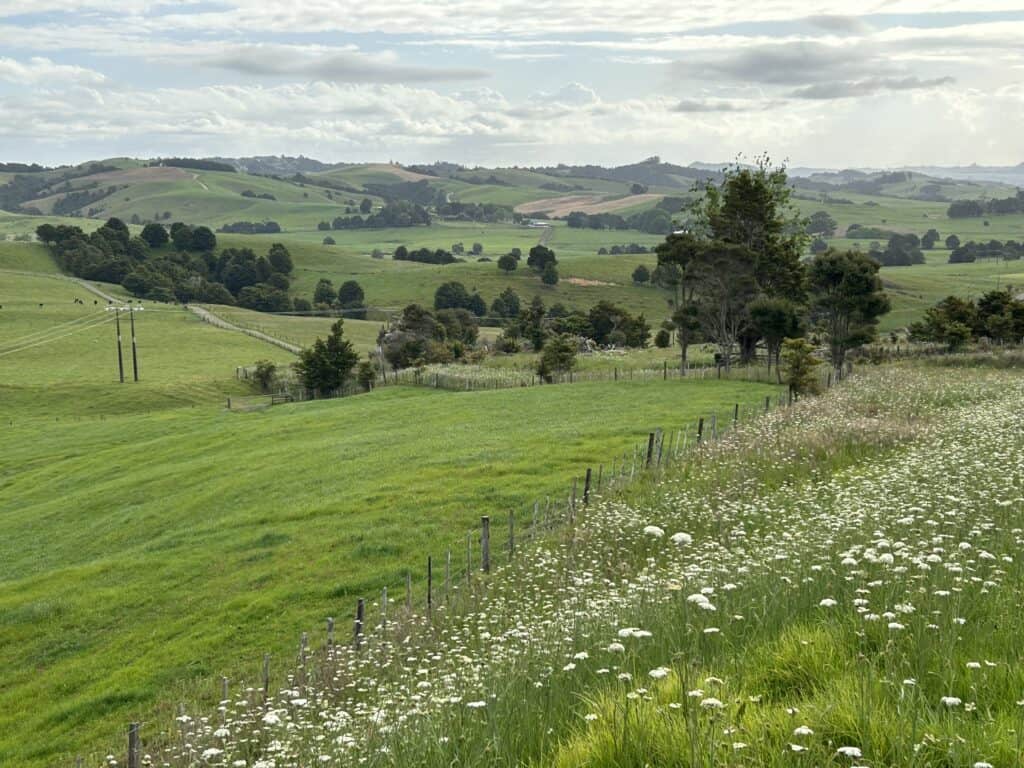
Whether you’re working with oils or acrylics, this dark-to-light technique will give you better control over your composition, help you establish stronger focal points, and make it easier to capture those breathtaking light effects that make landscape paintings truly memorable. Let’s dive into how you can master this approach and take your landscape paintings to the next level.
Understanding Values in Landscape Painting
Creating depth in landscapes isn’t just about color, it’s about mastering the delicate interplay of light and shadow through values. This understanding came to me during countless hours of plein air painting in the dramatic landscapes of far north New Zealand, where the contrast between sun-drenched hills and deep valley shadows taught me an invaluable lesson about the importance of values in creating compelling landscape paintings.
What Are Values in Painting?
Values refer to the relative lightness or darkness of colors in your painting. Think of it as how light or dark a color would appear if you were to view your painting in black and white. Understanding and controlling these values is crucial for creating depth and dimension in your work.
The Role of Value Contrast
The key to creating depth lies in recognizing where your strongest value contrasts appear. In most landscapes, these extreme contrasts—your darkest darks and lightest lights—are typically found in the foreground. As elements recede into the distance, these contrasts naturally soften, with dark values becoming lighter and light values becoming more muted. This gradual reduction, in contrast, is one of the most powerful tools for creating atmospheric perspective in your paintings.
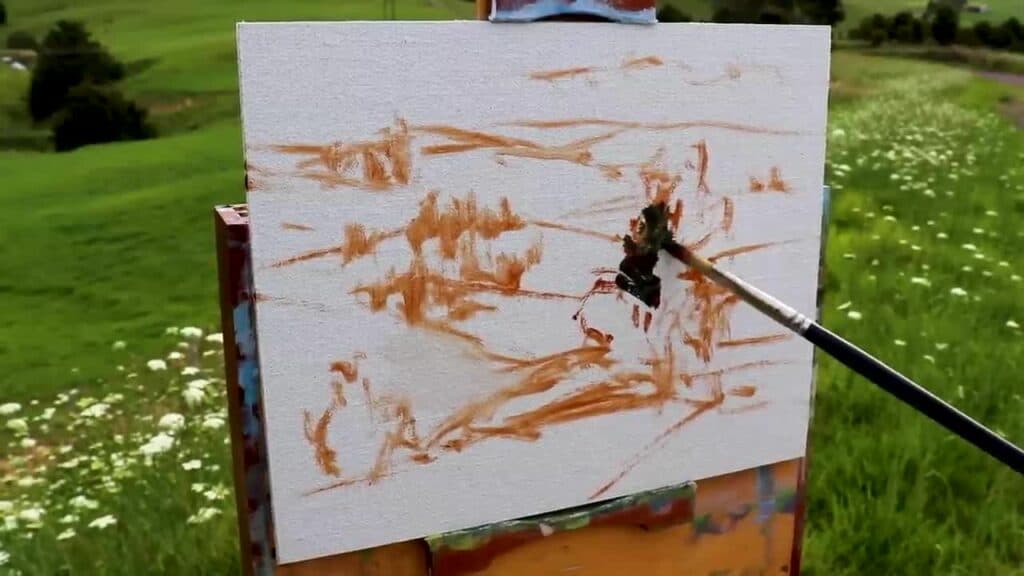
The Dark Values First Technique
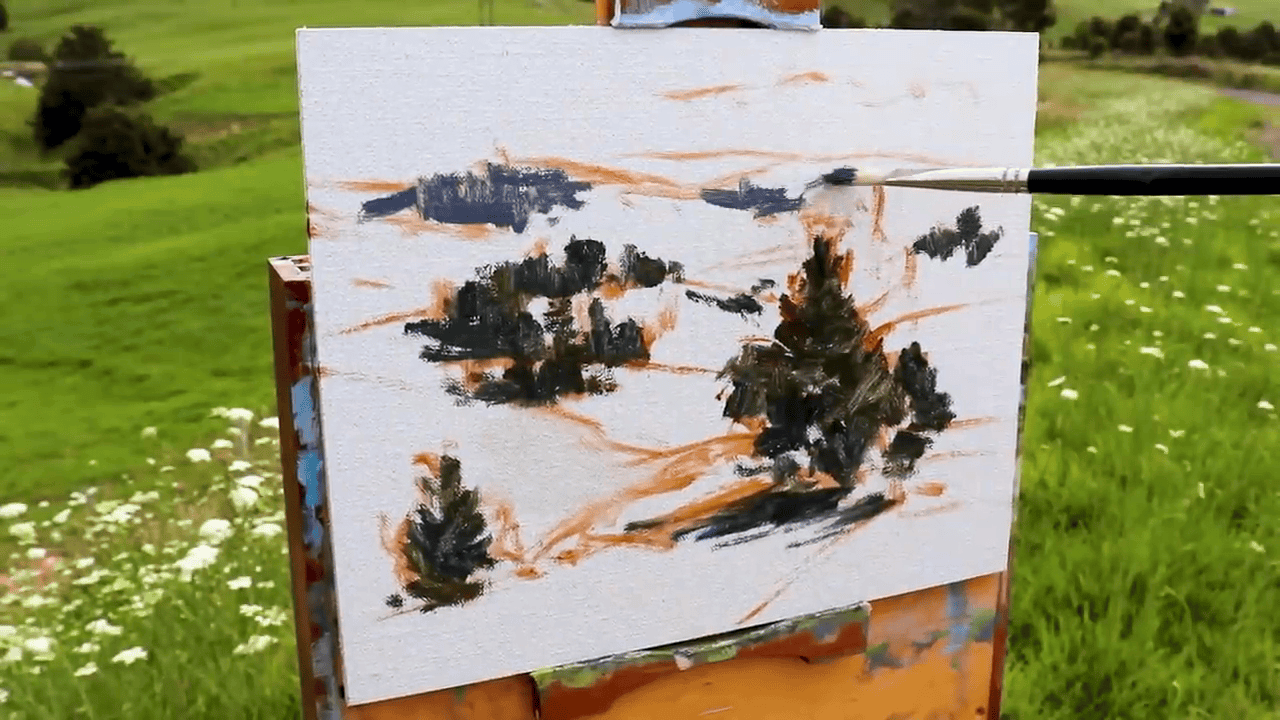
Through my experience painting the lush landscapes of New Zealand, I discovered that beginning with dark values provides a solid foundation for the entire painting. This approach isn’t just limited to plein air painting—it translates perfectly to studio work, offering several key advantages:
- Better value control
- Stronger composition from the start
- More accurate representation of depth
- Easier adjustment of lighter values
Learning from Nature
One particularly memorable afternoon, while painting New Zealand’s northern landscape’s rolling hills and dense foliage, I had a breakthrough moment. The strong afternoon sun created distinct shadows that clearly defined the landscape’s structure. By focusing on these dark values first, I found I could more accurately capture the essence of the scene before moving on to the mid-tones and highlights.
Creating Depth Through Dark Values
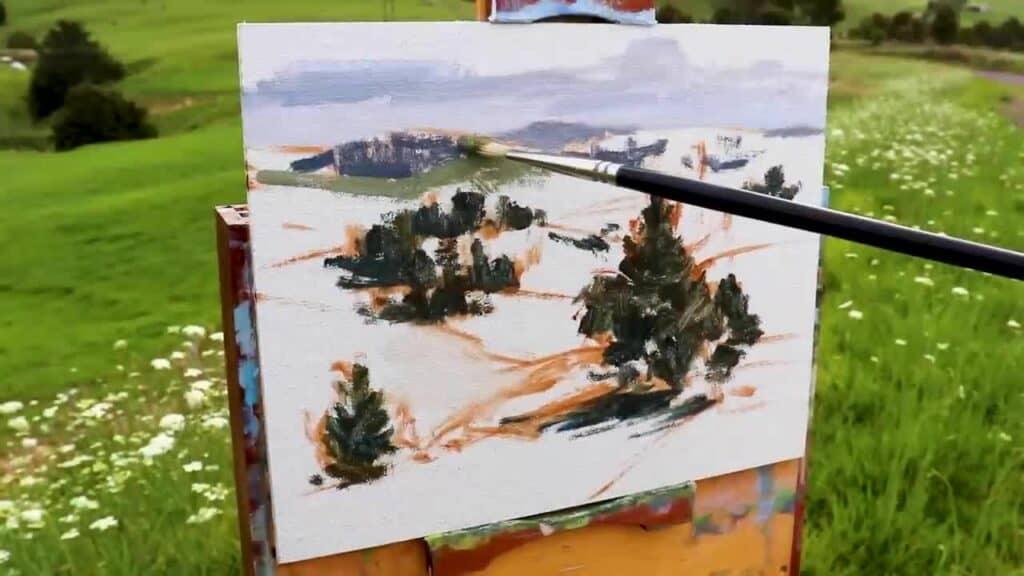
Mastering Foreground Elements
The foreground of your landscape is where the darkest values play their most crucial role. By establishing strong dark values in the foreground, you create a natural entry point for the viewer’s eye and set up the foundation for the entire painting’s depth.
Understanding Trees and Vegetation
Trees are nature’s gift to landscape painters when it comes to establishing dark values. Their complex structure naturally creates some of the darkest values in any landscape scene, providing perfect opportunities to anchor your composition.
Creating Natural Dark Greens
When painting trees, avoid using pure greens straight from the tube. Instead, try this tried-and-tested mixture:
- Start with ultramarine blue as your base
- Add yellow ochre gradually
- This combination creates a desaturated, natural green that’s perfect for capturing deep shadows within foliage.
The resulting color appears more natural because it mirrors how we actually see trees in nature, as complex masses of light and shadow rather than uniform green shapes.
Working with Shadows
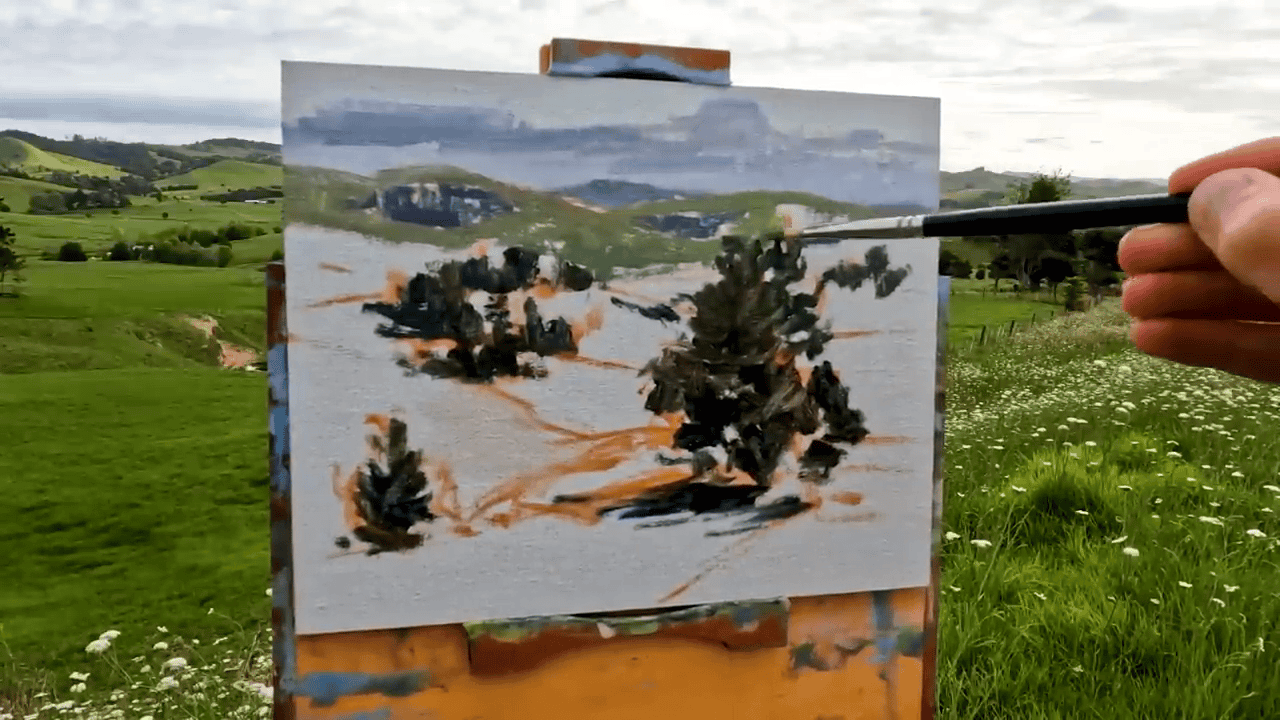
Shadows are your secret weapon in creating convincing landscape depth. They serve multiple purposes:
- Define form and structure
- Create rhythm across the composition
- Establish depth through value variation
Shadow Techniques for Different Planes
When painting shadows, remember that their values change depending on their position in the landscape:
Foreground Shadows
- Use your darkest values here
- Keep edges relatively crisp
- Include more detail and texture
Midground Shadows
- Slightly lighter than the foreground
- Softer edges
- Less detail but still distinct
Background Shadows
For distant trees and shadows, create a more atmospheric effect with:
- A mixture of ultramarine blue
- Burnt sienna
- Titanium white
- A touch of alizarin crimson
This combination creates the perfect subdued tone that suggests distance while maintaining the shadow’s essential dark value.
Pro Tip: Value Control
Remember to step back frequently from your painting and squint. This helps you see the overall value relationships more clearly and ensures you’re maintaining appropriate contrast throughout your composition.
Building Atmospheric Depth with Light Values
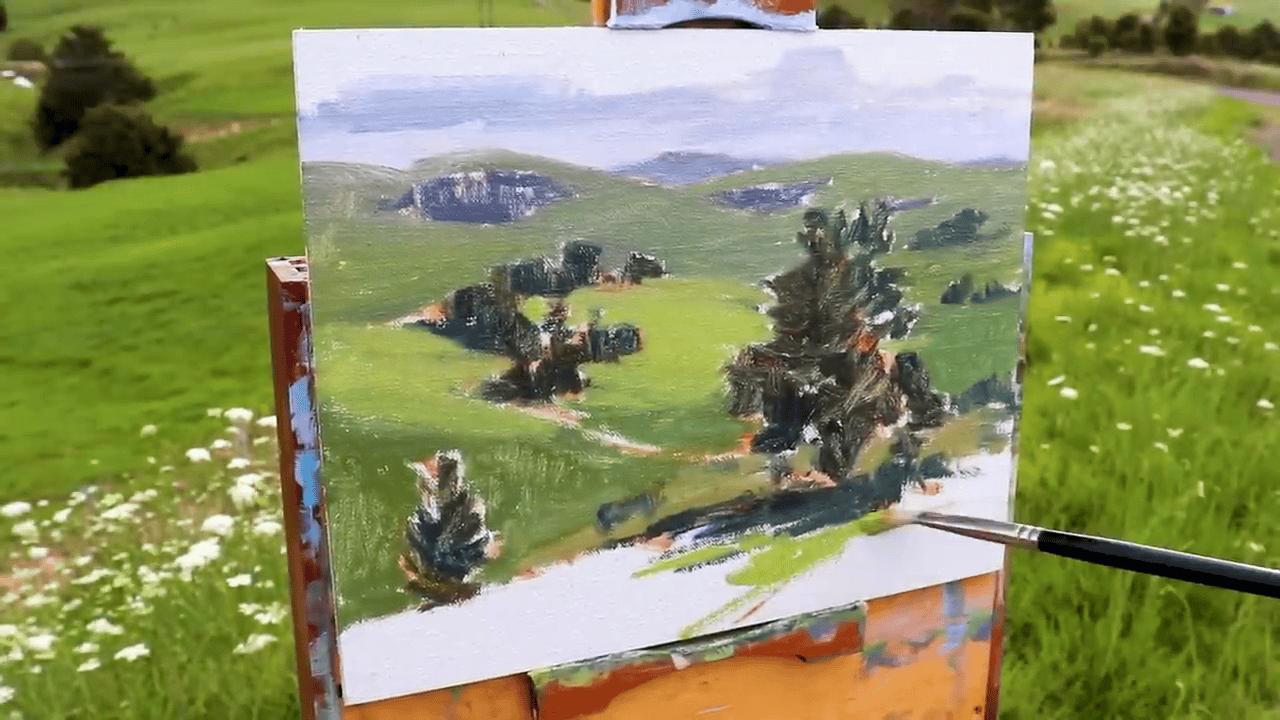
Understanding Atmospheric Perspective
Once your dark values are established, introducing lighter values requires careful consideration of atmospheric effects. This interplay between light and atmosphere is what gives your landscape paintings their sense of depth and distance.
Creating Natural Light Effects
Transitioning to Mid-Distance Fields
When painting fields that extend toward the horizon, consider these key factors:
- Cloud cover and its effect on local color
- Atmospheric haze
- Distance-related color temperature changes
For these areas, use this reliable mixture as your base:
- Yellow ochre (primary)
- Ultramarine blue
- Titanium white
Then adjust the mixture by adding:
- Cadmium yellow medium for warmer areas
- Cobalt teal for cooler variations
This combination allows you to maintain color harmony while creating subtle variations that suggest natural light conditions.
Capturing Dynamic Light Effects
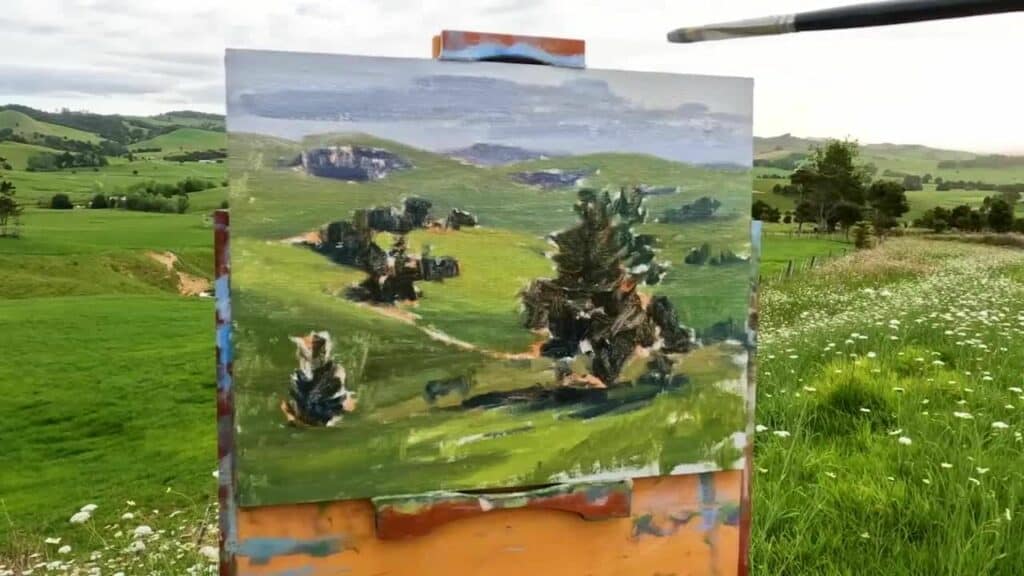
Creating Dramatic Sunlight
Natural light effects can transform an ordinary landscape into something extraordinary. Pay attention to:
Breakthrough Moments
- When sunlight pierces through clouds
- Creates spotlighting effects on specific areas
- Offers opportunities for stronger contrast
Color Temperature
For sun-lit areas:
- Use phthalo green sparingly to restore vibrancy
- Mix with your base greens for natural transitions
- Keep these areas limited to maintain focus
Pro Tips for Light Management
- Always compare your light values to your established dark values
- Keep sunlit areas slightly less intense than you might think—overstatement can break the illusion of depth
- Use light effects strategically to guide the viewer’s eye through your composition
Balancing Values
Remember that even your lightest values should relate logically to your dark foundation. This relationship creates the convincing sense of depth that makes landscape paintings compelling.
Essential Techniques for Realistic Landscape Painting
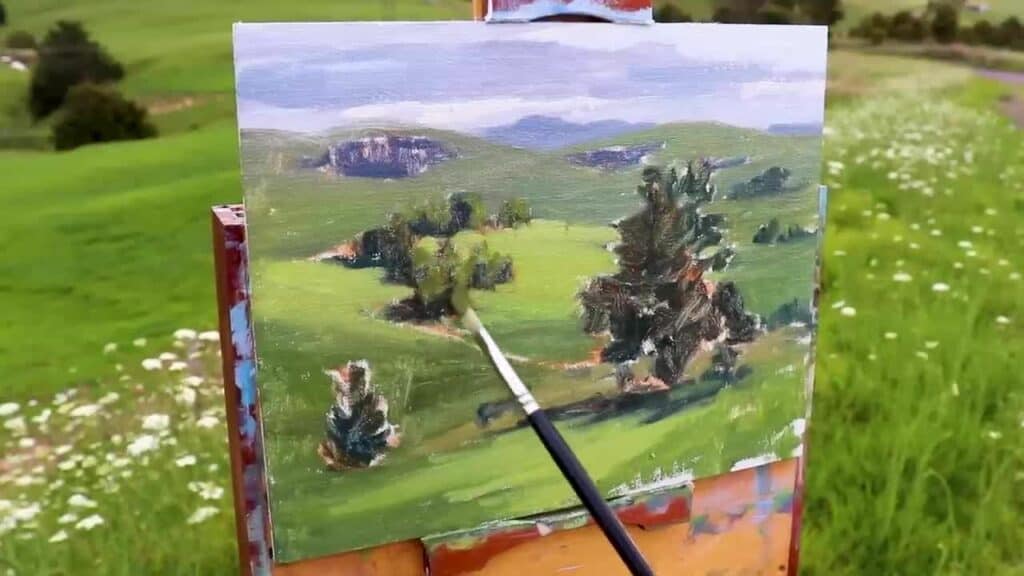
Efficient Paint Application Strategies
Choosing the Right Tools
The foundation of efficient painting starts with proper brush selection:
- Large bristle flats (like Rosemary & Co. No.5) for initial coverage
- Medium filberts for transitional areas
- Smaller brushes are reserved for final details
Time Management in Plein Air
When painting outdoors, time is of the essence. Here’s how to make the most of changing natural light:
- Start with large brushes for broad coverage
- Work systematically across the canvas
- Save detail work for after your foundation is established
Building Your Value Framework
The Dark Value Foundation
Starting with dark values offers several key advantages:
- Creates a clear structural roadmap
- Establishes definitive reference points
- Allows for more accurate light value judgments
Testing Value Relationships
When applying lighter values:
- Use your dark framework as a reference point
- Test new colors against existing shadows
- Adjust intensity and value as needed
Advanced Application Techniques
Layering Strategy
Build your painting in clear, purposeful layers:
- Dark value foundation layer
- Mid-tone transitional layer
- Light value detail layer
- Final highlights and accents
Brush Handling Tips
- Use confident, deliberate strokes
- Maintain a loose grip for better paint flow
- Vary pressure for different effects
- Clean brushes between major value changes
Pro Tip: Decision Making
Remember this fundamental principle: “By establishing your darkest values first, you create a reliable framework that guides every subsequent decision in your painting process.”
Tools and Techniques for Value Analysis
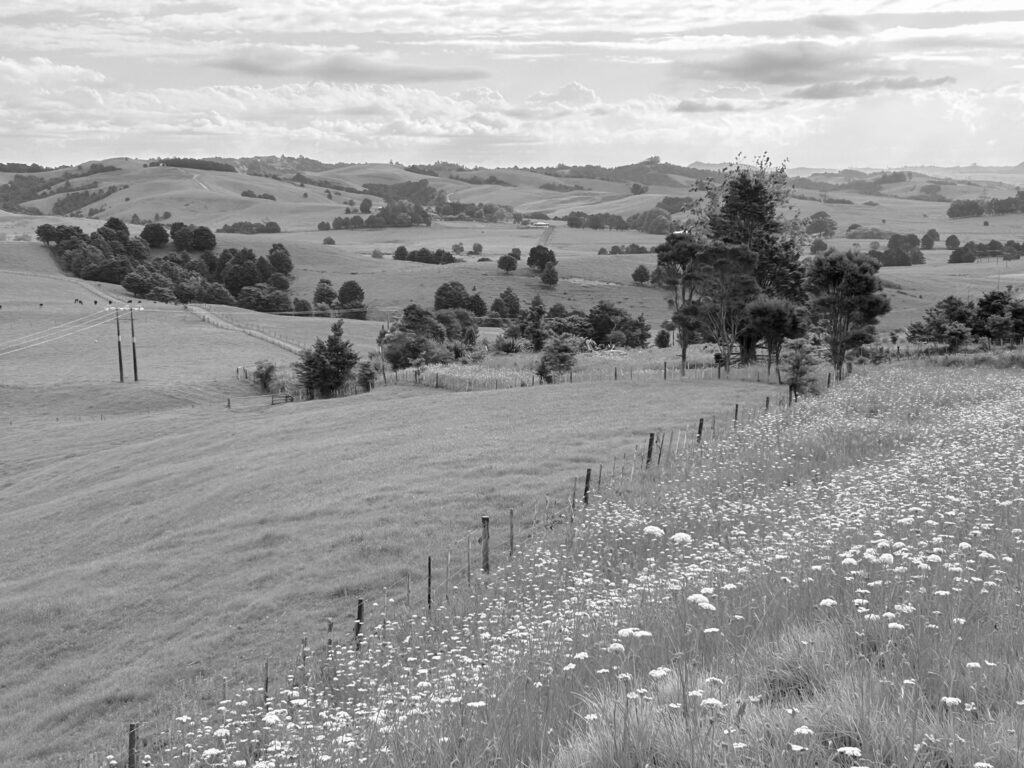
Using Black and White References
One of the most powerful tools in a landscape painter’s arsenal is surprisingly simple: converting your reference photos to black and white. This technique strips away the distraction of color, allowing you to focus purely on value relationships.
Why Convert to Black and White?
When you remove color from the equation, you can:
- See value relationships more clearly
- Identify the true contrast in your scene
- Understand the underlying structure of your landscape
- Make better decisions about your dark value placement
Practical Steps for Value Analysis
Converting Reference Photos
There are several ways to create black and white references:
- Use your phone’s built-in black and white filters
- Convert images in editing software like Photoshop or free alternatives
- Print your reference in grayscale
- Use a value viewer (a red transparent filter) while looking at color photos
Analyzing Value Patterns
When studying your black and white reference:
- Identify the darkest darks
- Look for the lightest lights
- Note where medium values create transitions
- Study how values group together to create larger shapes
Pro Tips for Reference Usage
Making the Most of Black and White References
- Keep both color and black and white versions available
- Use the black and white version for initial blocking in
- Refer to the color version for hue accuracy
- Regularly compare your painting to the black and white reference to check value accuracy
Common Pitfalls to Avoid
- Don’t rely solely on the black and white reference
- Remember that cameras can distort value relationships
- Consider that shadows appear darker in photos than in real life
- Maintain the artistic freedom to adjust values for better composition
Refining Your Landscape Painting
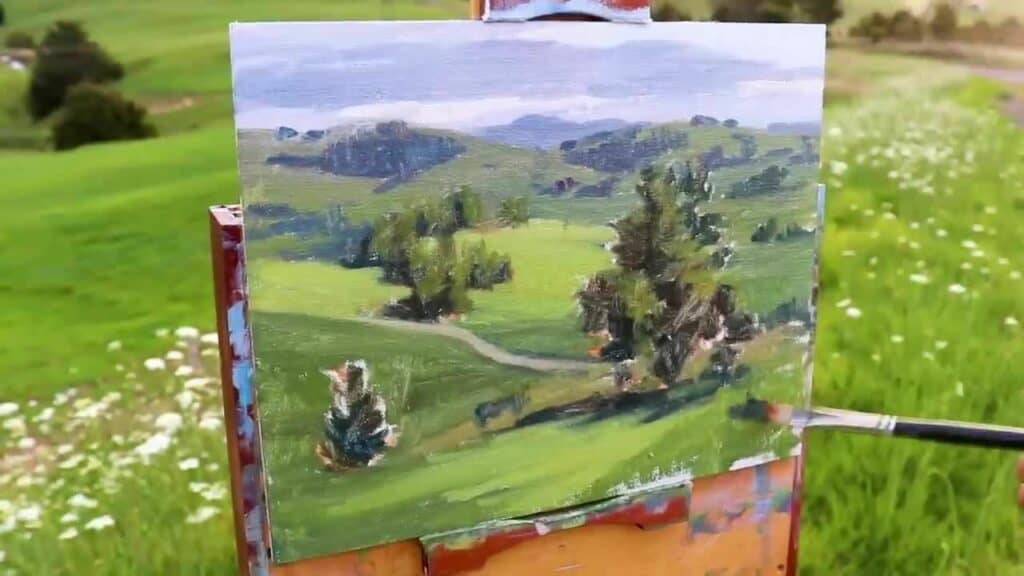
Adding Detail Work
Once your foundation of dark and light values is established, it’s time to focus on the elements that bring your landscape to life. This stage is about careful observation and deliberate application of detail.
Enhancing Mid-Ground Elements
For mid-ground trees and vegetation:
- Revisit initial dark values with slightly deeper greens
- Build up layers gradually for added dimension
- Pay attention to edges where elements meet
- Add subtle variations in color temperature
Creating Structural Elements
Introduce man-made elements with precision:
- Paint roads and tracks to suggest human presence
- Add architectural elements like fences and buildings
- Keep these elements proportional to their distance
- Use linear perspective to reinforce depth
Final Touches and Highlights
Light Effects
Save your brightest highlights for last:
- Mix a vibrant light green palette:
- Yellow ochre (base)
- Ultramarine blue
- Cadmium yellow
- Small amount of phthalo green
- Apply highlights strategically to:
- Sun-touched foliage
- Prominent edges
- Areas of focus
Detail Work
Use fine synthetic brushes for precise details:
- Add distant elements like fence posts
- Suggest animals or buildings in the landscape
- Create texture in foreground vegetation
- Define edges where necessary
Pro Tips for Finishing
- Step back frequently to assess overall balance
- Don’t overwork the details—sometimes less is more
- Keep your lightest touches crisp and confident
- Ensure details support rather than compete with your main focal point
Transform Your Landscape Paintings Starting Today
Key Takeaways
The journey to creating more compelling landscape paintings doesn’t have to be complicated. You can dramatically improve your work by focusing on a few fundamental changes to your approach—particularly starting with dark values. Remember:
- Begin with your darkest values to establish a strong foundation
- Understand and respect the natural progression of values in the landscape
- Work efficiently with appropriate tools and techniques
- Use black-and-white references to strengthen your value understanding
- Add details and highlights strategically to enhance your focal points
Your Next Steps
The techniques I’ve covered in this guide are just the beginning of your journey toward creating more dynamic landscape paintings. Here’s how you can continue to develop your skills:
- Practice the dark-values-first approach in your next painting
- Experiment with the color combinations we’ve discussed
- Try converting your reference photos to black and white
- Focus on building strong value relationships before adding detail
Free Resource
To help you master these techniques and take your landscape painting to the next level, I’ve created a comprehensive Landscape Painting Blueprint. This free resource dives deeper into:
- Advanced value techniques
- Color mixing strategies
- Composition principles
- Step-by-step demonstrations
Final Thoughts
Remember, transformative changes in your art often come from small but significant adjustments to your approach. By incorporating these techniques into your practice, you’ll develop a stronger understanding of value relationships and create more compelling landscape paintings.
Start with your next painting. Apply these principles, and watch as your work transforms into something that truly captures the beauty and depth of the landscapes you love to paint.
