This article may contain affiliate links, please read my affiliate disclosure for more information.
In this article, I will show you how to paint a landscape that features a stand of trees. I painted this artwork using oil paint but you could also paint this in acrylics.
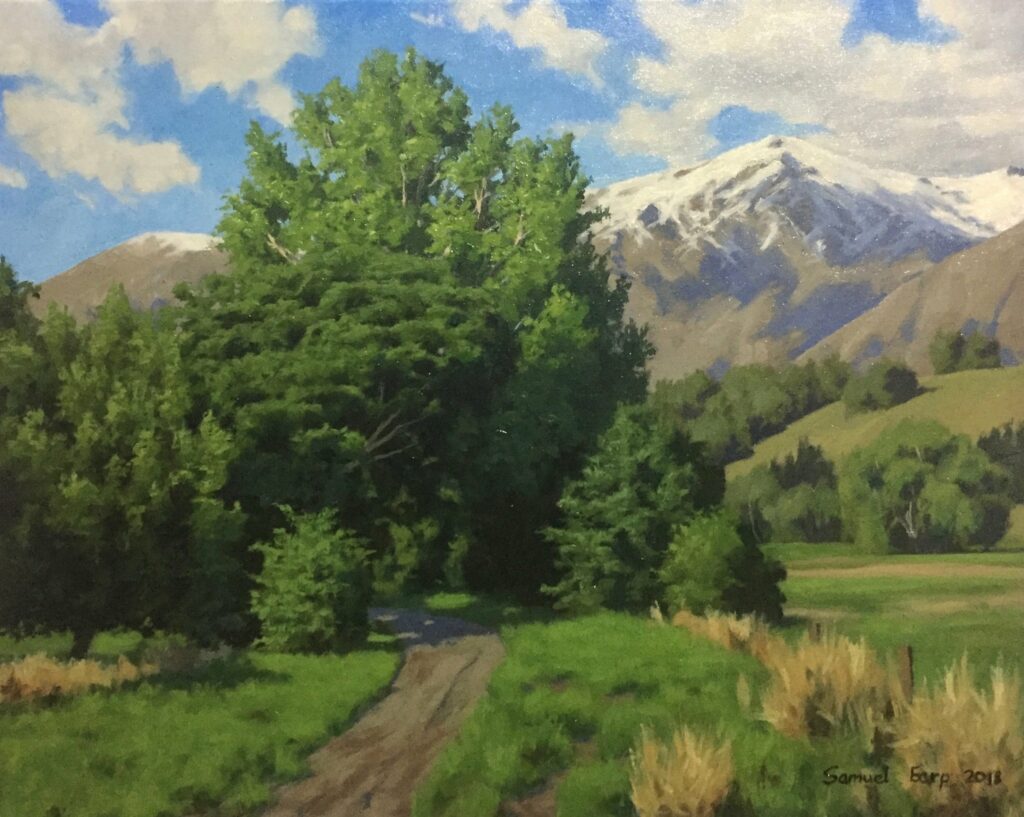
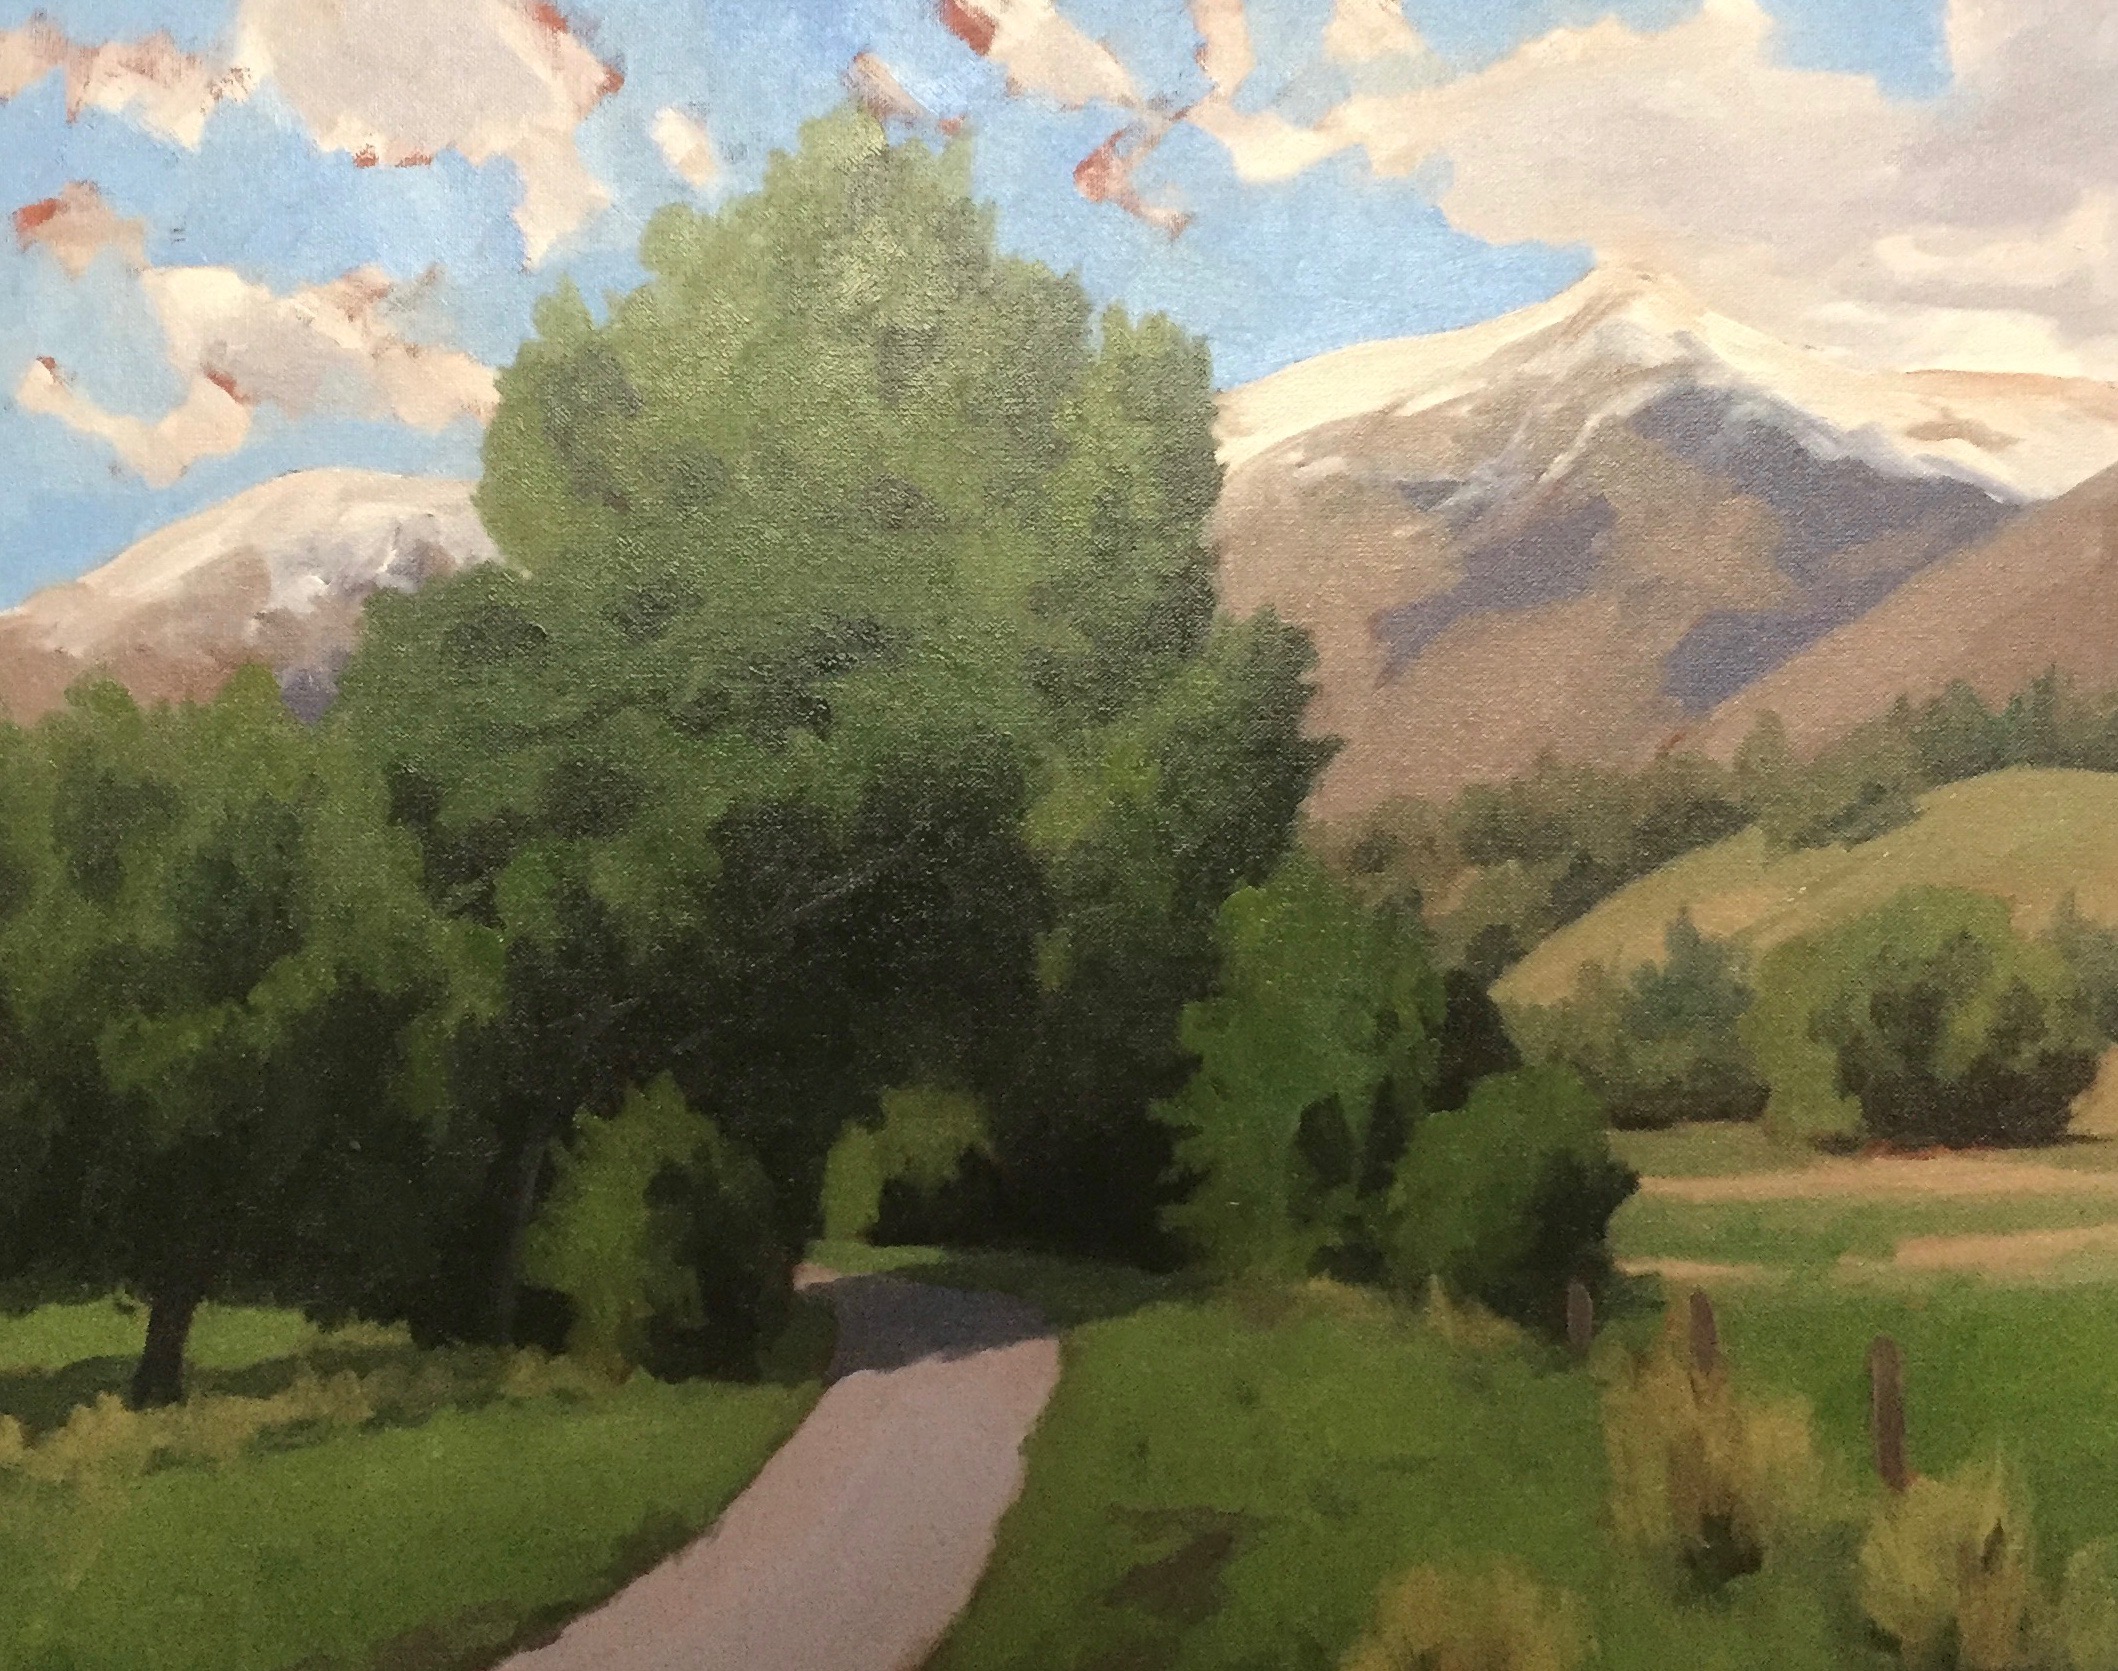
This painting was inspired by an area called Dalefield which is located in the Wakatipu Basin, just outside of Queenstown, New Zealand. I frequently come to this area to paint as there are so many subjects to capture on canvas including trees, fields, mountains and animals.
I came here to paint in March the day after we’d had a cold spell of weather that left snow on the mountains. Given that New Zealand is in the southern hemisphere the seasons are reversed and so February is a summer month. Anyway, I thought it would make for an interesting painting with trees and fields juxtaposed against some snowy mountains.
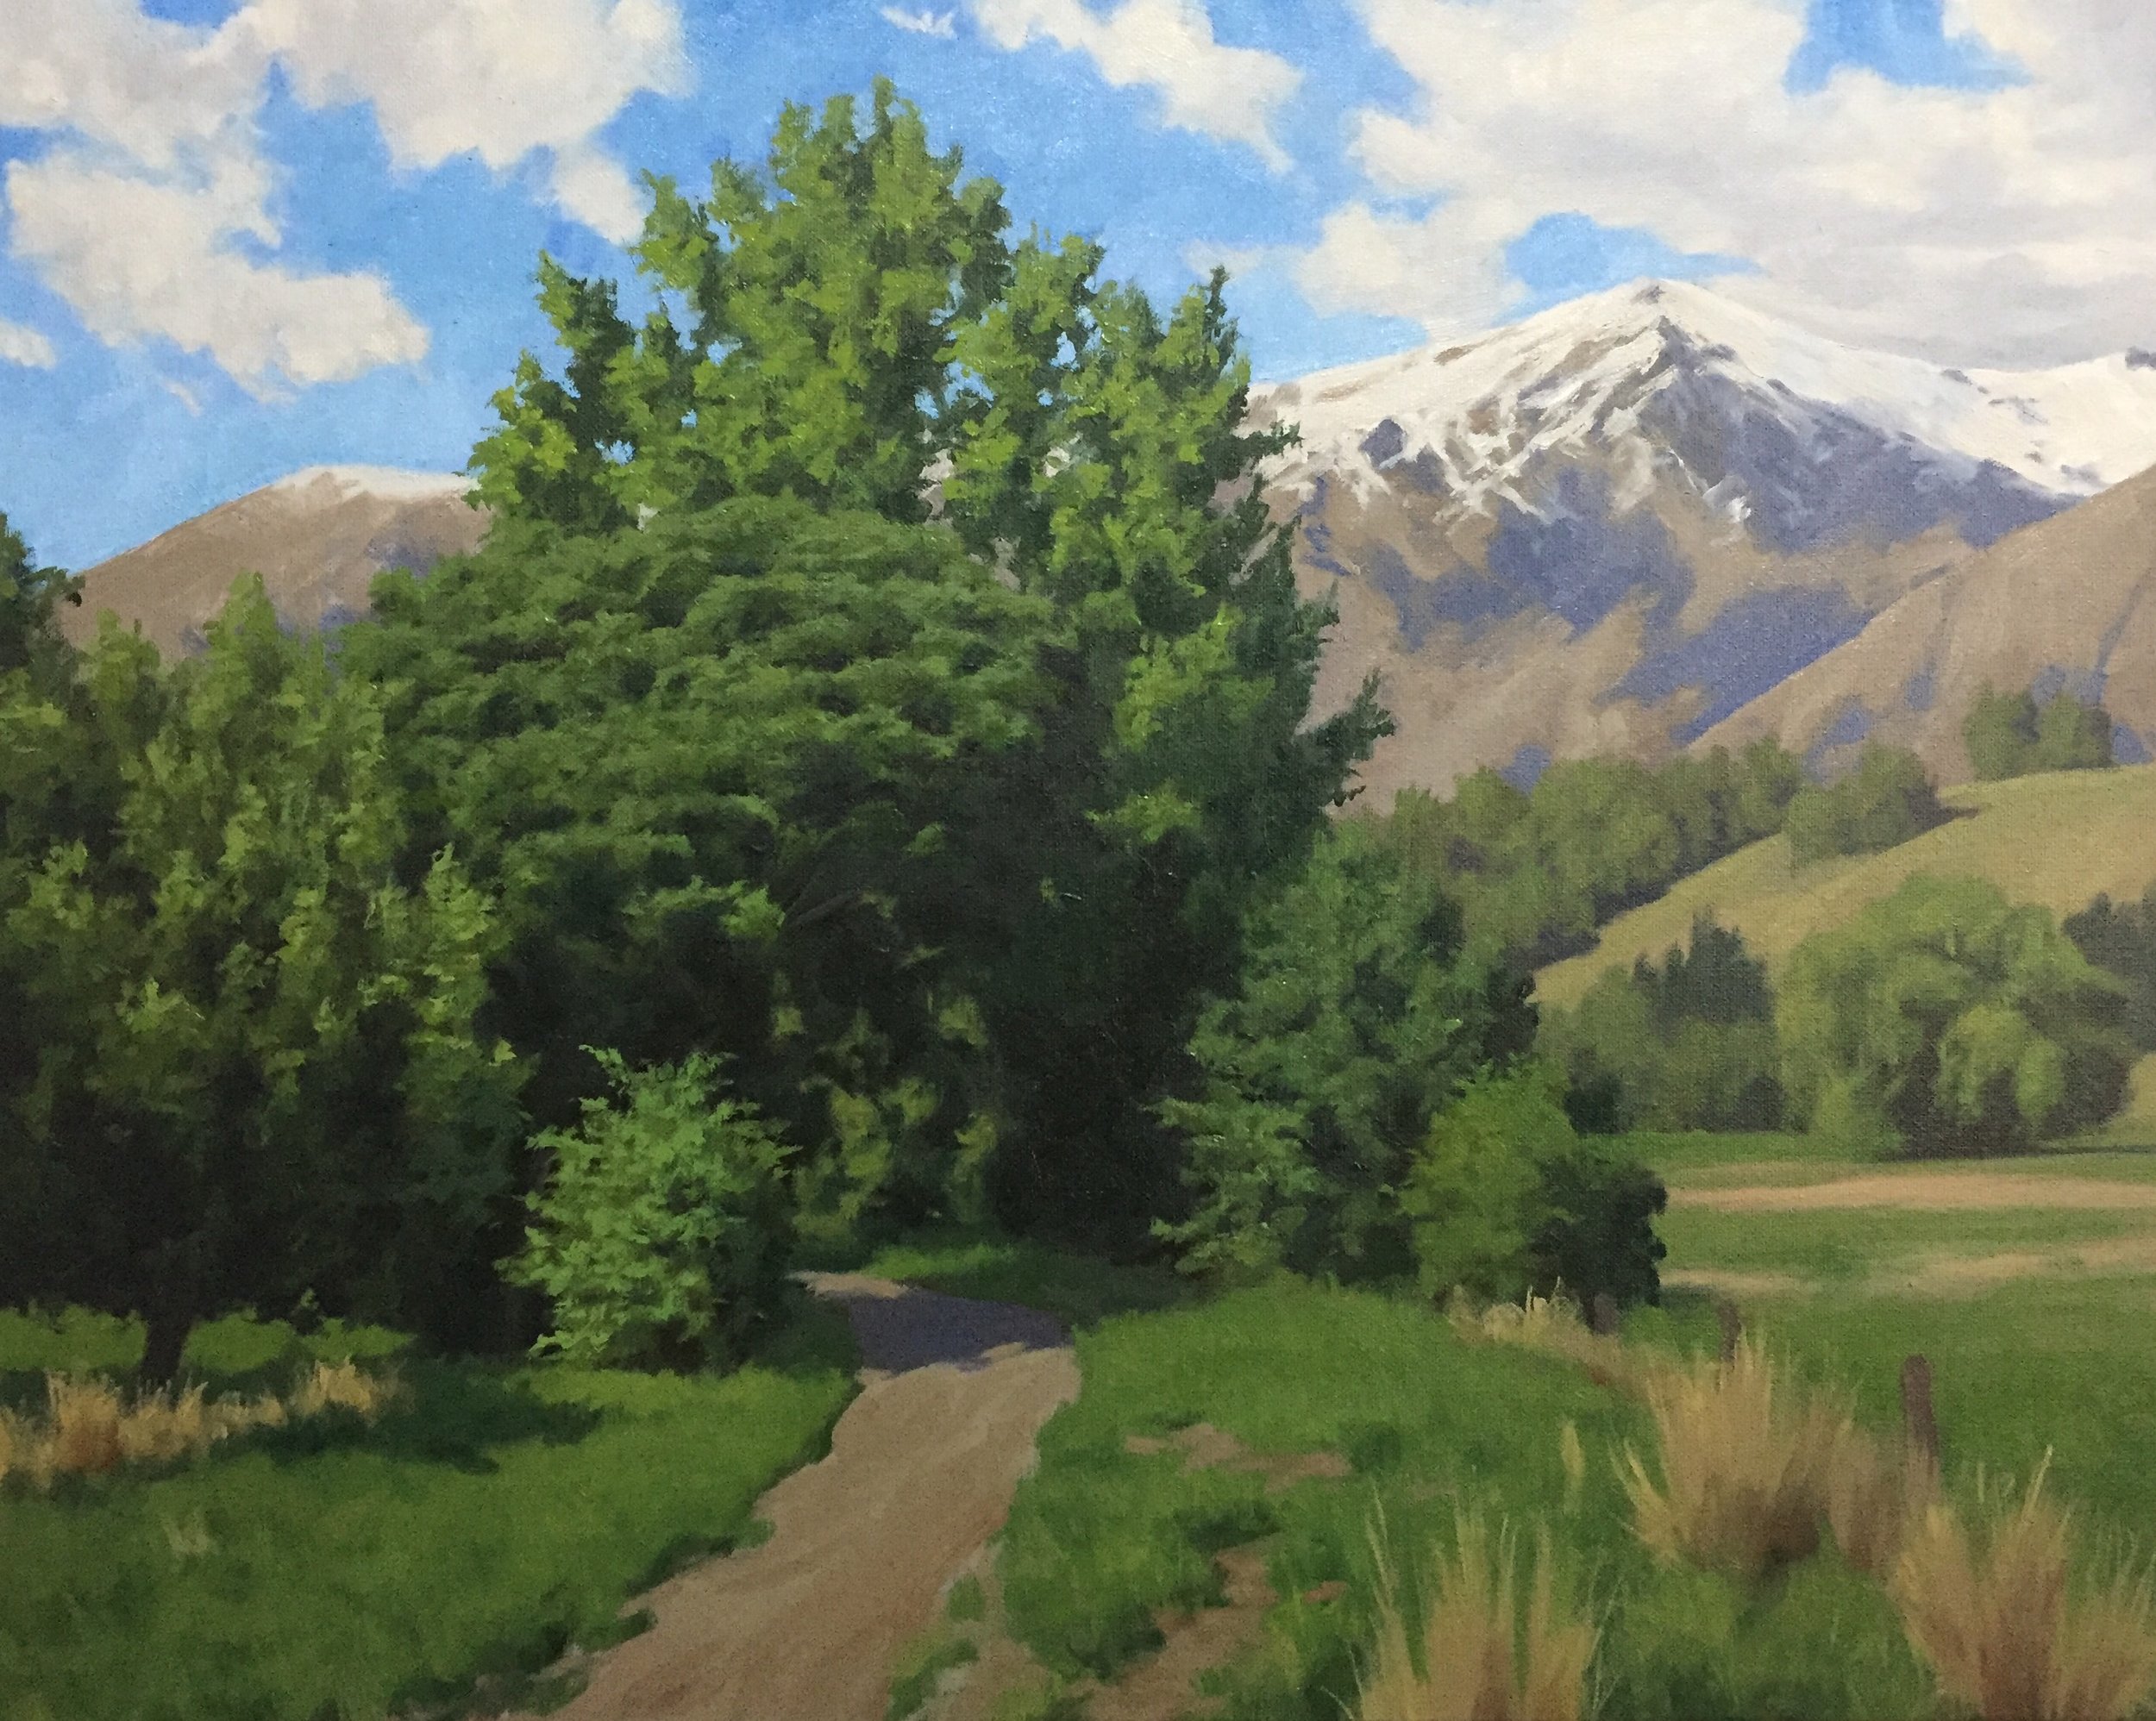
This was the view I painted.
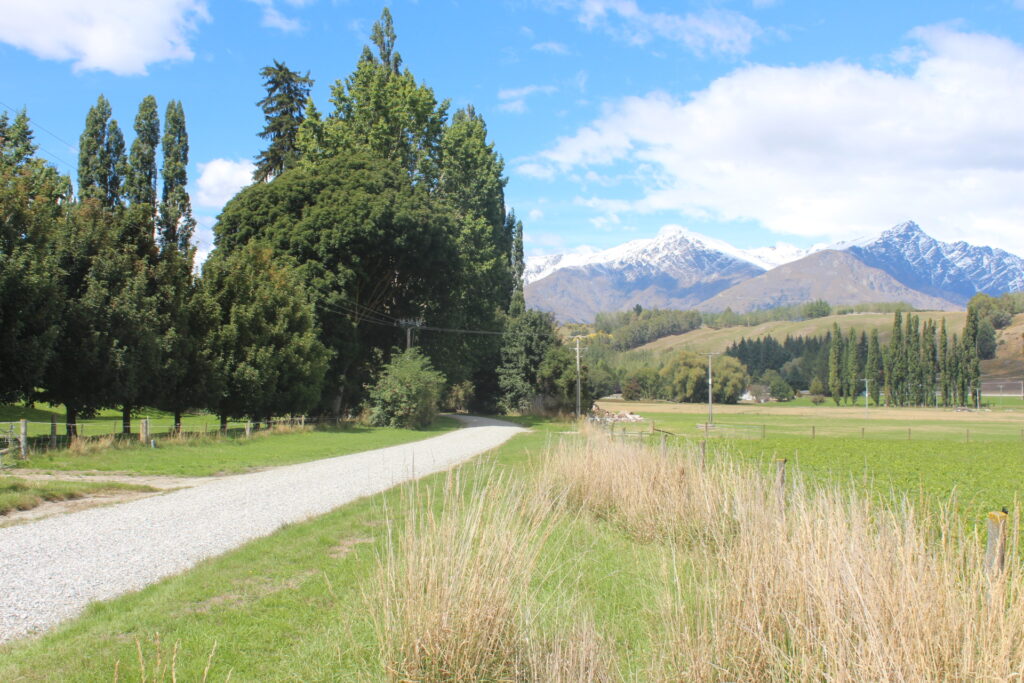
When I painted this scene outdoors I made the stand of trees the focal point and I kept the road in there to add some rhythm to the painting, I also removed the HV power lines from the scene as I felt these man-made objects would have spoiled the painting.
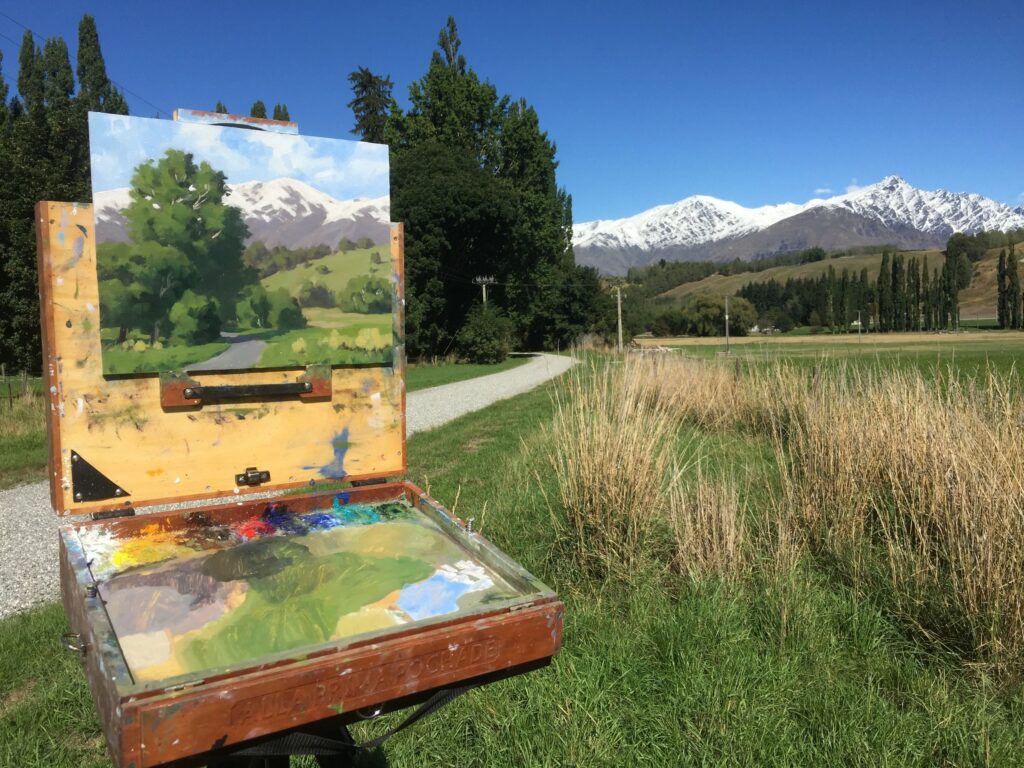
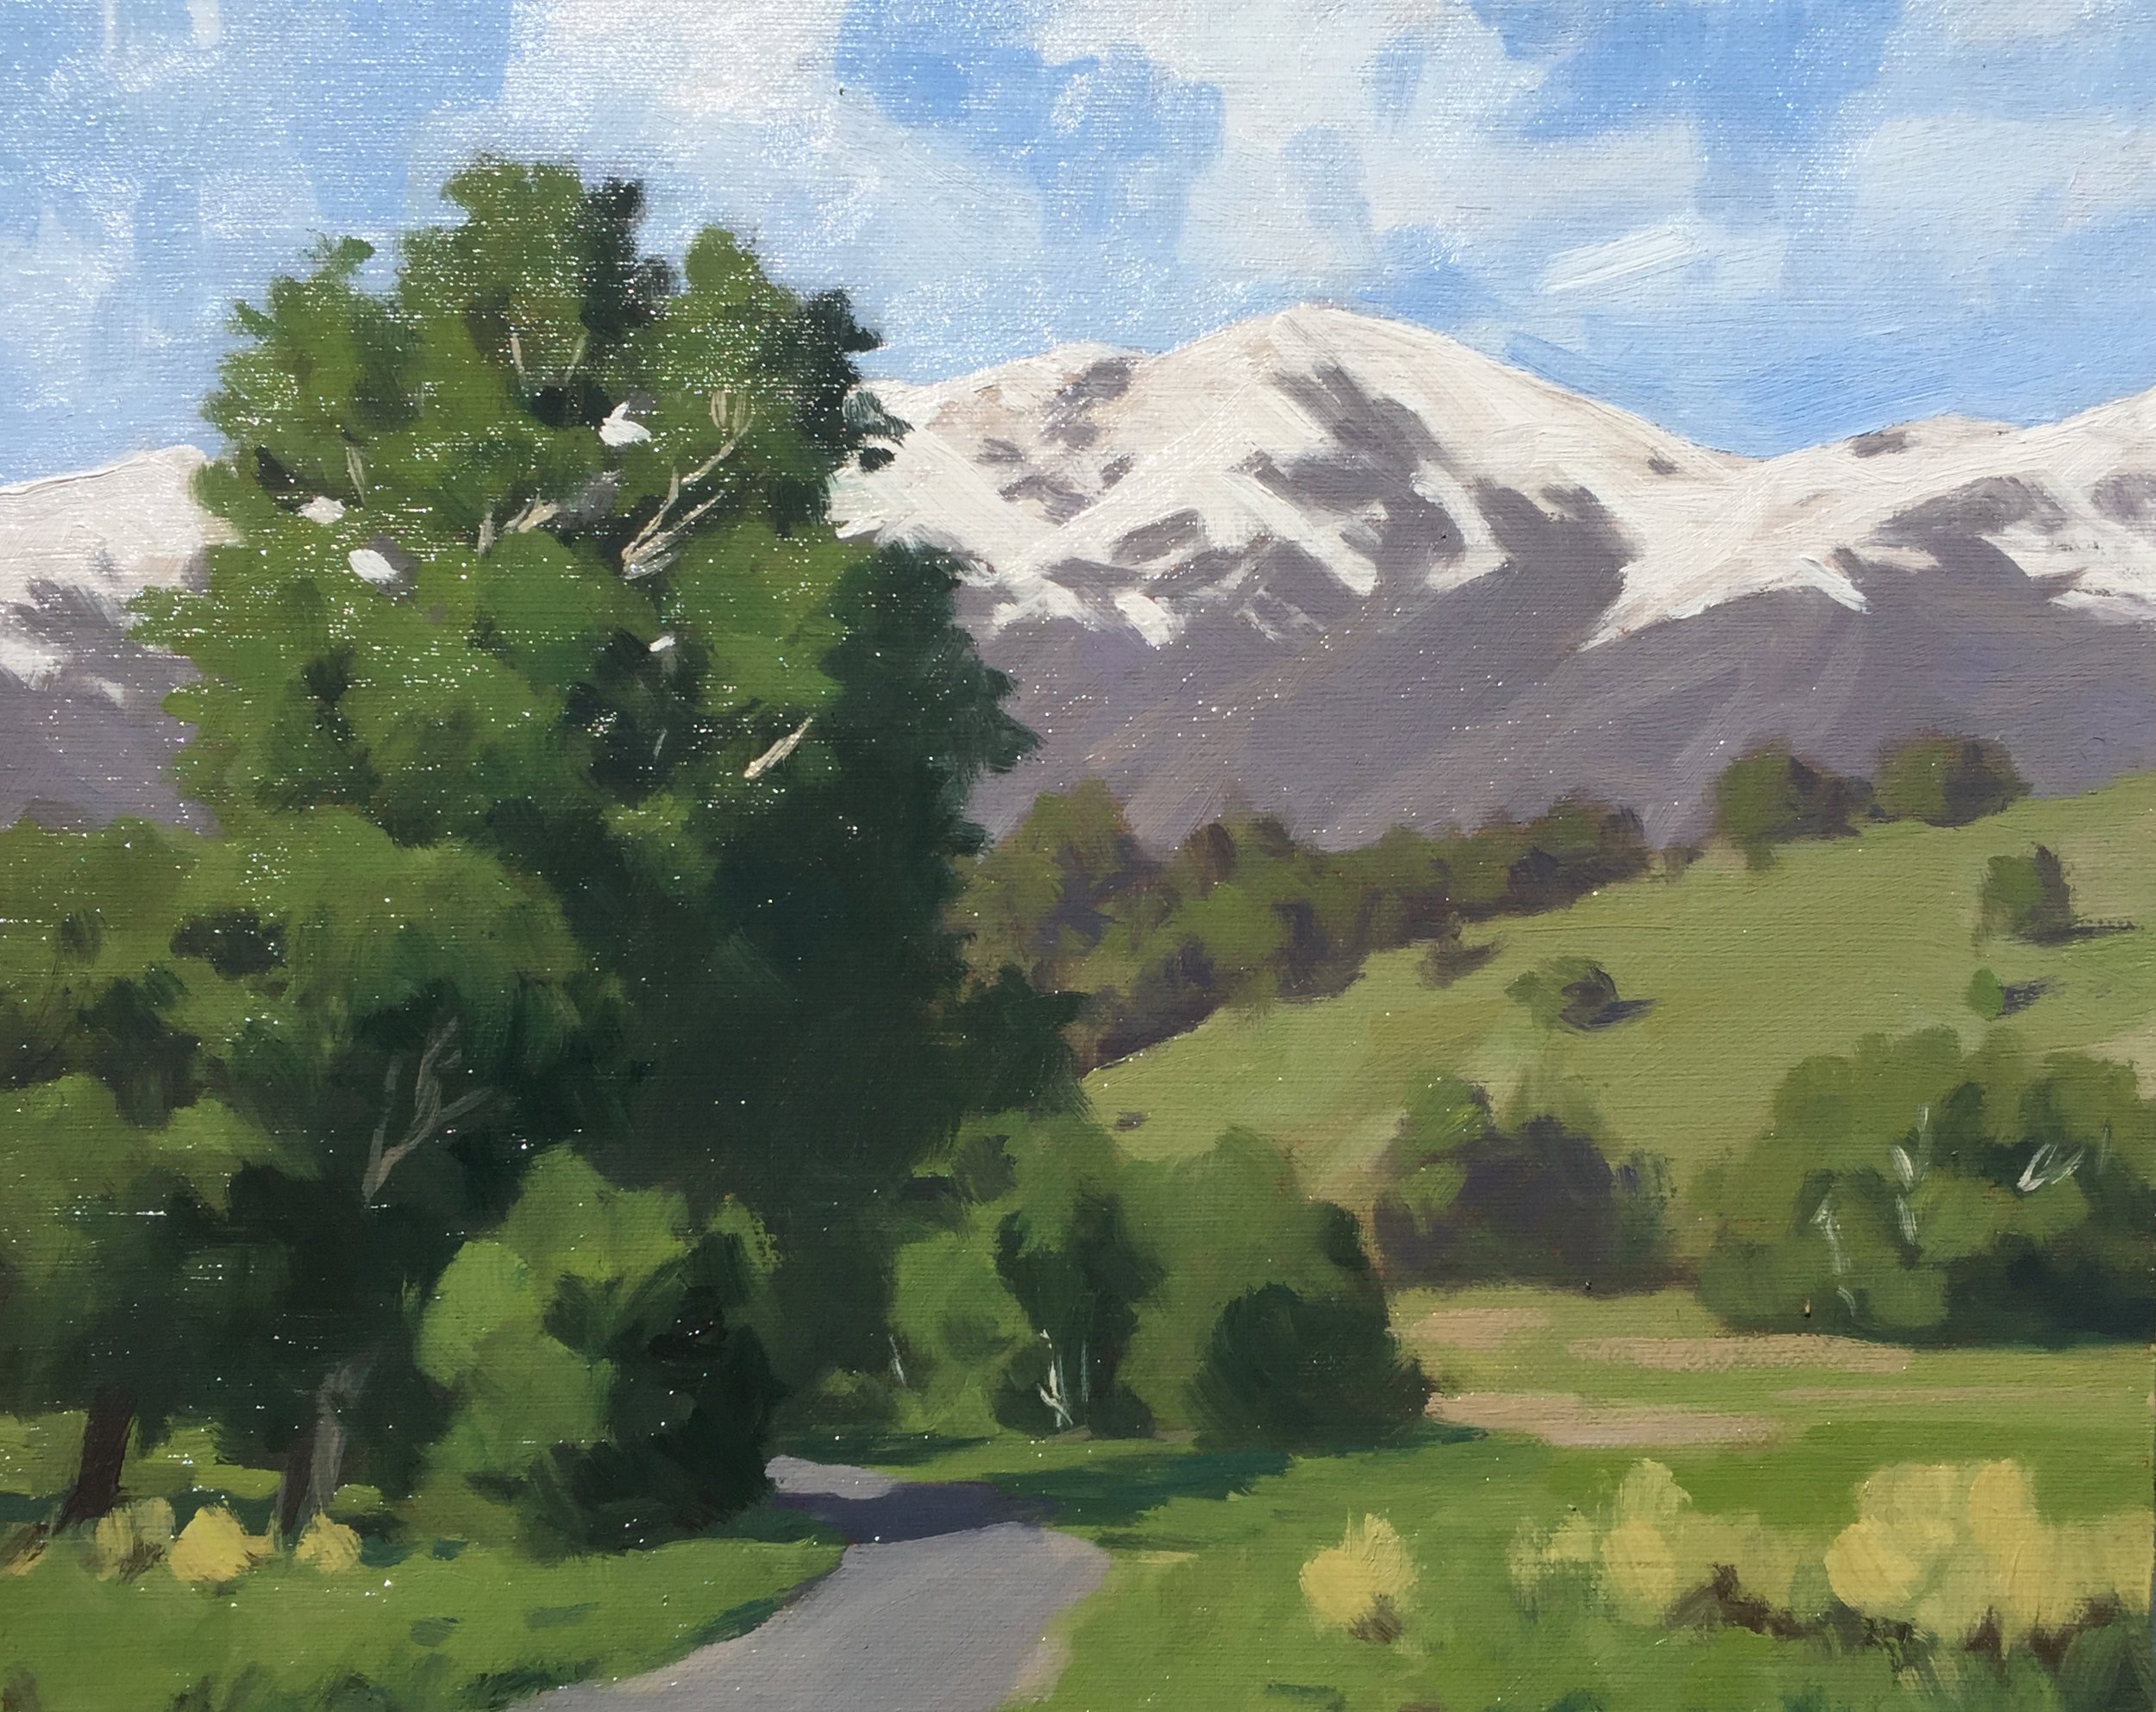
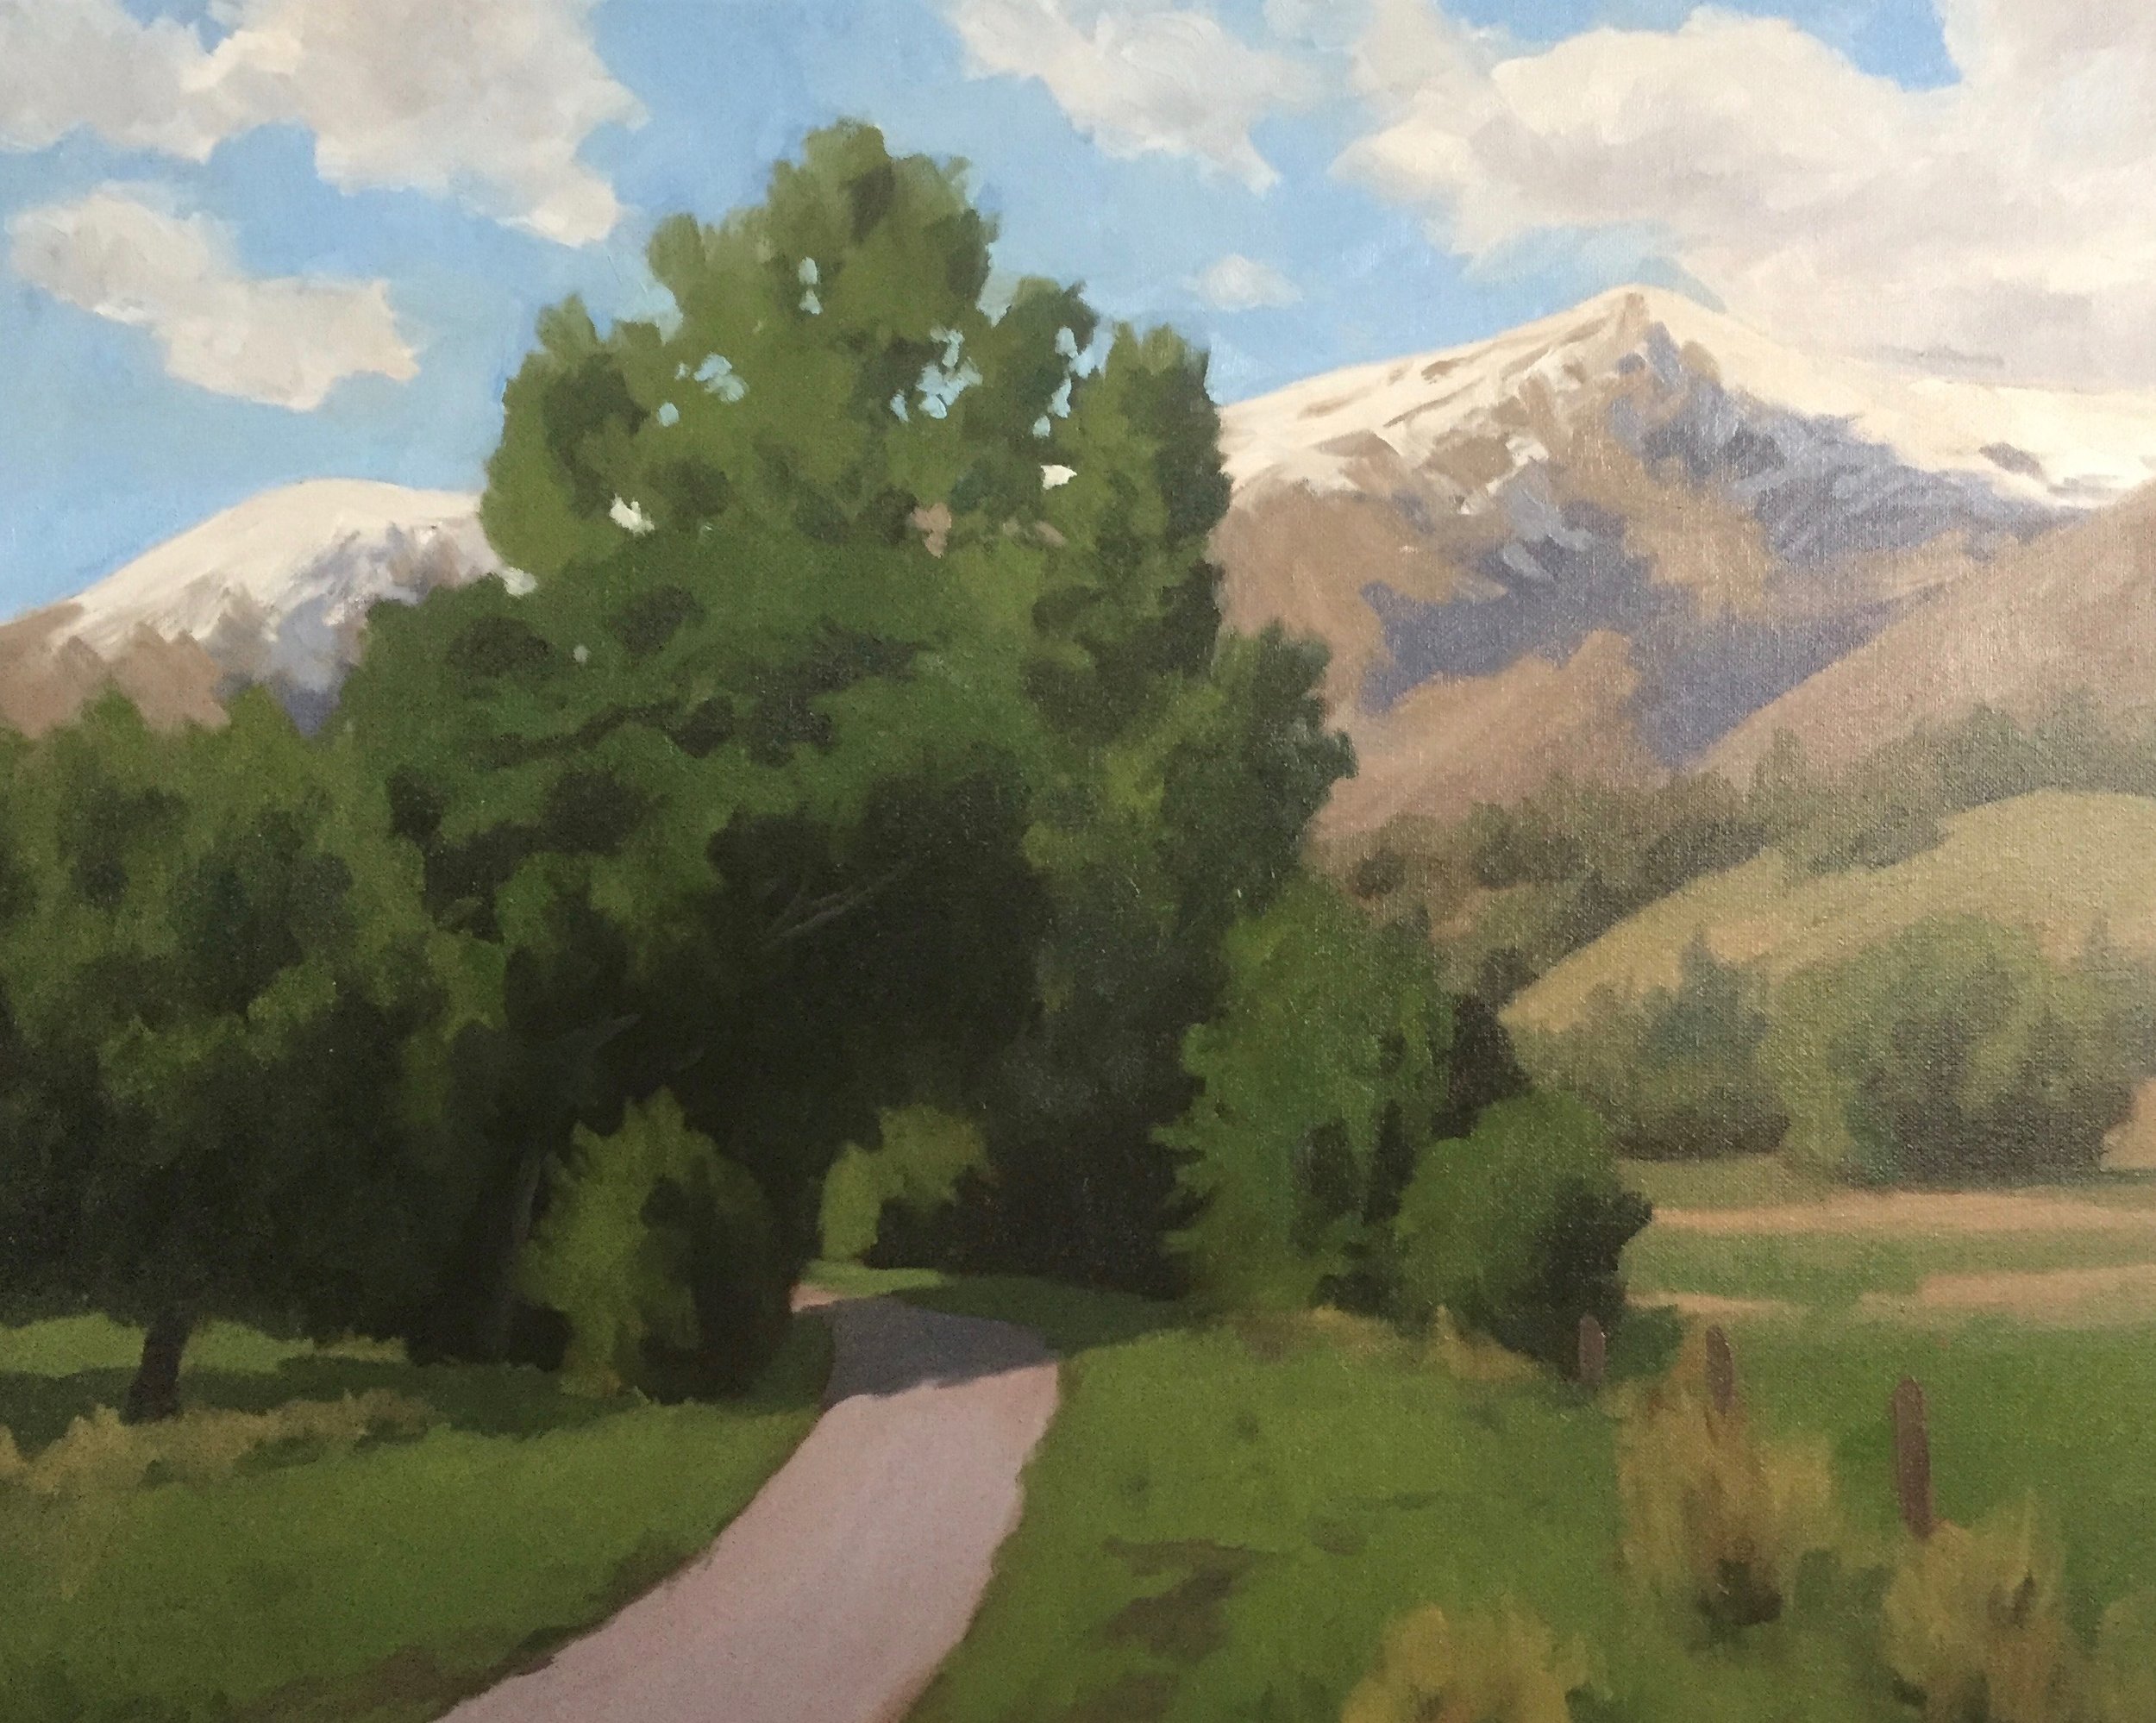
I was very happy with my plein-air painting and that’s when I decided I would create a larger studio painting of this view, also I could use my plein-air painting as a colour study to refer to for the studio painting.
The Design Process and Sketching
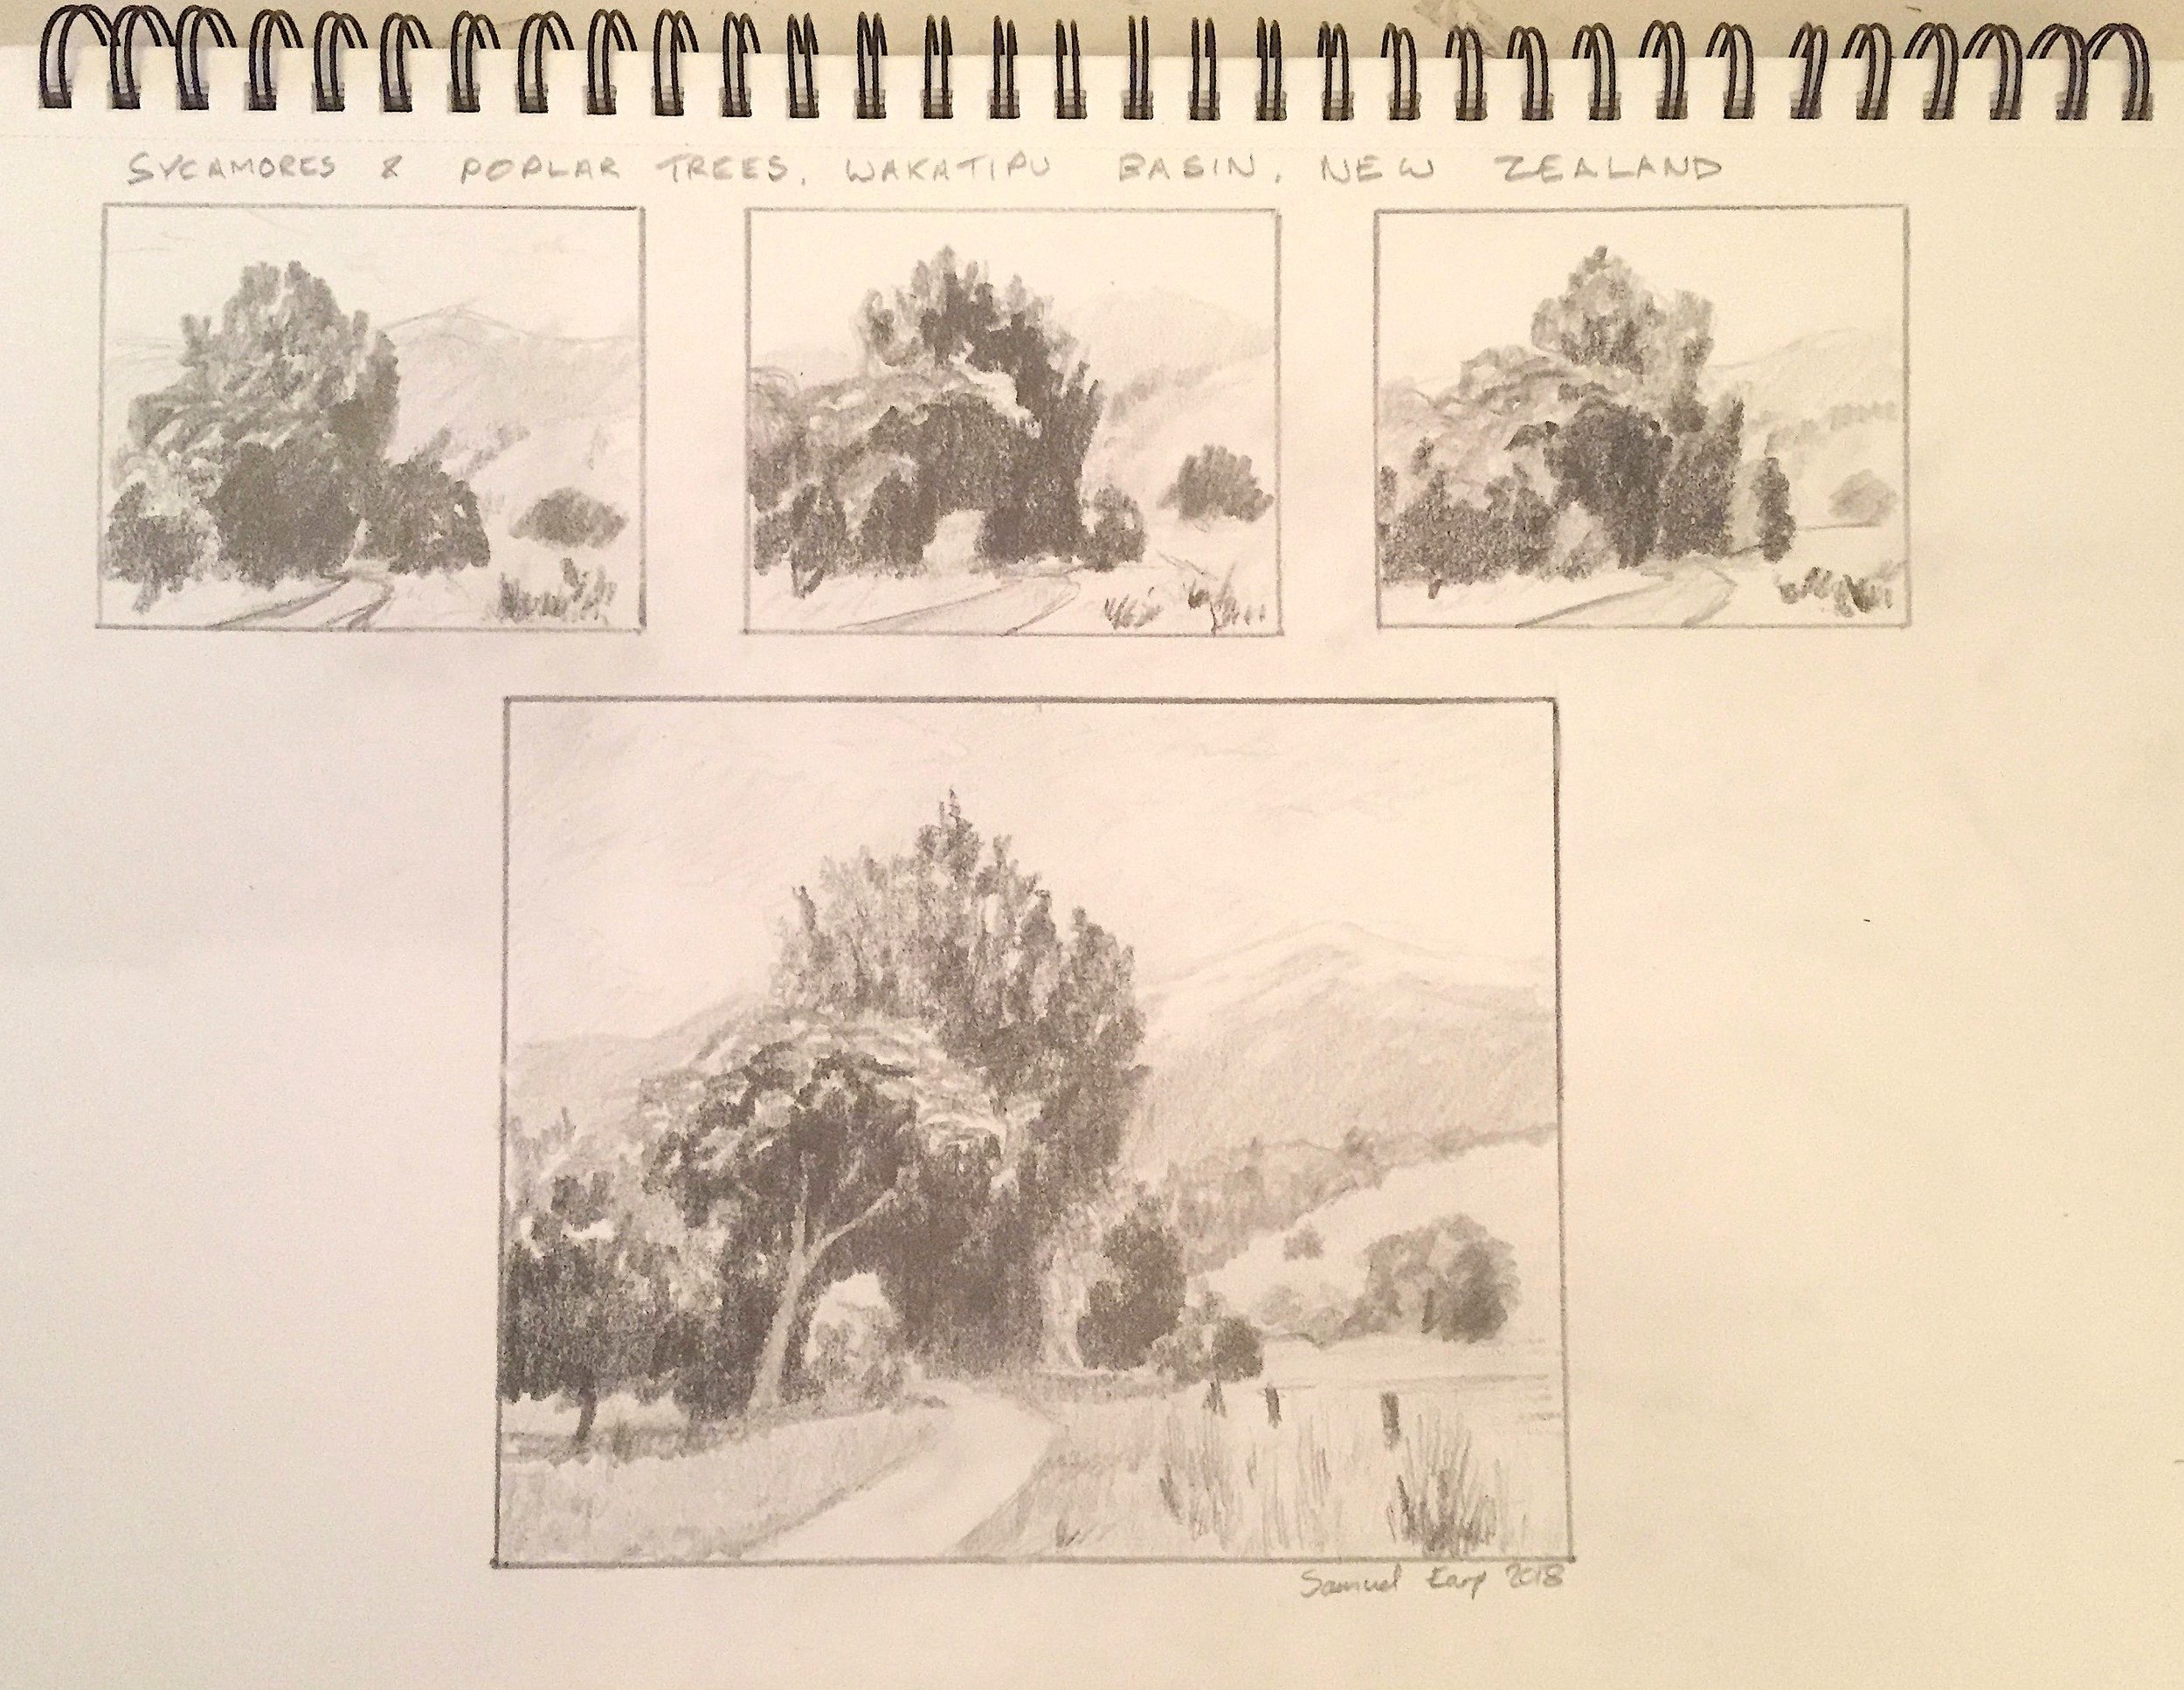
Now, whilst I was pretty happy with my plein air painting I felt I could improve the composition a little and so before I got into my studio painting I sat down with my sketchbook and did some quick five-minute thumbnail sketches. Then once I was sure of an idea for the composition I did a final sketch.
The sketch is purely for planning the composition and to give me an idea of the tonality of the scene, i.e. where my lights and darks will be when I come to paint this scene and I use a range of pencils from 4H to 4B.
Don’t worry if your pencil sketches aren’t perfect or amazing works of art, so long as they are good enough for you to transfer your composition onto the canvas that is all that matters.
Composition
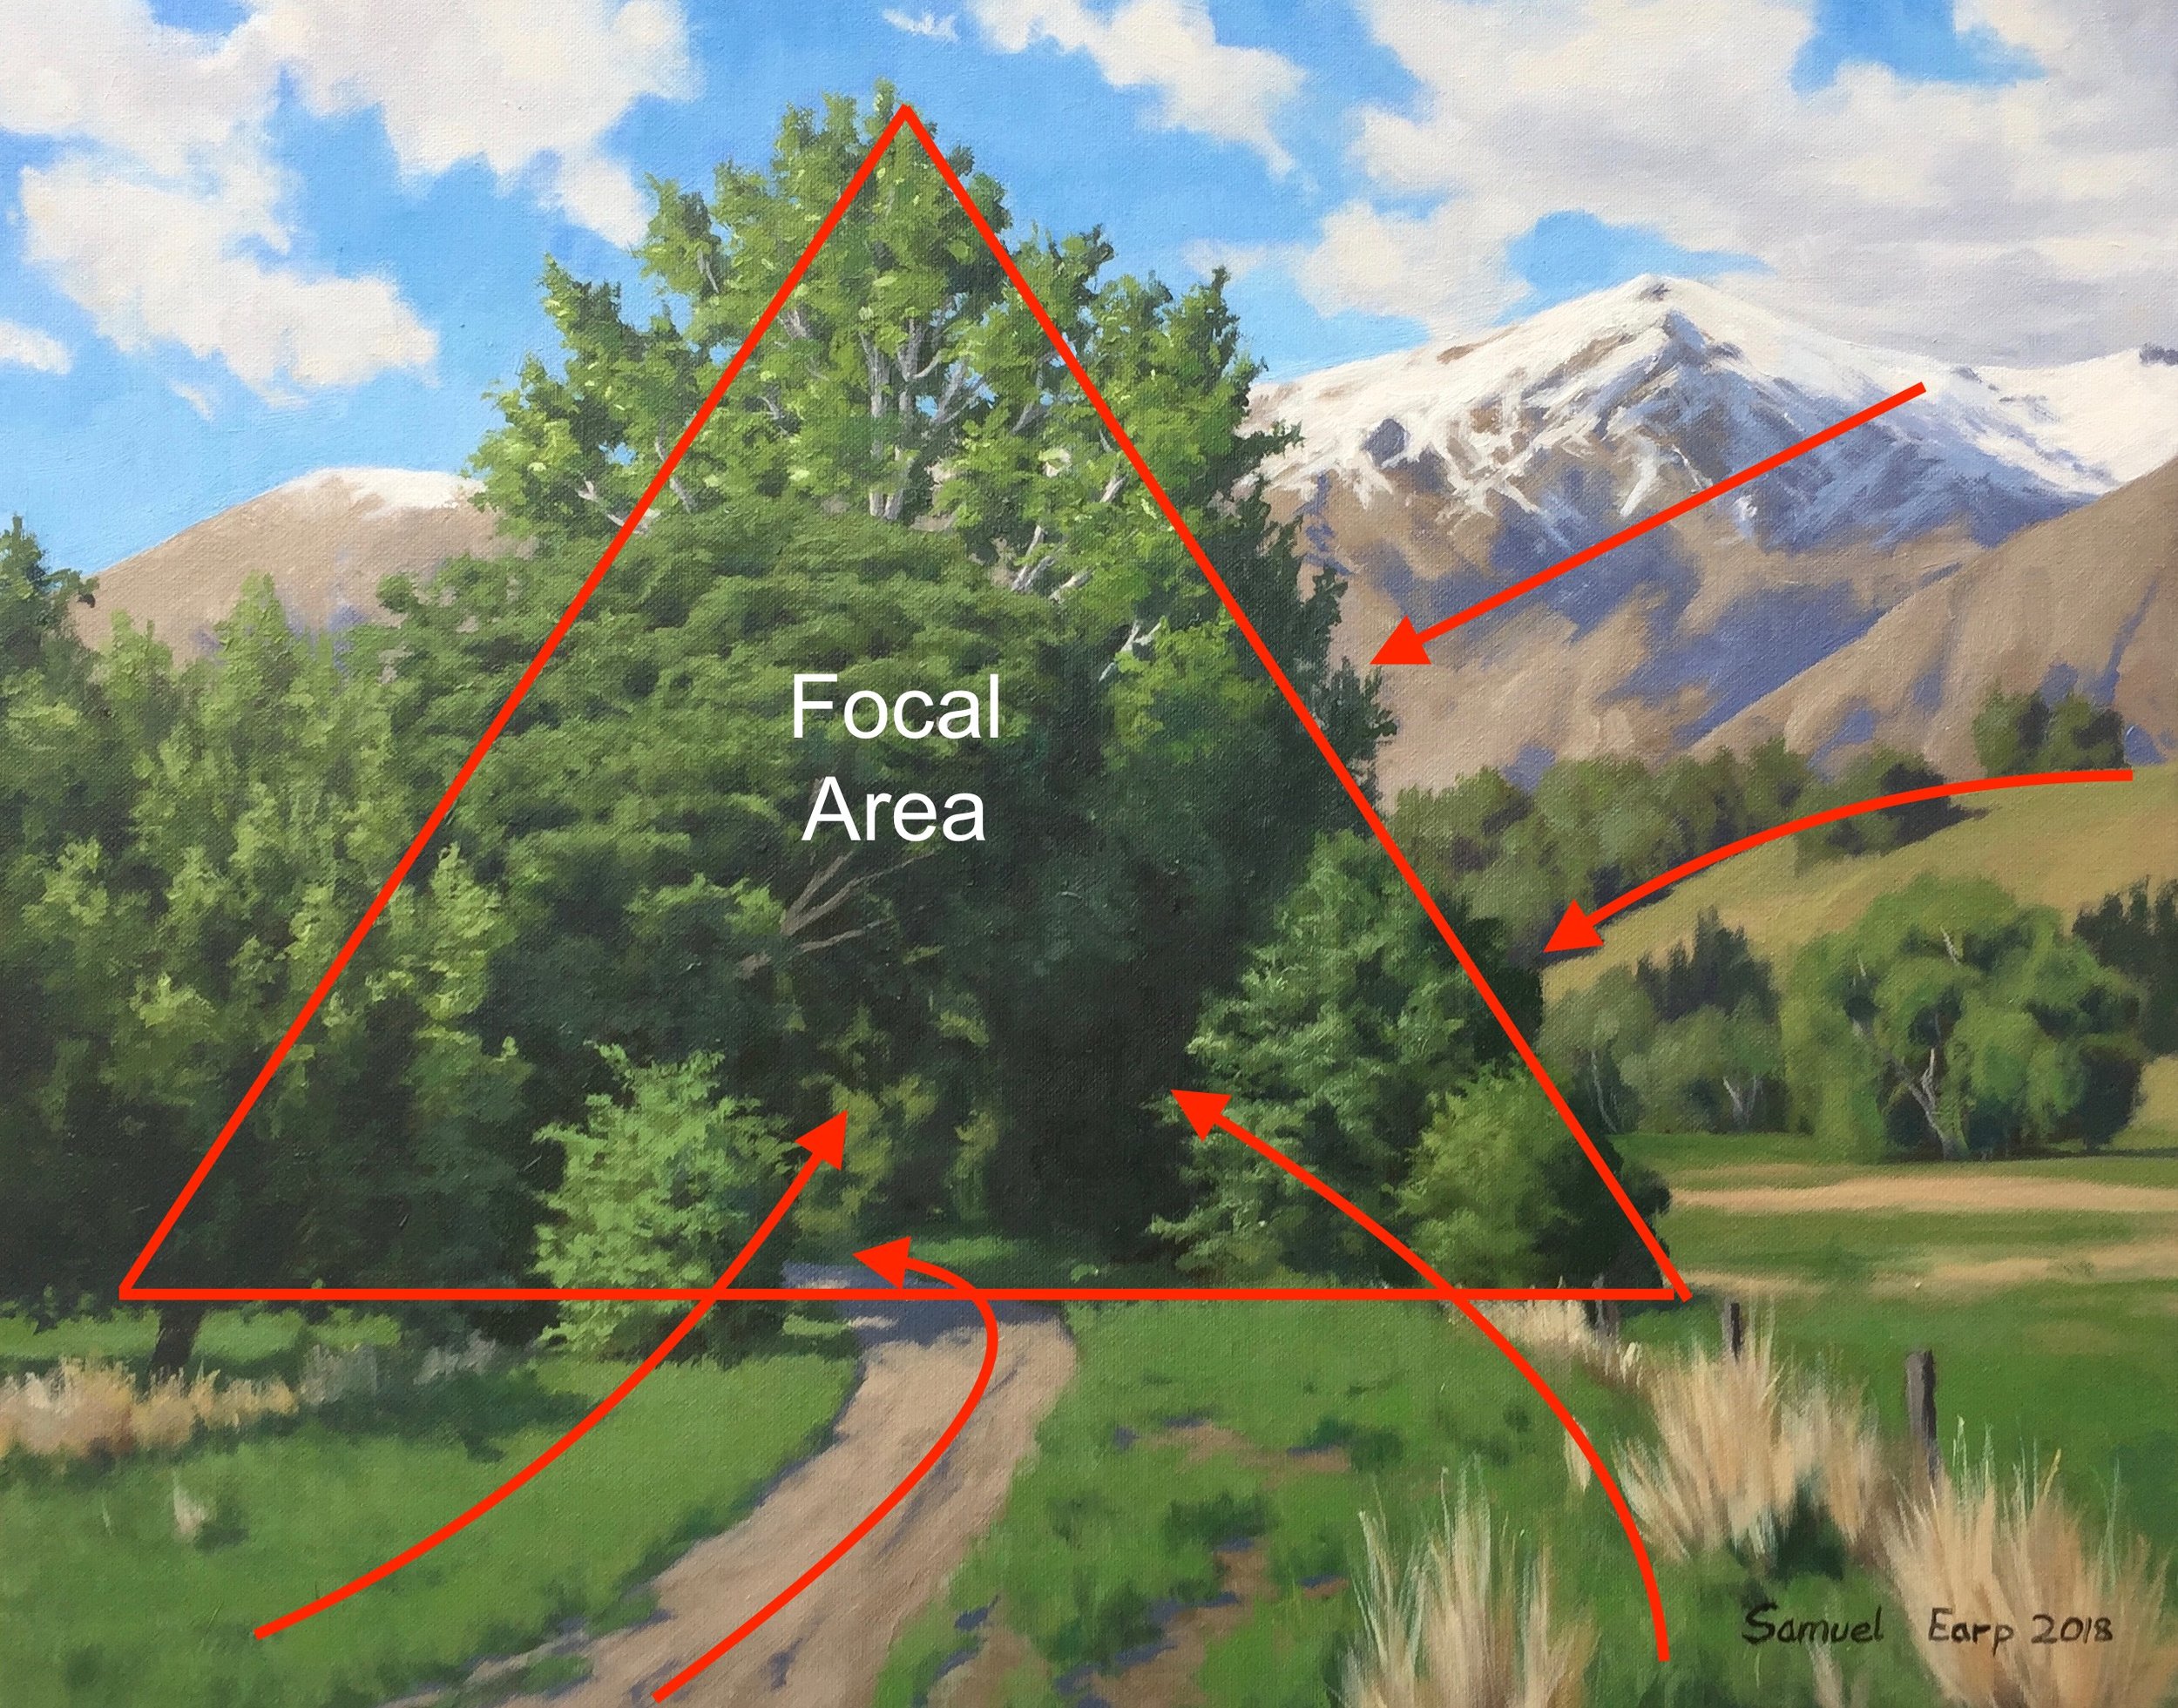
The aim of the composition is to create unity and a feature that should be the main interest in the paintings, it should dominate all the other forms and masses in the painting. In this case, I have made the stand of trees the area of interest in the painting.
This composition in this painting is known as a pyramid or triangle composition and it suggests permanence and stability because of its structure, perfect for trees. I have placed the stand of trees to the left of the centre, remember that you should never have your focal area in the middle of the painting as it’s predictable and forms a displeasing static.
I have added supporting elements to create some flow in the compositions, subtle props that lead the eye towards the focal area, and the stand of trees. In this case, the dirt track clearly leads towards the trees as well as the dead grass clumps in the foreground. The hills and mountains in the distance slope downwards in a manner that subtly redirects the eye back towards the trees.
Colours
I painted this artwork using oil paint but you can also use acrylics if you prefer. Here is a list of colours you will need for this painting:
- Titanium white
- Cadmium yellow deep
- Yellow oxide
- Burnt sienna
- Quinacridone magenta
- Ultramarine blue
- Cobalt blue
- Cobalt teal
- Pthalo green
Brushes
You won’t need a whole range of fancy brushes and I always think it’s best to keep it simple. Now, given that my painting style is that of a plein air painter, my studio paintings aren’t massively detailed either and for good reason. I feel that excessive detail tends to ruin the composition as the eyes and brain are having to decode too much information. Often the suggestion of detail is more effective as the brain fills in the gaps, it also makes the paintings look more alive.
With more gestural brush strokes in mind, I have opted for using mostly flat brushes, filberts and daggers.
Here is a list of the brushes I used in this painting:
- No.6 flat
- No.4 flat
- No.2 flat
- No.2 filbert
- No.1 round
- 1/2″ dagger
- 3/8″ dagger
- 1/4″ dagger
Tonal Values
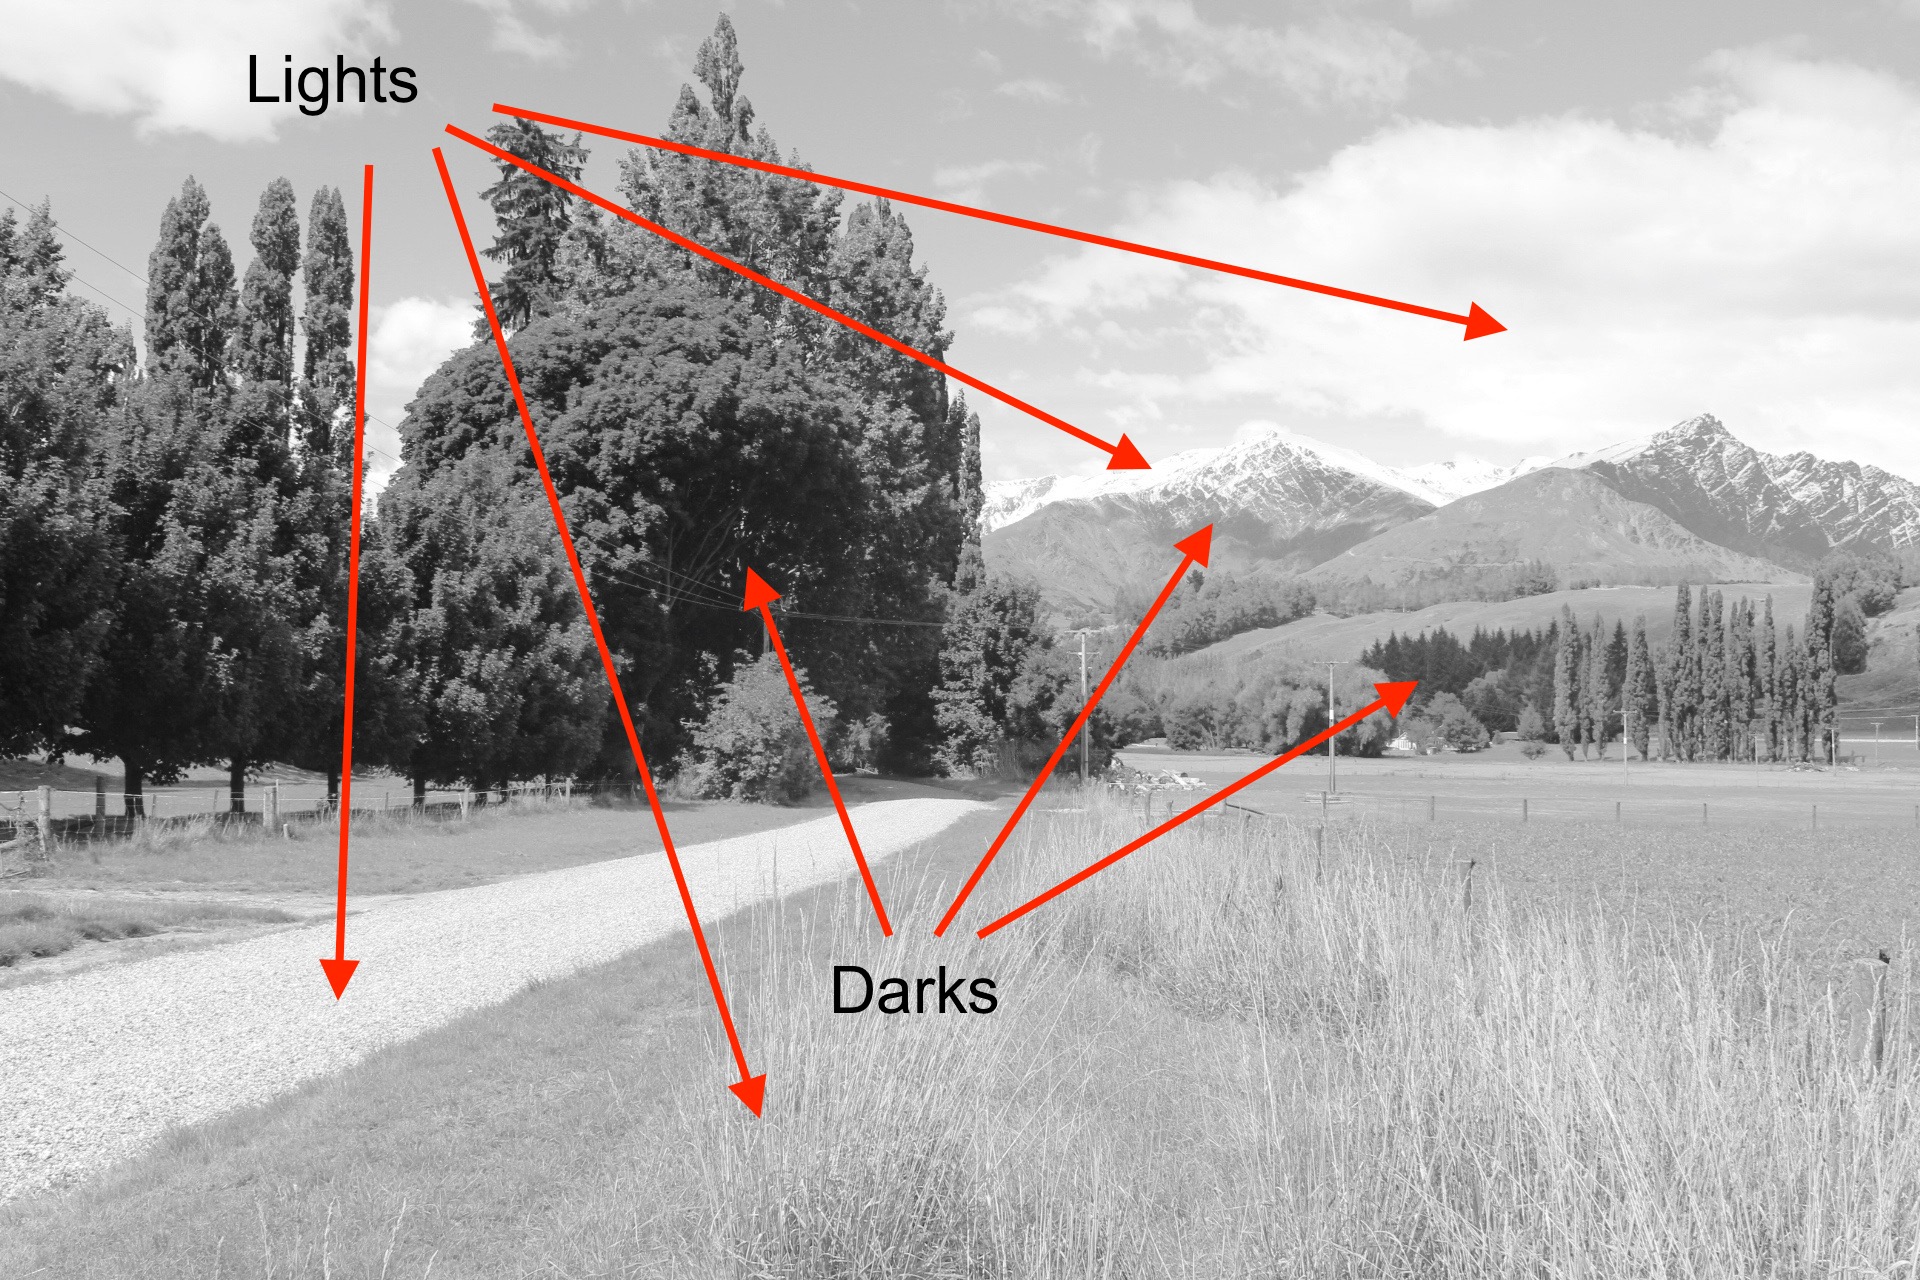
Before starting the painting and even in the design process itself I establish where my light and dark values are and this will help to establish the overall tonality of the painting. The primary elements of the tonal scale are light, dark and halftones. Values refer to how light or how dark an object is.
In a landscape painting, objects in the distance such as the mountains will have a narrower tonal scale where darks are not quite dark and lights are not quite light. As we come forward in the painting the tonal scale increases so the darks get darker and the lights get lighter.
The concept of light and dark values is best illustrated when we switch our reference photos from colour to black and white. The shadows of the trees are the darkest values but as we look at the shadows in the distance such as the trees in the mid-ground and the mountains in the distance, the shadows become lighter.
The lightest values in the photo is the track, grass, clouds and the snow on the mountains. Keeping in mind where the lights and darks are in the photo will help with colour mixing as well as achieving a harmonious painting.
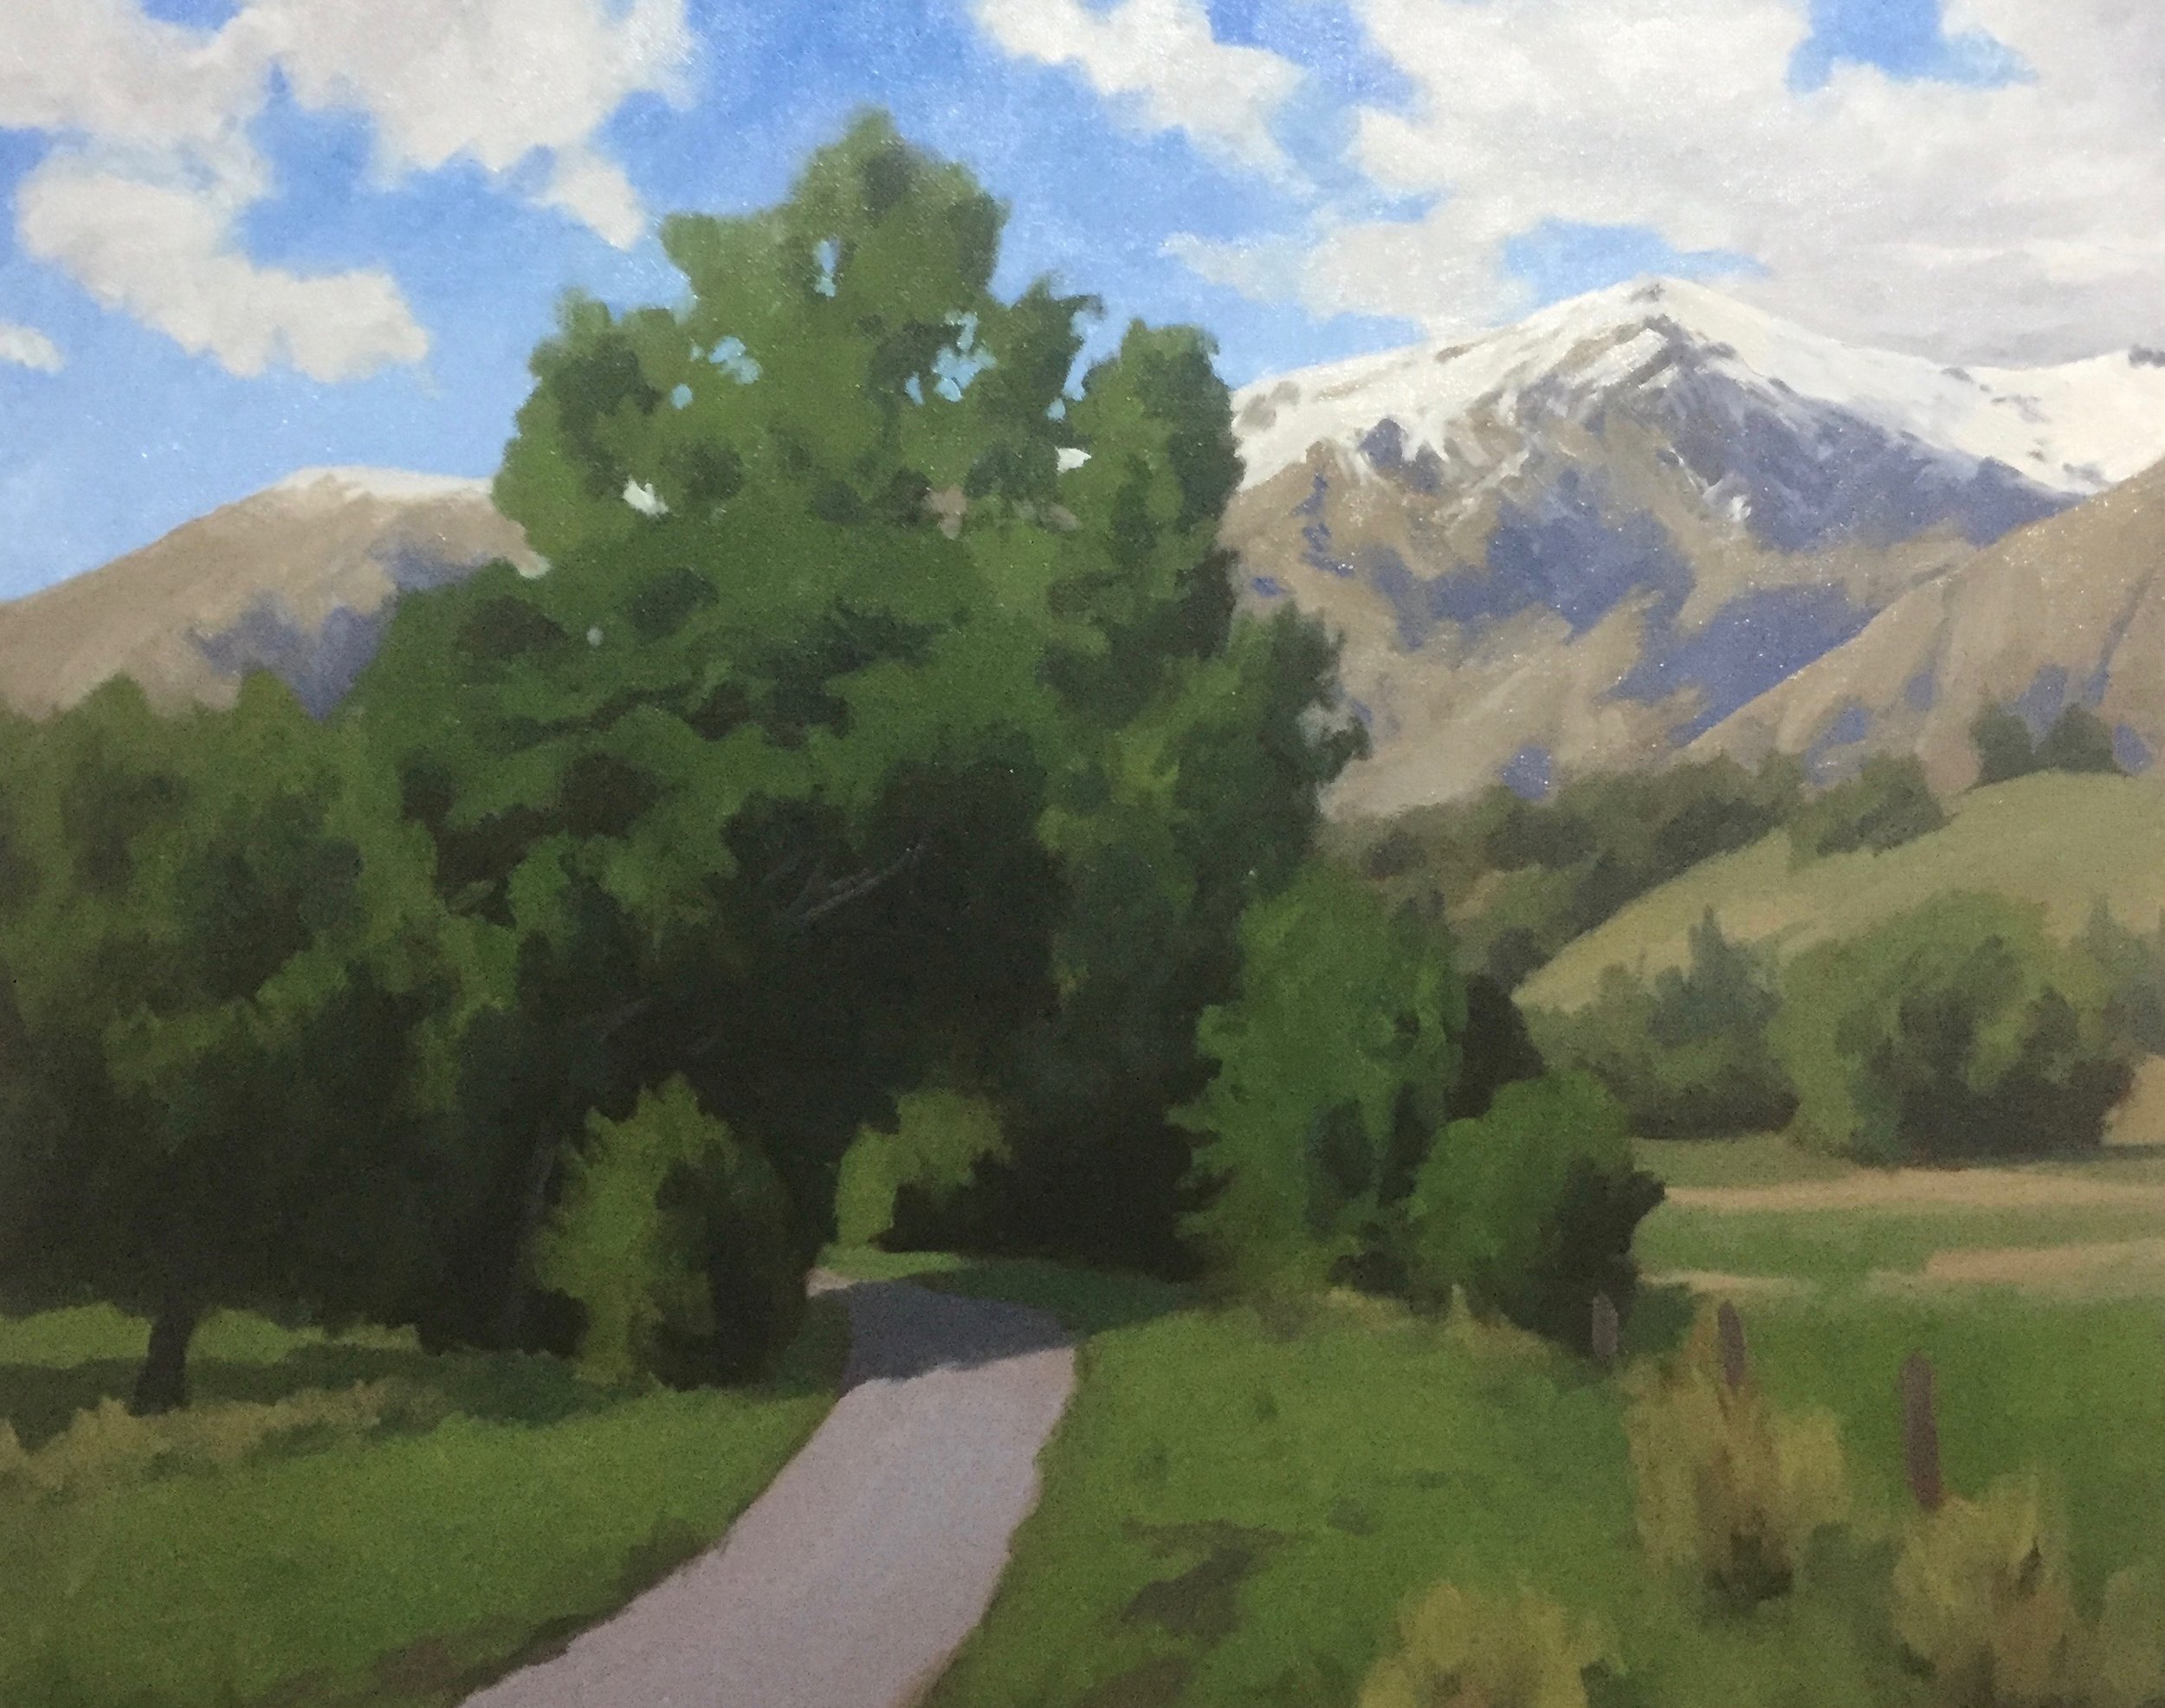
Blocking-In
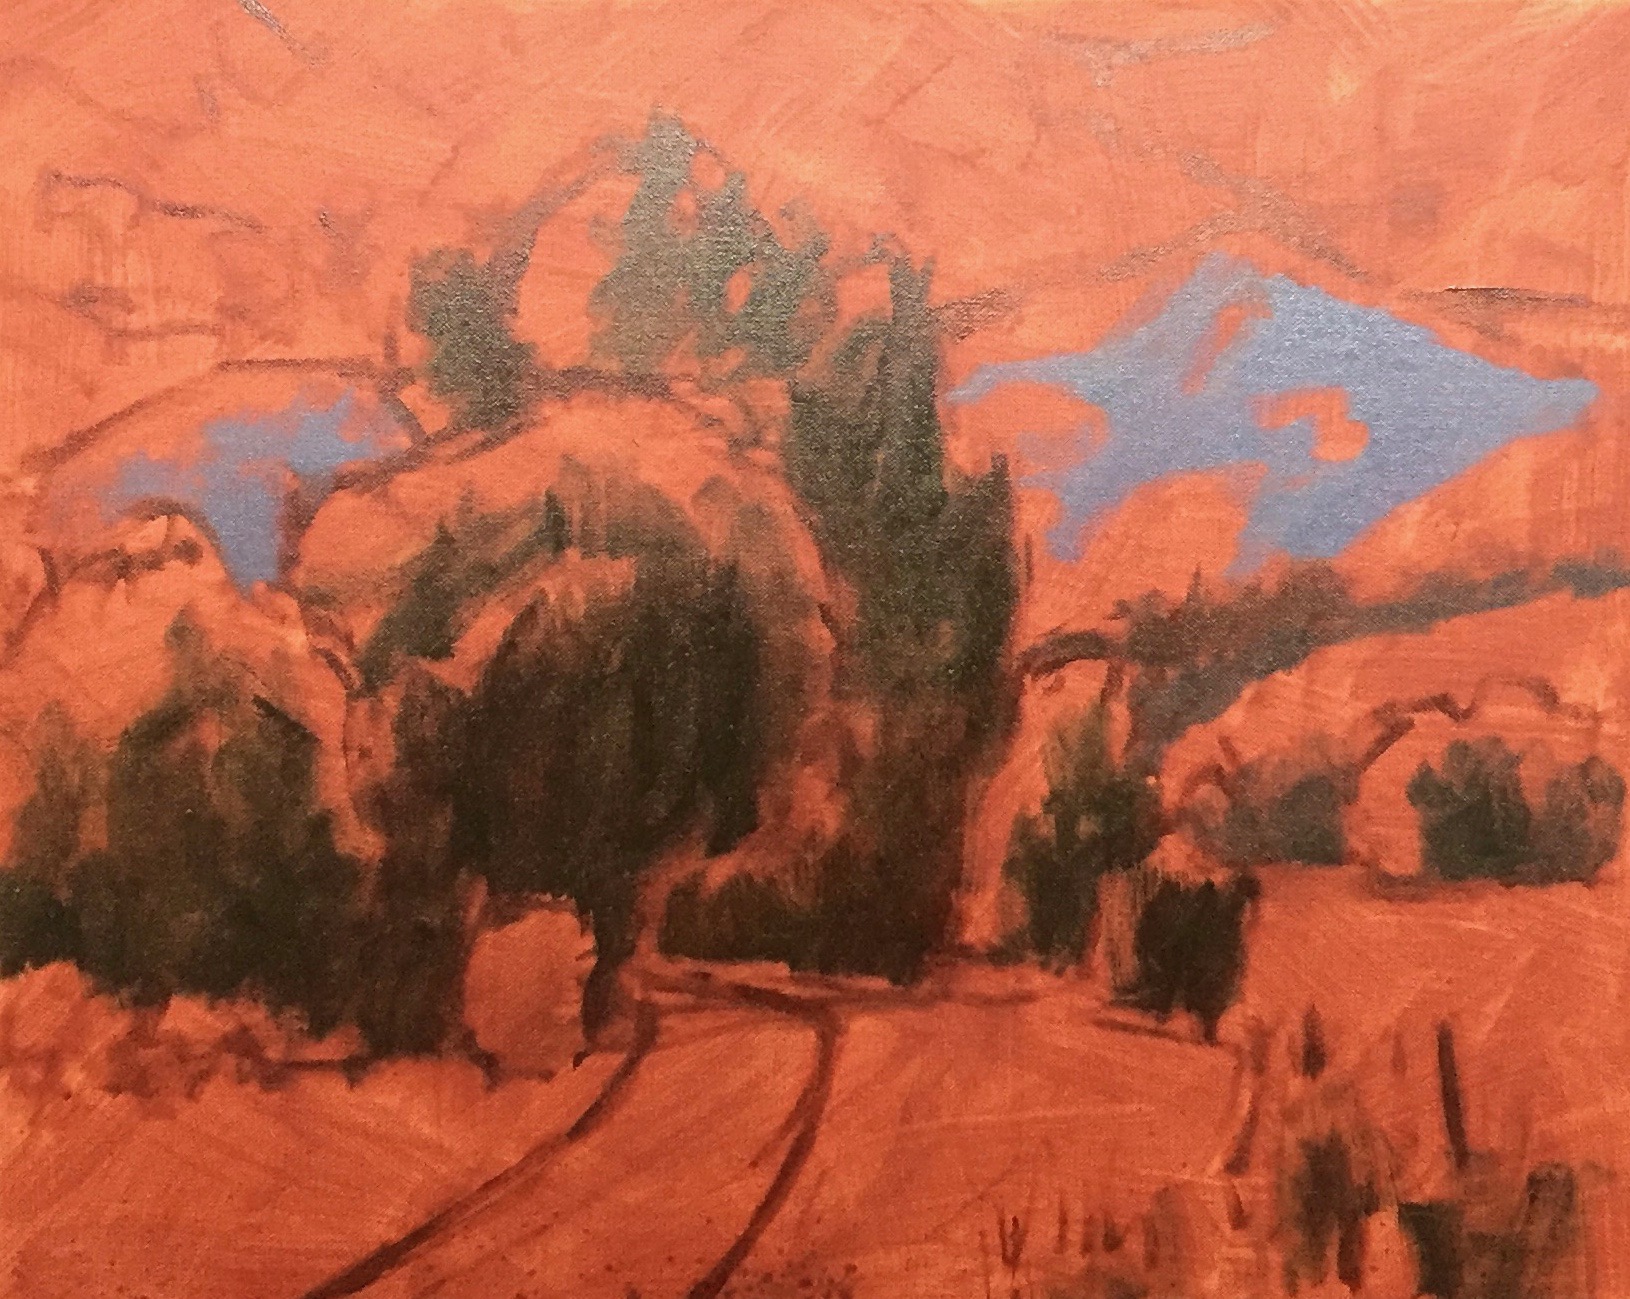
I’m painting on a 40cm x 50cm canvas. I have applied a thin layer of burnt sienna to the canvas and allowed it to dry, this helps to warm up the painting as it comes through the paint layers and gives it a more traditional look. It also helps with establishing colour and tone as there is less of a distorting effect which can occur from painting on a white surface.
I sketch out the composition with burnt umber mixed with liquin which is a medium that not only thins the paint and improves the flow but also speeds up the drying time.
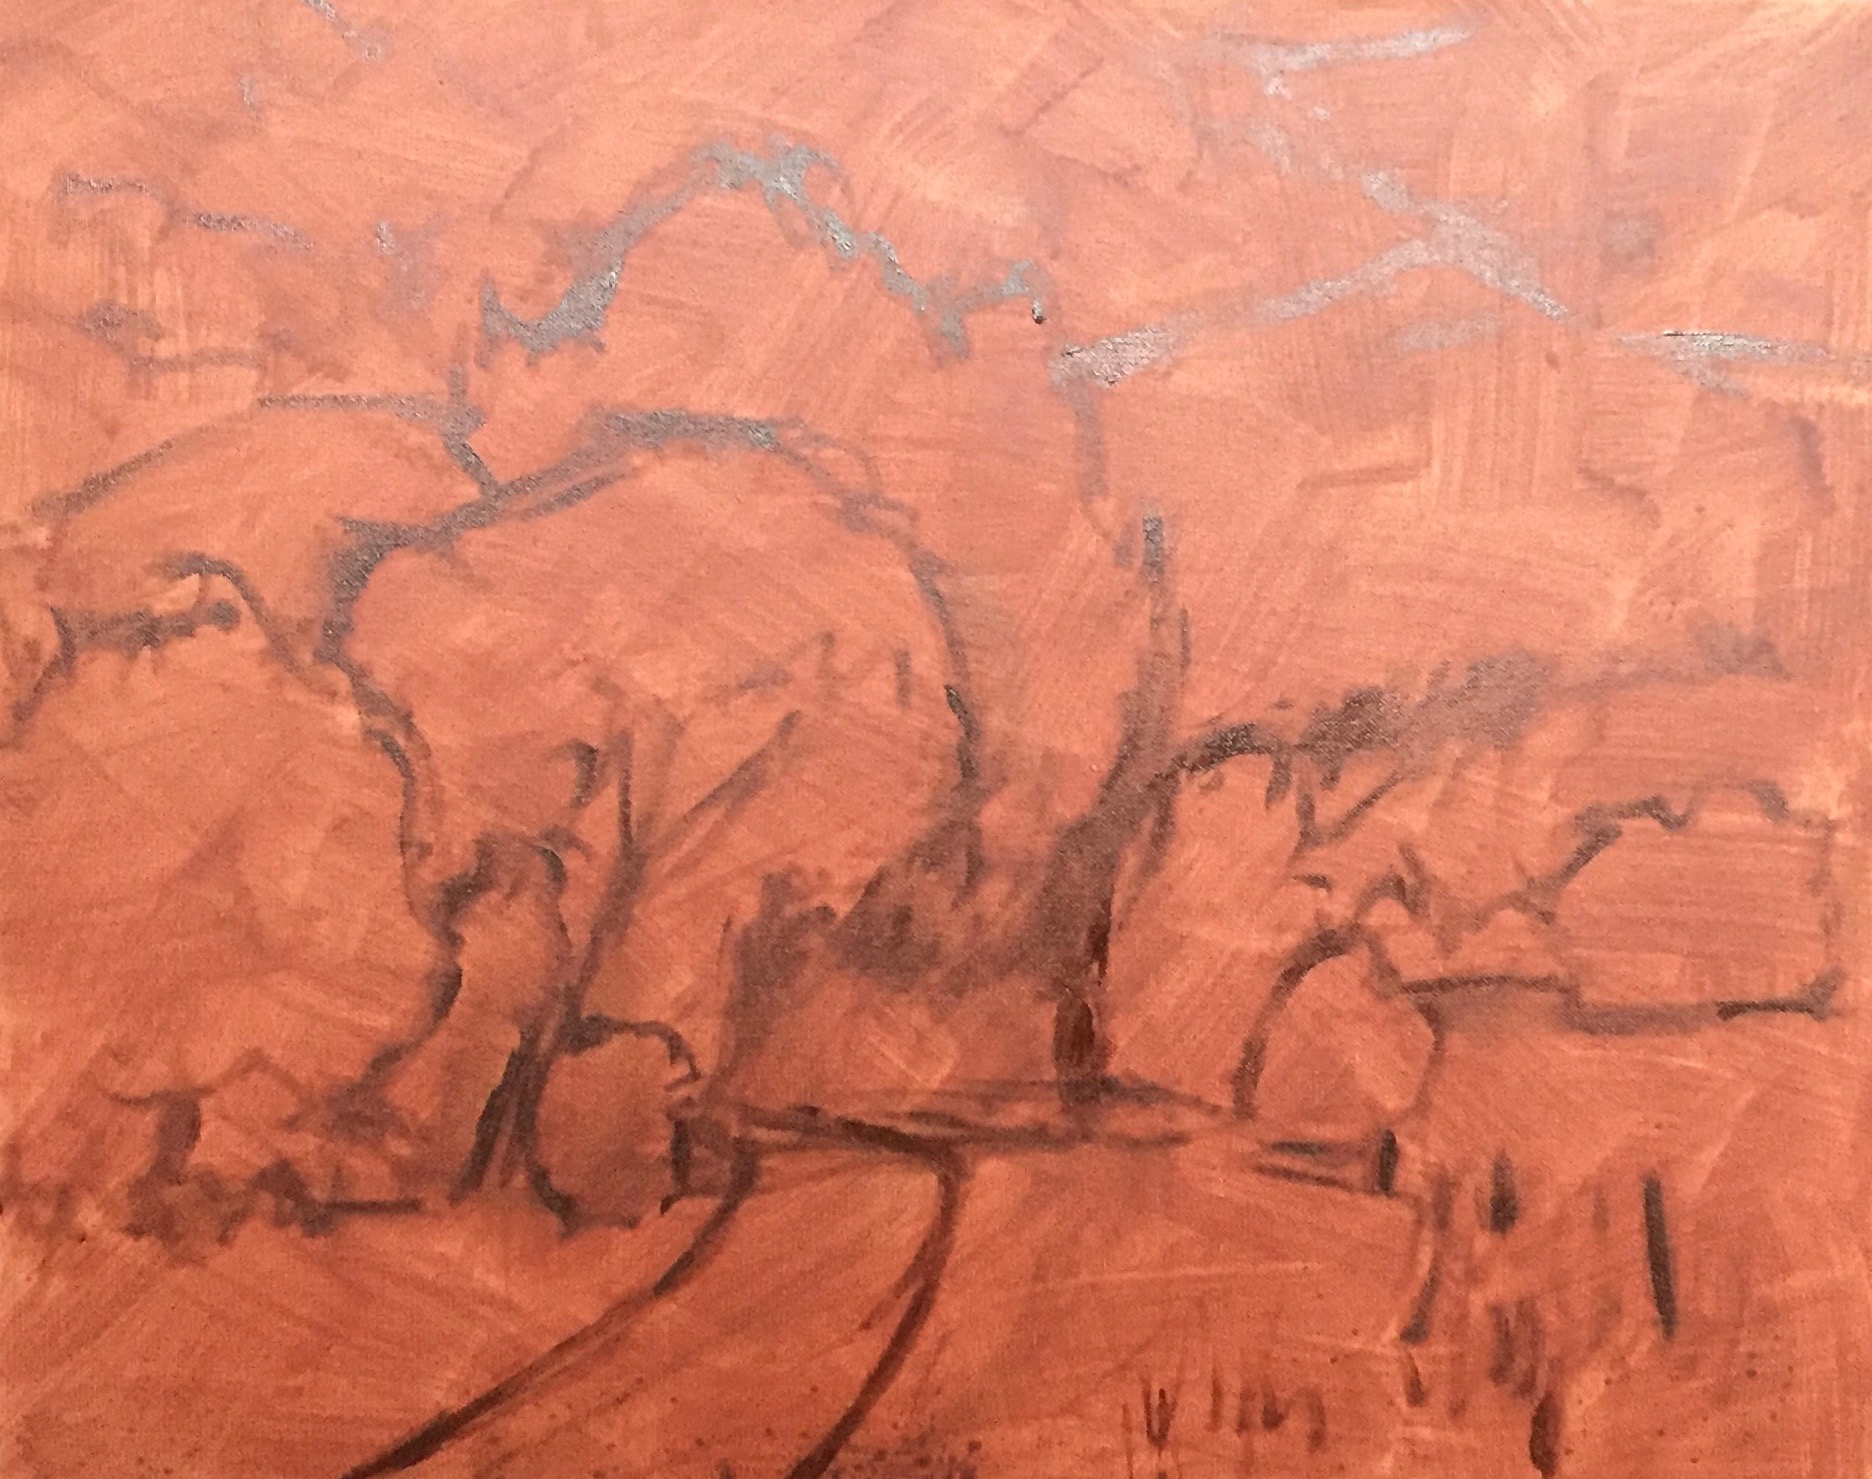
Once I have sketched out the composition I determine where my darkest tones are in the painting, in this case, it’s the shadows in the poplar and sycamore trees in the foreground. Once I have figured out what my darkest values are I can use it to gauge the rest of my tones in the painting.
I’m using a No.6 flat brush as I start blocking in, I want to keep my brush strokes loose and gestural so I will be pretty much-using No.6 flat brushes throughout the entire blocking-in phase.
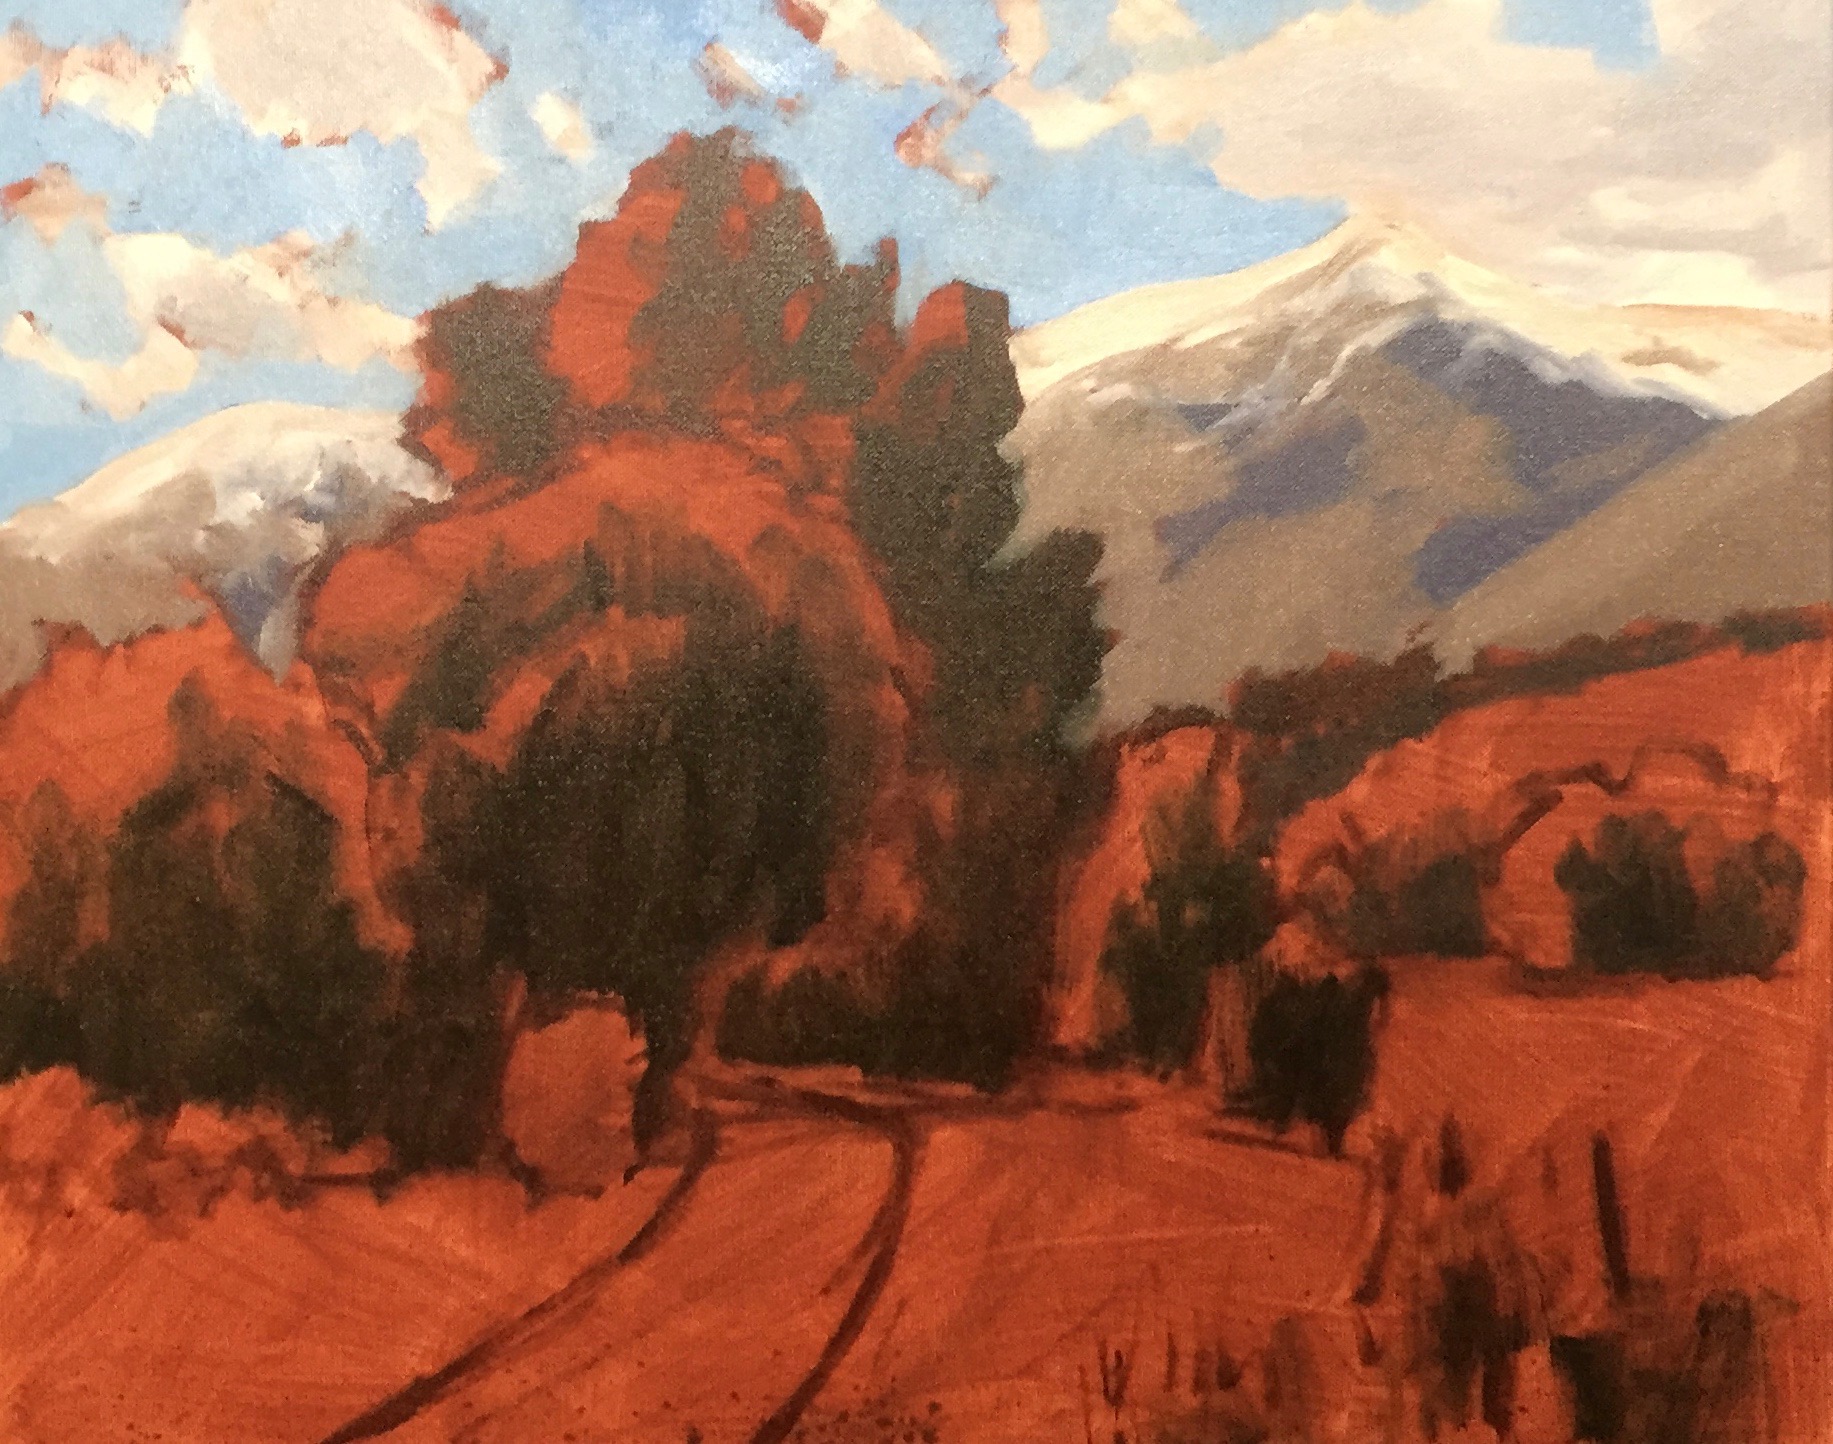
I mix the shadows of the trees using burnt umber, burnt sienna, ultramarine blue and a very small amount of phthalo green. I use this same colour combination with the willow trees in the mid-ground but add a little titanium white to the mix.
I then start marking in the shadows in the mountains using a combination of burnt umber, ultramarine blue, quinacridone magenta and titanium white.
Having established my darks I move onto the sky. I mix the cloud highlights with titanium white and burnt umber knowing full well that it will mix in nicely with the cloud shadows I’m about to add. I mix the colours of the cloud shadows with the exact same colours as I used for the mountain shadows, burnt umber, ultramarine blue, quinacridone magenta and titanium white. Using this same colour combination for shadows throughout the painting will create more colour harmony. Even the shadows in the foreground trees contain burnt umber and ultramarine blue.
I mix the blue in the sky with ultramarine blue, cobalt blue, cobalt teal a very tiny amount of quinacridone magenta and titanium white. I vary the amounts of the blues in order to add texture and interest to the sky.
I block-in the areas in light on the mountain, the colour results from lots of jagged rocks and tussock grass that grows on the mountain and I mix this again with the same colour combination I used in the sky with the emphasis on more burnt umber, I also add I small amount of yellow oxide into the mix. You can also use yellow ochre as well.
I paint the snow in the mountain with titanium white and burnt umber. The burnt umber helps the snow to recede in the painting.
Next, I work on the greens in the grass and I’m sure you are wondering, how do you get green to recede in a painting, well the answer lies in desaturating colours. The more desaturated the colour the more it will recede in the painting.
I mix the colours of the distant fields with yellow oxide, ultramarine blue and titanium white as a base, and then I add varying amounts of cobalt teal, quinacridone magenta and burnt sienna to vary the texture. If the green is too saturated I can reduce the chroma by adding a colour containing its opposite on the colour wheel, red, which could include burnt sienna or quinacridone magenta.
I mix the grass in the foreground by starting with cadmium yellow deep, ultramarine blue and titanium white. I then add a little burnt sienna, and yellow oxide and I kick up the saturation with phthalo green. Be careful when using phthalo green as it’s a very strong colour and can quickly overpower your mixture. I add a little cobalt teal in places to vary the texture and colour of the grass.
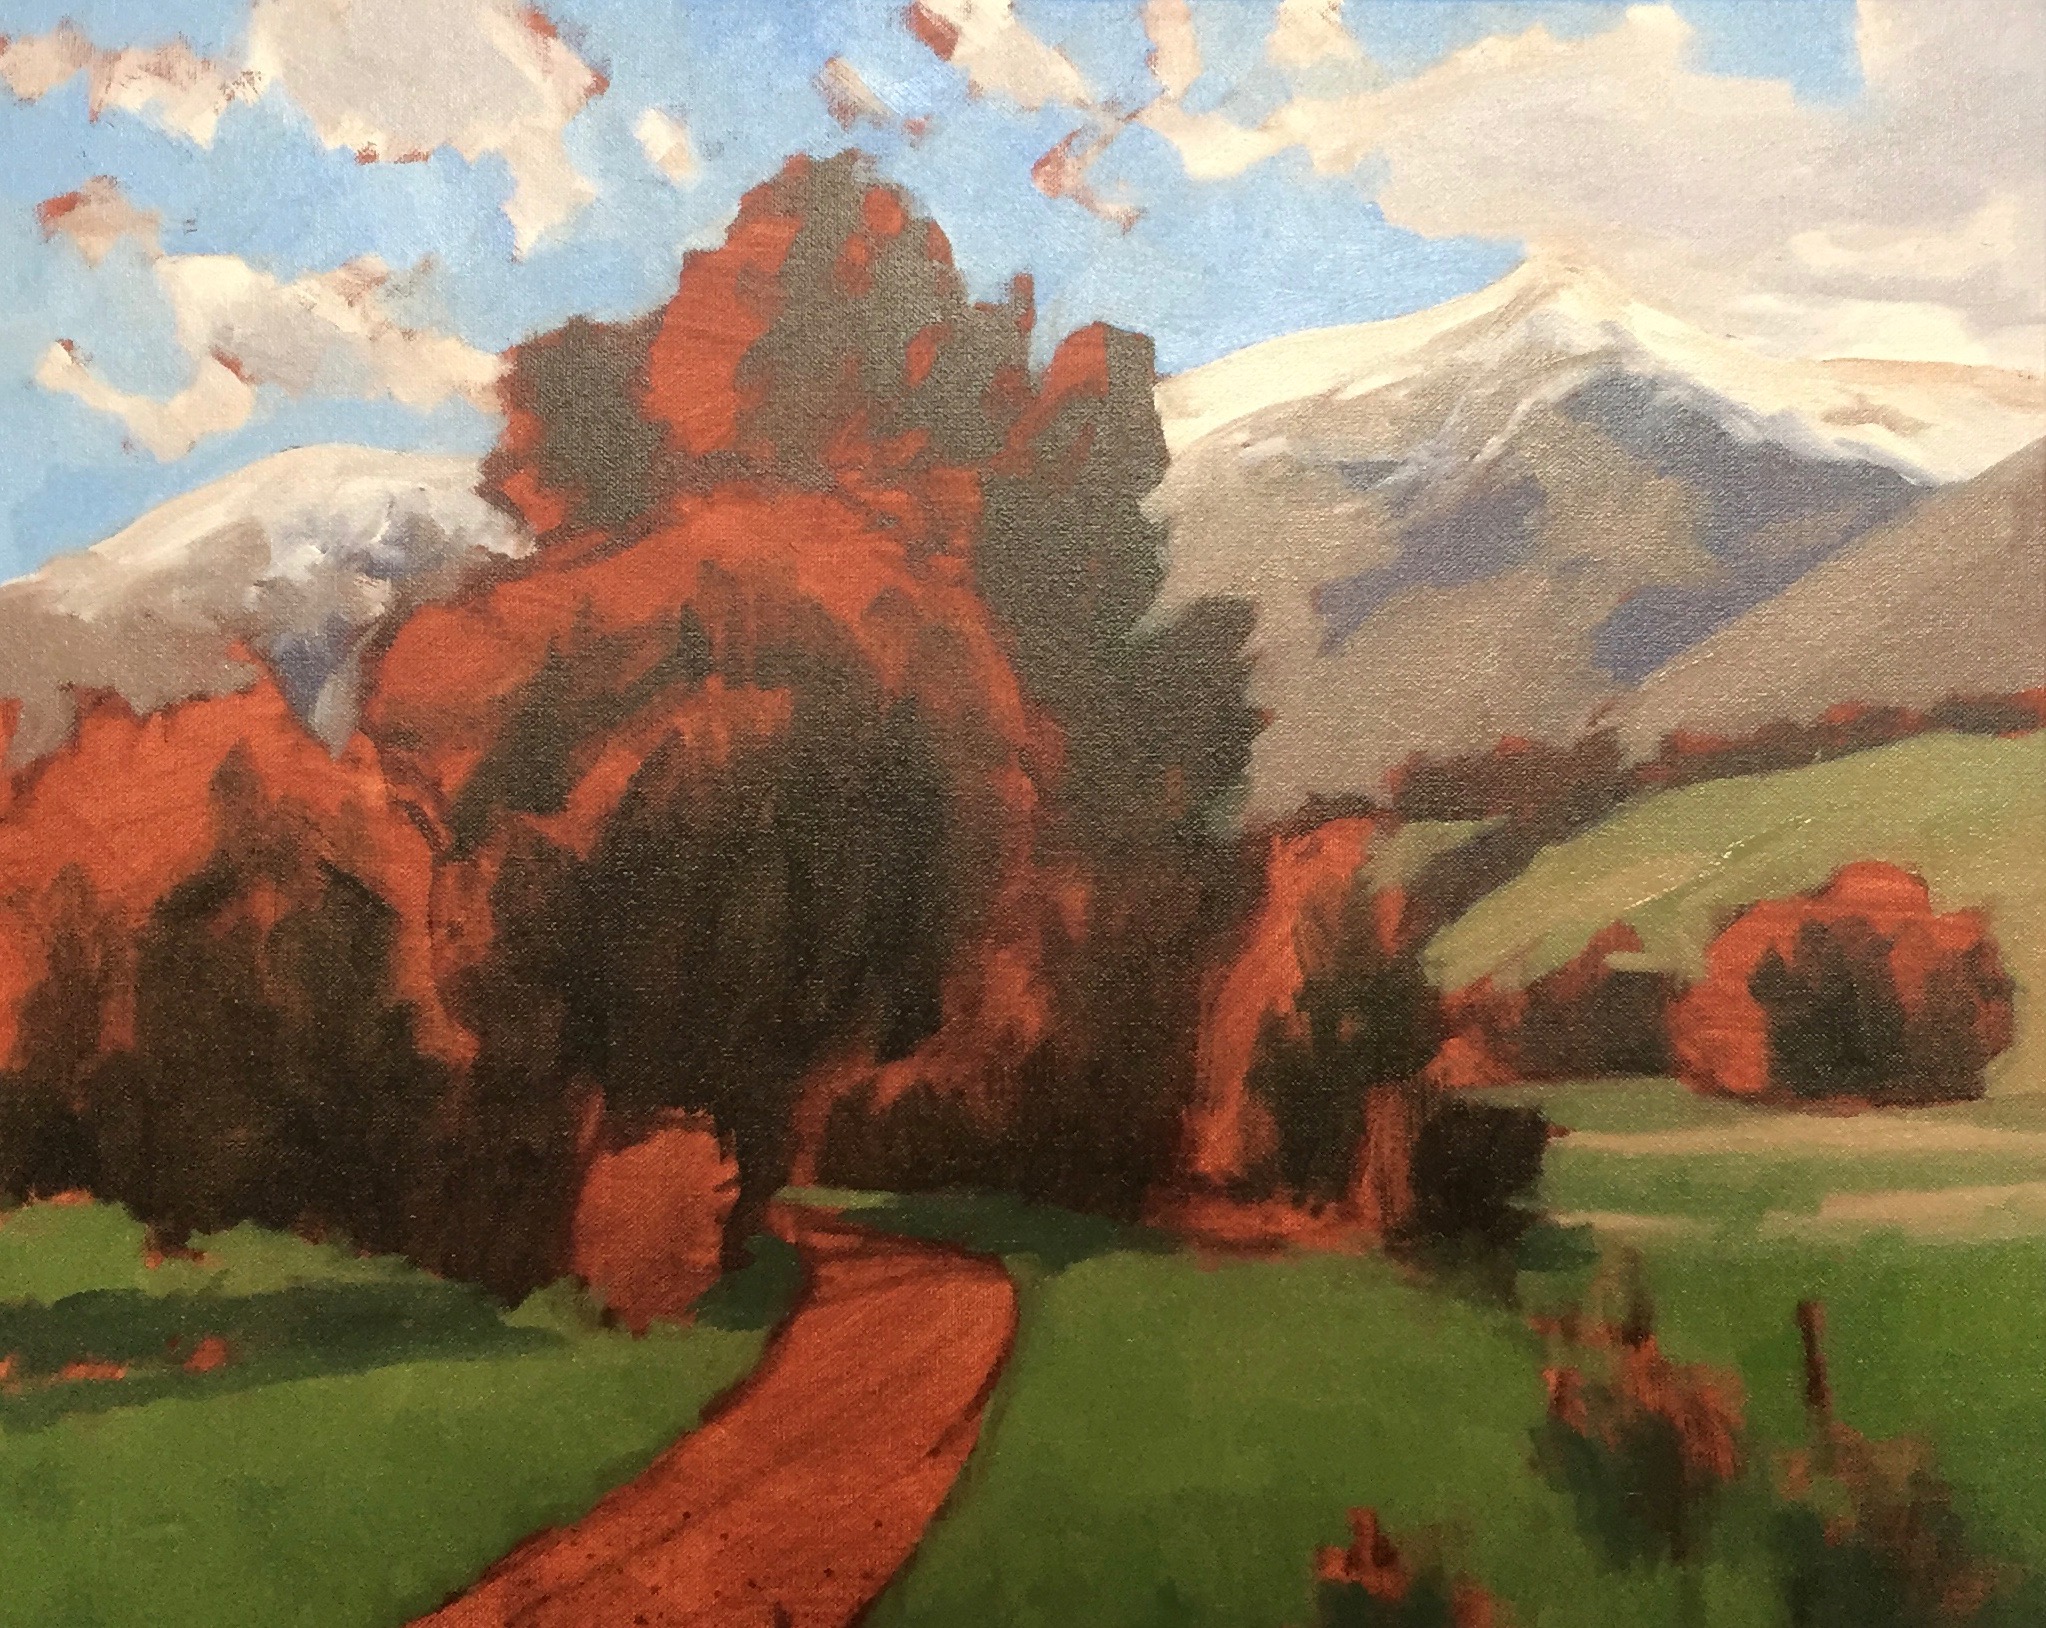
Now to paint the main focal area of the painting and again using a No.6 flat brush I start blocking-in the foliage of the trees. Again, I am keeping my brush strokes loose and gestural.
The tone of the foliage is darker than the grass so I must keep this in mind, but I am basically using the same colour combination for the foliage as I used in the grass, however, I will vary the amounts of the colours in the mix. I darken the foliage from the get-go by adding more ultramarine blue. The foliage contains more earthy siennas in the green so I increase the amount of burnt sienna in the mix. You might need to play around with these colours a little until you get the right one.
I mix the colour of the path with ultramarine blue, burnt umber and titanium white.
I’m getting near to completion of the block in stage and I add some mud to the grass by mixing burnt umber, ultramarine blue and a small amount of quinacridone magenta with titanium white. I also add the clumps of dead yellow grass.
I paint the shadows in the dirt track by mixing the same colours I used in the mountain and clouds shadows, burnt umber, ultramarine blue, quinacridone magenta and titanium white. This is a useful colour combination and a good default colour mix to use in a painting.
I complete the blocking-in phase by tidying up the clouds in the sky and just refining the overall forms in the painting. Once the blocking-in stage is complete I allow the painting to dry so then I can start building up the detail.
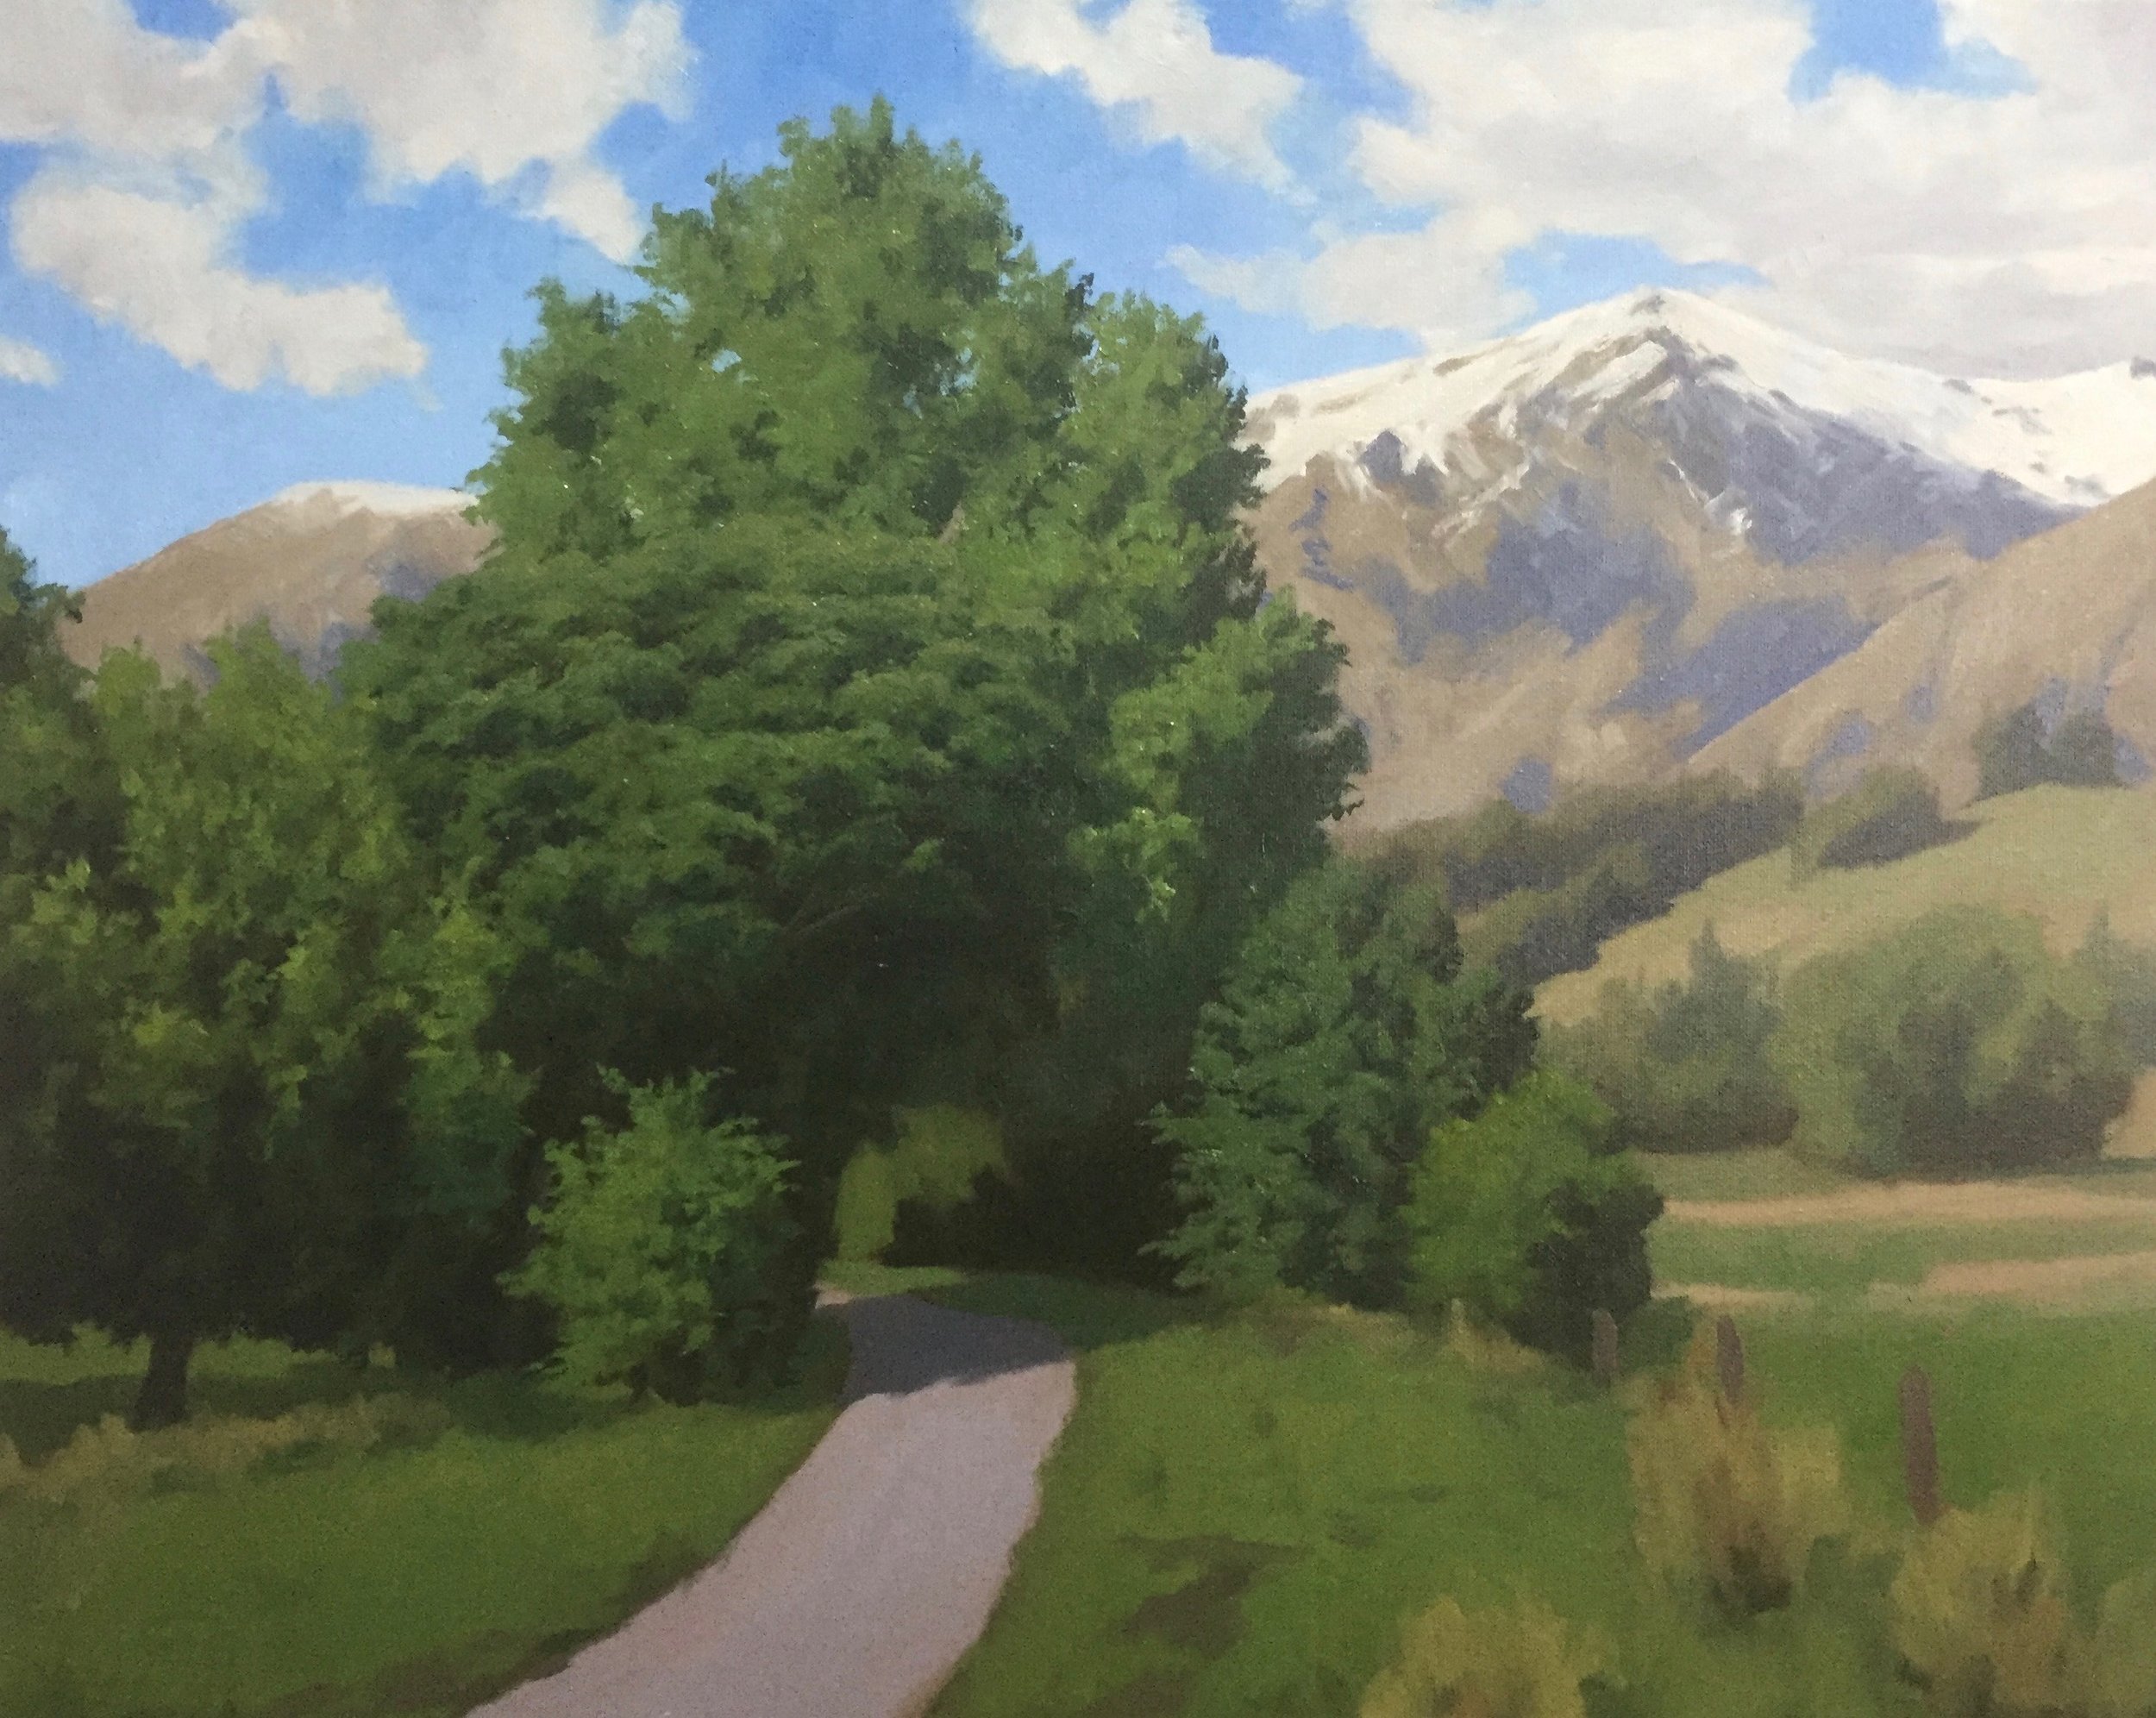
Building Up The Detail
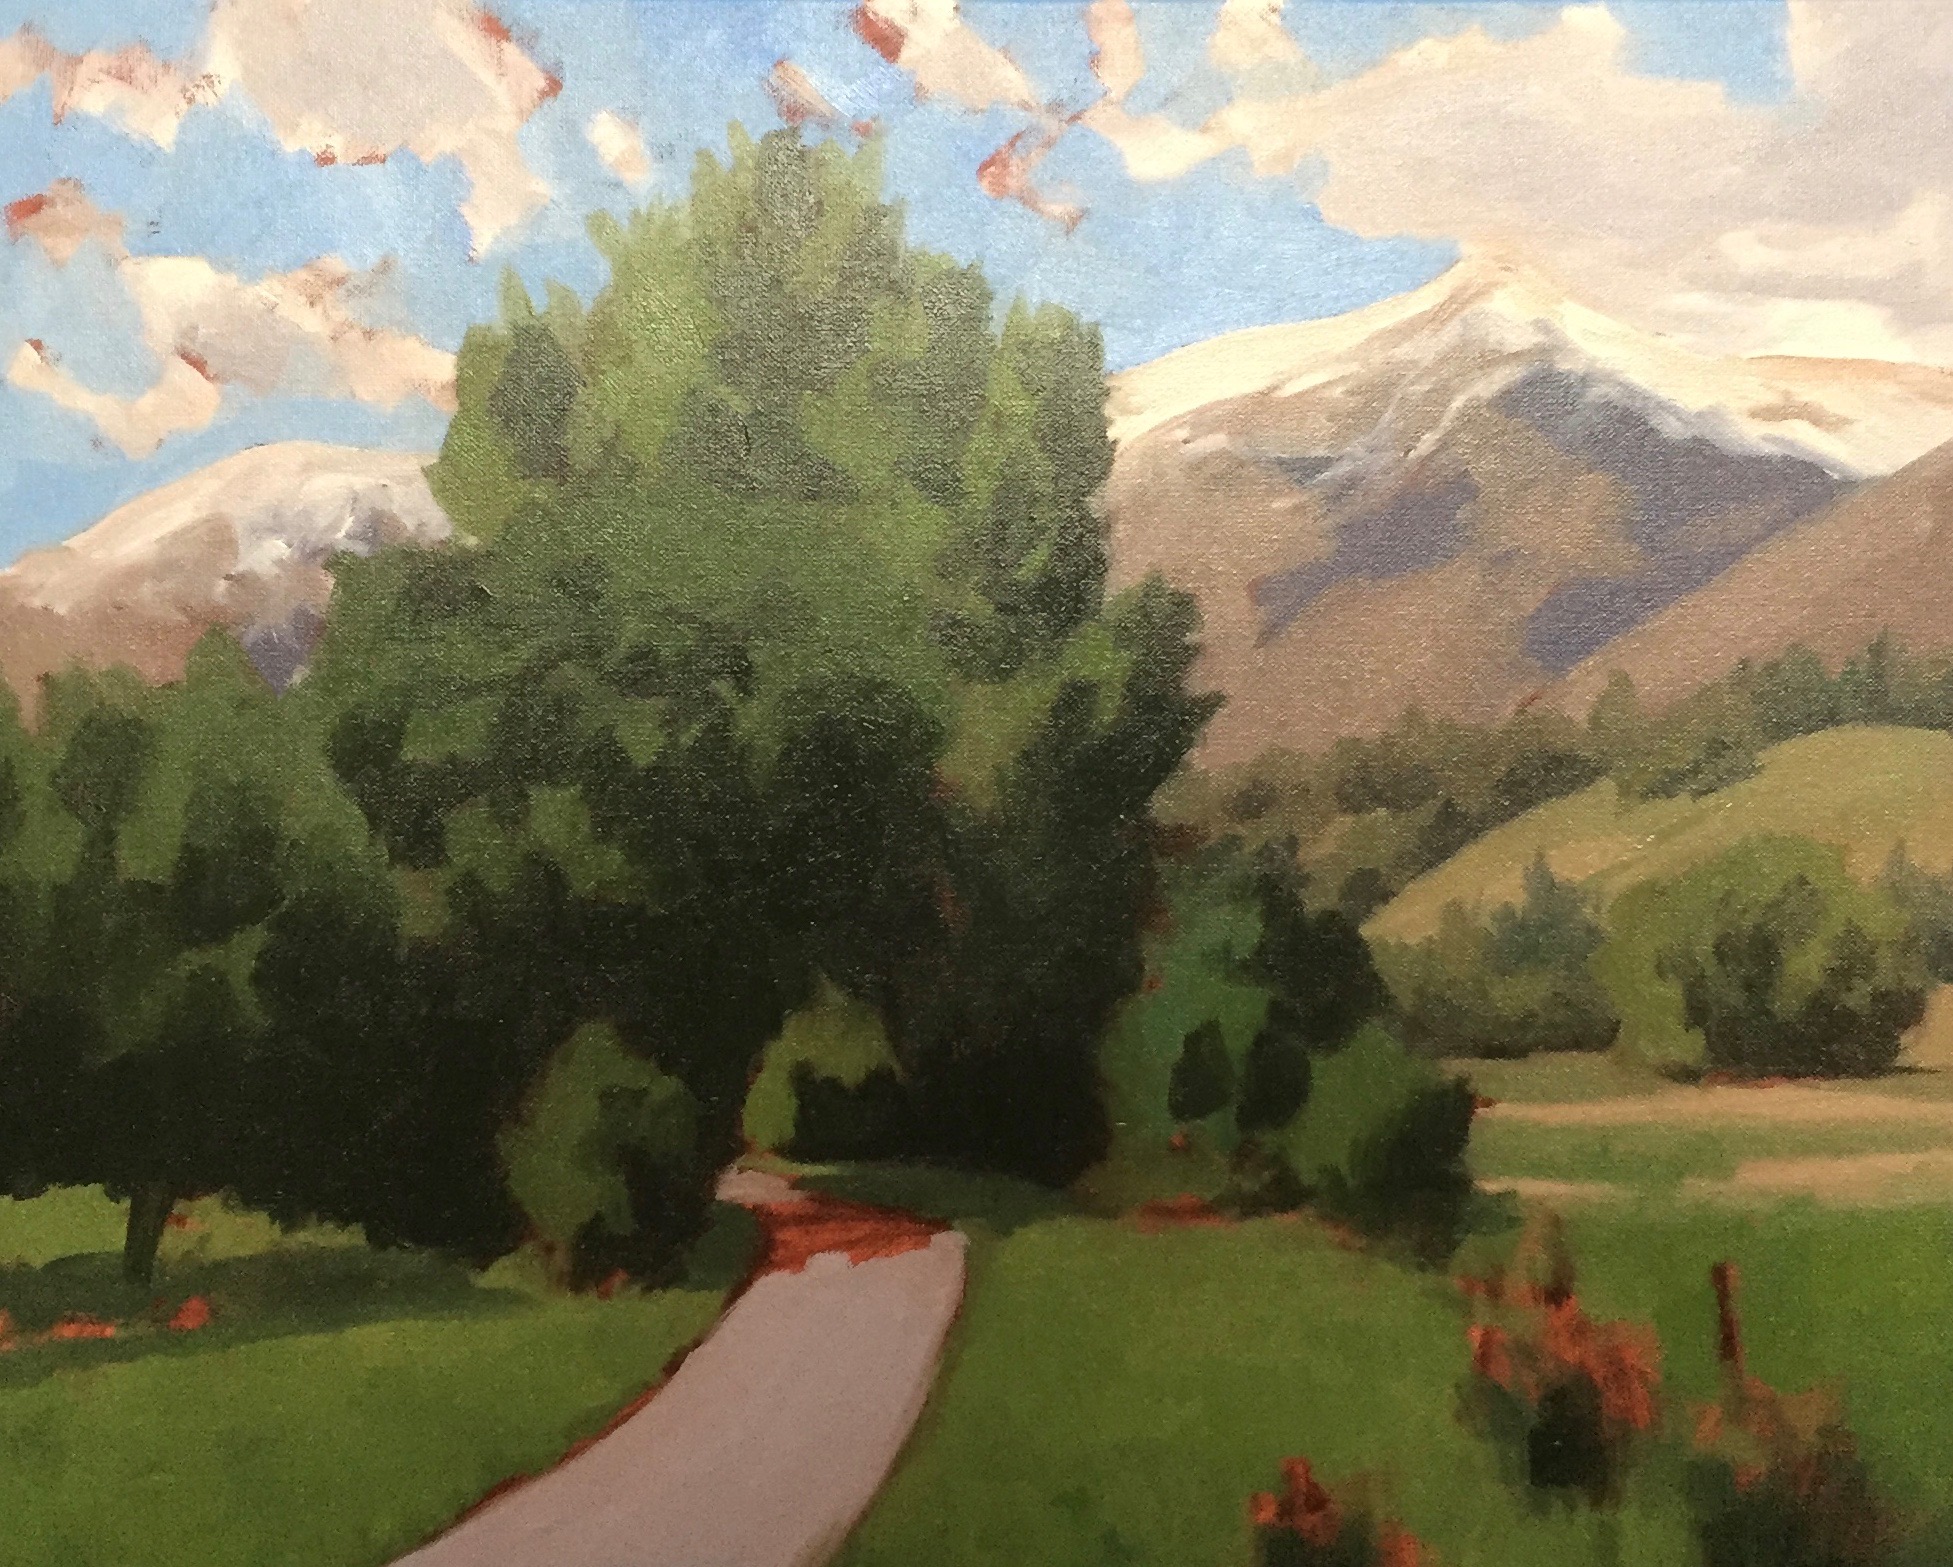
So now that the blocking in the process is complete and I have allowed the painting to dry I can start building up the detail. I start by refining the clouds and I am using the same colours that I used in the blocking in phase which include ultramarine blue, burnt umber, quinacridone magenta and titanium white.
I do want the clouds to be tonally too light as they will jump forward in the painting and distract the viewer from the main focal area so I darken the tone a little. I also refine the sky and using a No.6 flat I also refine the form of the clouds.
Next, I start working on the mountains and again I am using the same colours as I used in the blocking in phase but I am adding lighter tones in places to refine the shape of the mountains. I don’t want to add loads of fine detail to the mountains as this will be confusing to the eye and will zap some of the life out of the painting.
Now for the main part of the painting which is adding the detail of the foliage in the stand of trees. I start with the sycamore tree and I am using a filbert brush to paint the foliage. I am still using the same colours to mix the greens as I did with the blocking in phase which include cadmium yellow deep, ultramarine blue, and phthalo green to increase the chroma and titanium white. I am also adding in places yellow oxide, burnt sienna and quinacridone magenta in order to make the greens look more organic.
For the poplar tree behind the sycamore and the other smaller trees, I use a 3/8″ dagger brush to give the illusion of different shape leaves. I also vary the colour of the foliage between the trees. I’m building up a lighter tone each time to give the illusion of solid forms within the trees.
I refine the trees in the mid-ground but I desaturate my greens so they recede in the painting, I’m still using the same green colour combinations but adding more yellow oxide and burnt sienna in order to reduce the saturation of these colours.
I work on the grass in the foreground using a No.6 flat brush. The grass is tonally lighter than the foliage in the trees even though I am still using the same colour combinations, but also adding a little cobalt teal to the mix here and there. I need to add more titanium white to my green mixes but not so much that the colour becomes chalky. If you find your greens becoming chalky, add more cadmium yellow deep, phthalo green and burnt sienna to the mix. You may have to play around with the colour mixture until you get it right.
I add more detail to the foliage in the stand of trees and again apply lighter too than the previous layer.
Next, I work on the detail of the dirt track and I am using mostly burnt umber, burnt sienna, ultramarine blue, a tiny amount of quinacridone magenta and titanium white. I wanted to break the line of the path so I’ve added clumps of grass to the path edge and mud patches in the grass.
Final Details
I complete the painting by adding some more spots of lighter green in the foliage of the stand of trees. I then add the branches in the poplar and sycamore trees which I mix using a combination of burnt umber, ultramarine blue, a tiny amount of quinacridone magenta and titanium white. For the highlights in the branches, I mix titanium white with a little burnt umber and yellow oxide.
I paint some suggestions of branches in the willow trees in the mid-ground.
Overall I refine the stand of trees and the grass in the foreground, it’s always quite difficult to know when a painting is finished!

Thanks for reading 😊
