In this blog post I will show you how to paint trees en plein air in 6 easy steps. Capturing the essence of nature on canvas is a thrilling experience for any artist, and there’s no better way to do it than by painting en plein air. If you’ve ever stood before a majestic tree, brush in hand, and felt overwhelmed by the task of recreating its beauty, you’re not alone. But fear not! In this blog post, we’ll break down the process of painting trees en plein air into six manageable steps that even beginners can follow.
As an artist based in the stunning Northland region of New Zealand, I’m constantly inspired by the natural beauty that surrounds me. Recently, while exploring the charming area of Pakaraka, I stumbled upon a roadside view that took my breath away. The trees were just beginning to don their autumn colors, creating a vibrant palette that begged to be painted.

This serendipitous encounter reminded me of why I love plein air painting so much. There’s something magical about setting up your easel outdoors, feeling the breeze on your skin, and racing against the changing light to capture a moment in time. It’s this very experience that I want to share with you today.
Whether you’re a seasoned artist looking to refine your technique or a newcomer eager to try your hand at outdoor painting, this guide will equip you with the tools and knowledge you need to create stunning tree portraits in the great outdoors. We’ll cover everything from selecting the right spot to adding those final touches that bring your painting to life.
Setting Up Your Plein Air Painting Station

Before you can begin capturing the beauty of trees on canvas, it’s crucial to set up a comfortable and efficient painting station. This step is often overlooked, but it’s the foundation for a successful plein air painting session.
Choosing Your Equipment
For this demonstration, I’m using an Alla Prima Pochade box easel, which is an excellent choice for outdoor painting due to its portability and stability. When selecting your easel, consider factors like weight, ease of setup, and storage capacity for your supplies.
Selecting Your Canvas
I prefer working on an 8 x 10 linen panels for plein air painting. Linen panels are ideal for plein air painting because they’re lightweight, durable, and have a pleasant texture that works well with oil paints. The size is perfect for completing a painting in one session while still allowing for enough detail.
Essential Color Palette
A well-chosen color palette is key to capturing the nuances of nature. For this tree painting, I’m using the following oil colors:
- Titanium White
- Burnt Sienna
- Yellow Ochre
- Cadmium Yellow
- Cadmium Red Light
- Alizarin Crimson
- Ultramarine Blue
- Phthalo Green
This selection of oil paints provides a good balance of warm and cool tones, allowing for a wide range of color mixing possibilities. Remember, you don’t need every color under the sun – learning to mix and create various hues from a limited palette is a valuable skill for any artist.
Additional Supplies
Don’t forget other essential items such as:
- A variety of brushes (flat, round, and filbert)
- Palette knives for mixing and applying paint
- A container for brush cleaning solution
- Paper towels or rags
- A portable stool or chair for comfort during longer sessions (optional).
Pro Tip: Always pack a hat and water when painting outdoors. Comfort and safety are crucial for a productive painting session.
With your station set up and supplies at the ready, you’re now prepared to begin your plein air tree painting adventure. In the next step, we’ll dive into how to observe and analyze the scene before you start painting.
Buy Prints
Step 1: Sketch the Composition
Once you’ve set up your easel and observed the scene, it’s time to lay the foundation of your painting. This crucial step will guide the entire process, so it’s worth taking your time to get it right.
Preparing Your Medium
Before you start sketching, mix your medium. I prefer using Burnt Sienna mixed with Liquin Original. This combination offers several benefits:
- It improves the flow of the paint, making it easier to create smooth, gestural lines.
- It speeds up the drying time, which is particularly useful when working outdoors where conditions can change quickly.
- A warm tone of Burnt Sienna can be applied to your canvas prior to painting as it provides a pleasant underpainting that can add depth to your final piece. However I prefer to paint on a white surface as it helps me to gauge my tonal values much better.
Creating a Dynamic Composition
When sketching your composition, aim for a layout that engages the viewer’s eye and creates visual interest. Here are some key principles to keep in mind:
- Rule of Thirds: Divide your canvas into a 3×3 grid. Place key elements along these lines or at their intersections for a more balanced and interesting composition.
- Leading Lines: Use natural elements like roads, rivers, or tree lines to guide the viewer’s eye through the painting. In our scene, the road serves as a perfect leading line, drawing attention to the main tree.
- Balance: Create a sense of equilibrium in your composition. Here, we’re balancing the main tree of interest with another tree on the left side of the canvas.
- Focal Point: Decide on your main area of interest – in this case, it’s the prominent tree showing autumn colors.
Pro Tip: Avoid centering your focal point or horizon line. This creates a static, less interesting composition. Instead, place these elements off-center using the rule of thirds for a more dynamic feel.
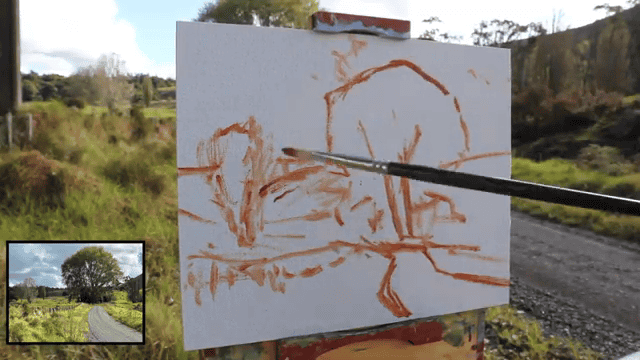
Sketching Technique
Use light, loose strokes to block in the main shapes and lines of your composition. Don’t worry about details at this stage – focus on getting the proportions and placement right. Remember, this sketch is just a guide; you’ll refine and adjust as you paint.
Consider Negative Space
As you sketch, pay attention to the spaces between and around objects. These negative spaces are just as important as the objects themselves in creating a balanced composition.
Simplify Complex Elements
When sketching trees, don’t try to capture every branch and leaf. Instead, focus on the overall shape and major structural elements. You’ll add detail later in the painting process.
By taking the time to create a well-thought-out sketch, you’re setting yourself up for success in the subsequent stages of your painting. This initial framework will guide your color choices and brushwork, helping you create a cohesive and visually appealing final piece.
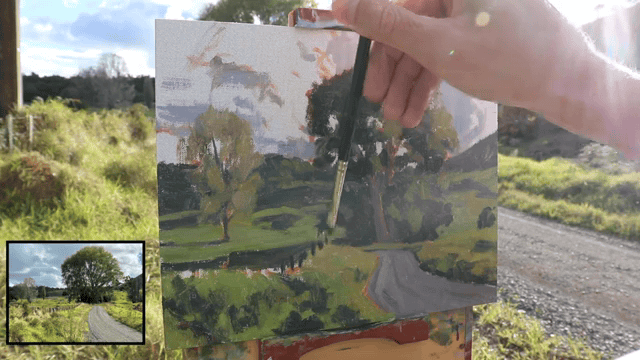
Step 2: Paint the Darks First
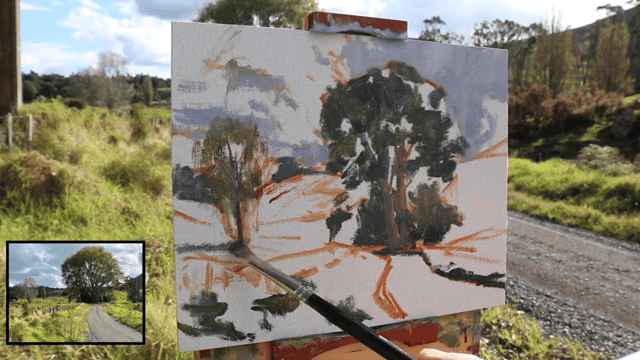
With your composition sketched, it’s time to lay down the foundation of your painting by establishing the dark values. This step is crucial for creating depth and structure in your artwork.
Understanding Value
Before we dive in, let’s clarify what we mean by ‘value’. In painting, value refers to the lightness or darkness of a color. It’s essentially how a color would appear in a black and white photograph. Understanding and accurately representing values is often more important than getting the exact colors right, especially in plein air painting where light conditions can change rapidly.
Why Start with Darks?
Beginning with dark values offers several advantages:
- It provides a structural framework for your painting.
- It helps you accurately judge and mix subsequent colors.
- It allows you to work more efficiently as light conditions change.
- It creates contrast and depth from the outset.
Identifying Dark Areas
In our tree scene, the primary dark areas include:
- Occlusion shadows within the tree’s foliage and trunk
- Shadows cast by clouds on the landscape
- Darker areas of the ground or underbrush
Painting Technique
Using your dark value mix (which could be a combination of Burnt Sienna, Ultramarine Blue, and a touch of Phthalo Green for a rich, dark tone), begin blocking in these shadowed areas. Work with confident, broad strokes at this stage – you’re not aiming for detail yet.
- Tree Shadows: Start with the deepest shadows within the tree. These are typically found where branches meet the trunk, or in the densest parts of the foliage.
- Cloud Shadows: Although clouds themselves are light, the shadows they cast on the landscape can be quite dark. Include these in your initial dark value pass.
- Ground Shadows: Don’t forget the shadows on the ground, which can help anchor your tree and give it a sense of place.
Pro Tip
Squint your eyes when looking at your subject. This helps you see the basic value structure without getting distracted by details or colors.
Adjusting for Changing Light
One of the challenges of plein air painting is the constantly changing light. By establishing your darkest values early, you create a stable reference point. If the light changes dramatically, you can adjust your other values in relation to these established darks.
Creating Depth
Remember that shadows aren’t just flat dark areas. They have subtle variations in value and temperature. As you lay in your darks, consider adding slight variations to create more interest and depth.
Balancing Act
While it’s important to establish your darks, be careful not to overdo it. Leave room for mid-tones and highlights. You can always darken areas later if needed, but lightening dark areas can be more challenging.
By taking the time to carefully establish your dark values, you’re creating a solid foundation for the rest of your painting. This step will guide your color choices and help you achieve a sense of light and atmosphere in your final piece. In the next step, we’ll move on to adding mid-tones and beginning to build up the form of our trees.
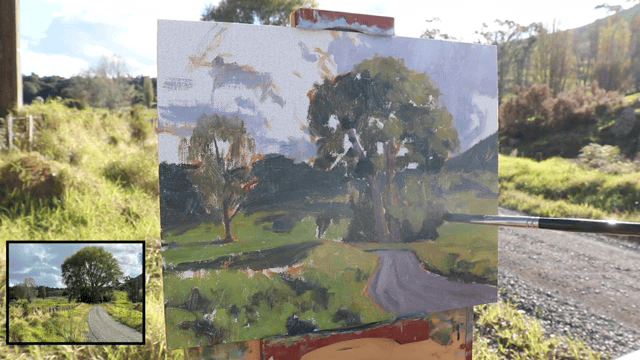
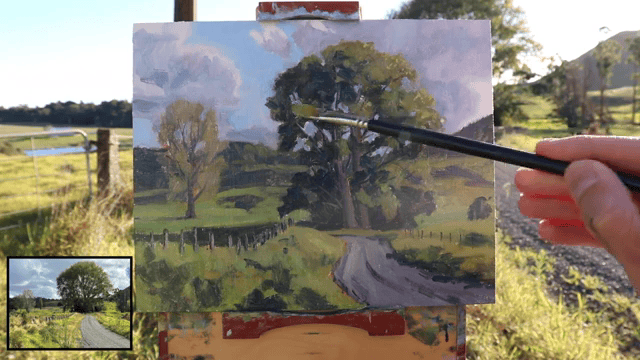
Step 3: Paint the Areas in Light

After establishing the dark values, it’s time to breathe life into your painting by focusing on the areas in light. This step is where your tree will start to take shape and gain dimension.
Mixing Colors for Tree Foliage
For the tree canopy, create a versatile green mixture that captures the essence of your scene. A good starting point is:
- Yellow Ochre
- Cadmium Yellow
- Ultramarine Blue
- A touch of Alizarin Crimson (to desaturate the green)
Adjusting Values and Tones
- Use Titanium White to lighten your mixture as needed.
- Add Phthalo Green for a more vibrant, emerald tone, especially useful for painting grass or younger leaves.
Capturing Seasonal Changes
Since we’re painting an autumn scene, incorporate more Yellow Ochre into your mixture for the tree canopy. This will help reflect the warm, golden tones typical of fall foliage.
Technique for Applying Light Colors
- Start with larger brushes to block in general areas of light.
- Gradually use smaller brushes to define leaf clusters and branches.
- Pay attention to how light interacts with different parts of the tree – tops of branches will be lighter than inner areas.
Creating Depth in Foliage
- Vary your green mixtures slightly as you paint to create depth and interest.
- Use cooler greens (more blue) for areas further back in the canopy.
- Use warmer greens (more yellow) for areas catching direct sunlight.
Balancing Warm and Cool Tones
- Incorporate both warm and cool tones in your light areas to create visual interest.
- Use warmer tones (more yellow or red) for areas in direct sunlight.
- Use cooler tones (more blue) for areas in partial shadow or reflected light.
Preserving Your Dark Values
As you add lighter colors, be careful not to paint over all your dark areas. The contrast between light and dark is crucial for creating a sense of form and depth.

Pro Tip: Observing Light Direction
Pay close attention to the direction of light in your scene. This will guide where you place your lightest values and help create a convincing sense of three-dimensionality in your tree.
By carefully painting your light areas, you’re adding dimension and life to your tree. Remember, the goal isn’t to paint every leaf, but to create the impression of foliage that captures the essence of the tree and the autumn season. In the next step, we’ll focus on adding details and refining our forms.
Note: Trees generally have darker values compared to lighter elements like the sky and clouds.
Step 4: Modelling and Adding Details
Now that we’ve established our light and dark areas, it’s time to refine the forms and add some selective details to bring our tree to life. In plein air painting, the goal is to capture the essence of the scene rather than creating a photorealistic representation. This approach allows for a more expressive and emotive painting.
Brushwork and Technique
Opt for broader, more gestural brushstrokes to convey the energy and movement of the tree. Use larger brushes (flats or filberts) for most of this stage to encourage looser painting. This approach allows some brushstrokes to remain visible, adding texture and interest to your painting. Reserve smaller brushes for only the most essential details.
Focus on suggesting rather than defining every element of the tree. Add just enough detail to guide the viewer’s eye and imagination. Continue to refine the tree’s form by adjusting values and adding mid-tones to create a smooth transition between your light and dark areas.
Creating Depth and Texture
Use dry brush techniques to suggest the texture of bark or rough foliage. Vary your brushstrokes to differentiate between trunk, branches, and leaves. For the foliage, use slightly darker, cooler tones for recessed areas and add touches of lighter, warmer colors to suggest sunlight hitting leaf edges.
Define major branches without overworking them. Suggest smaller branches with quick, thin strokes rather than painting each one individually. Use diagonal or curved brushstrokes to suggest movement in the tree, such as the direction of growth or the effect of wind on the branches.
Pro Tip
Regularly step back from your easel to view your painting from a distance. This helps you see the overall effect and prevents overworking any one area. Remember, too much detail can actually detract from the overall impact of your painting. It’s often what you leave out that makes a plein air painting successful.
By focusing on expressive brushwork and selective detailing, you’re creating a painting that captures not just the appearance of the tree, but also its character and the feeling of the moment. In our final step, we’ll add those last touches that will bring the whole scene together.
Step 5: Restate the Dark Values
As we approach the final stages of our plein air tree painting, it’s crucial to revisit and restate the dark values in the scene. This step is often overlooked but plays a vital role in creating a cohesive and impactful painting.
Emphasizing Shadows
Begin by re-examining the shadows in your scene, particularly those within and around the trees. Look for areas where the contrast may have become muted during the previous stages of painting. Using a mixture of Ultramarine Blue and a touch of Yellow Ochre, carefully redefine these shadow areas. This combination creates a rich, deep shadow color that complements the warmer tones of your autumn scene.
Pay special attention to:
- The deepest parts of the tree’s foliage
- The underside of major branches
- Areas where the trunk meets the ground
- Shadows cast by the tree onto the surrounding landscape
As you restate these dark values, remember that shadows aren’t uniformly dark. Vary the intensity and temperature of your shadow mixture slightly to create depth and interest. This subtle variation will make your shadows appear more natural and less flat.
Adjusting Contrast
Restating the darks isn’t just about making certain areas darker; it’s about fine-tuning the overall value relationships in your painting. As you work:
- Step back frequently to assess the overall effect of your adjustments.
- Squint at your painting and the scene to better perceive value relationships.
- Consider whether you need to lighten some areas to enhance the contrast further.
Remember, strong contrast can draw the viewer’s eye to important focal points in your painting. Use this to your advantage by ensuring the areas you want to emphasize have the most distinct light-dark transitions.
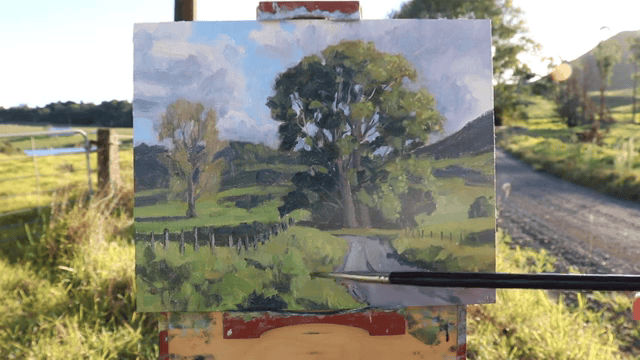
Step 6: Save Your Lightest Values Until Last

As we reach the final stage of our plein air tree painting, it’s time to add those crucial highlights and last-minute details that will make your artwork truly shine.
Applying the Lightest Values
Begin by identifying the areas of your painting that require the brightest highlights. For the tree canopy, focus on the spots where sunlight directly hits the leaves. Use the same color mixture you’ve been working with for the foliage, but adjust the value to be significantly lighter by adding more Titanium White.
Don’t forget to add highlights to other elements of your scene:
- For grassy areas, add touches of light to suggest sun-dappled ground.
- In the sky, use a mixture of pure Titanium White with a small amount of Yellow Ochre to create luminous clouds.
When applying these lightest values, use a gentle touch. Apply the paint with minimal pressure to avoid blending it with the layers beneath. This technique, often referred to as “dry brushing,” allows you to add bright highlights that sit on top of your existing paint layers, creating a sense of texture and depth.
Adding Final Details
With your main highlights in place, it’s time for those finishing touches that will bring your painting to life:
- Use a small synthetic rigger brush (size 0 or 1) for precise control when adding fine details.
- Add thin highlights to tree branches and stems to suggest how light interacts with these elements.
- Consider adding a few strategically placed bright spots in the foliage to imply sunlight peeking through leaves.
- If your scene includes any distant elements, you might add a touch of atmospheric perspective by slightly lightening and cooling far-off areas.
Remember, less is often more at this stage. Each highlight or detail should serve a purpose in your composition. Step back frequently to assess the overall effect of your additions.
Final Considerations
As you put the finishing touches on your plein air tree painting, take a moment to consider the following:
- Is the overall value range of your painting effective in conveying the light and atmosphere of the scene?
- Does your eye move comfortably around the composition, or are there any areas that need adjustment?
- Have you captured the essence of the autumn scene and the character of the tree?
By carefully adding these final highlights and details, you’re not just completing your painting – you’re enhancing its ability to convey the beauty and atmosphere of the autumn scene you set out to capture. Your plein air tree painting is now a unique representation of a moment in time, preserving the essence of nature through your artistic vision.

Summary
Here are the steps summarized:
- Sketch out the composition on the canvas.
- Paint all the dark values and shadows first.
- Paint all the areas in light.
- Model and add details with fewer brush marks.
- Restate the dark values.
- Add the lightest values at the end.
Wrapping Up Your Plein Air Experience
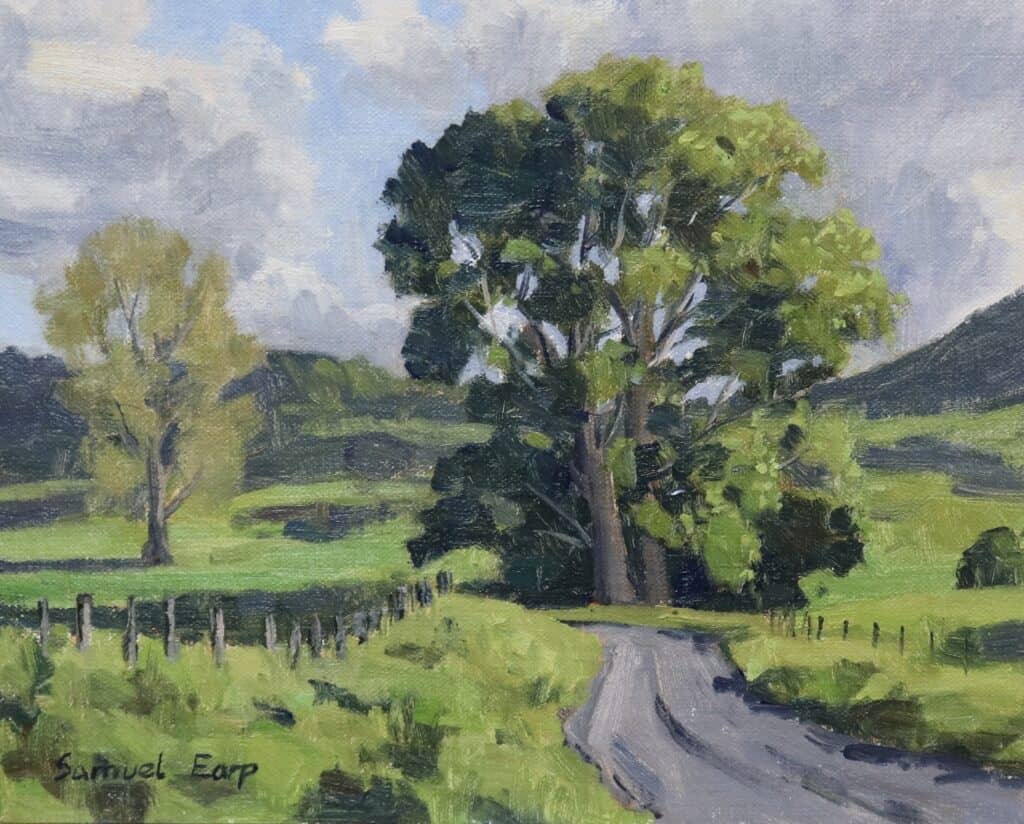
As the sun dips towards the horizon, casting its warm, golden light across your freshly completed canvas, take a moment to step back and admire your work. You’ve successfully captured the essence of the autumn tree scene before you, translating the beauty of nature onto your panel through thoughtful observation and skillful brushwork.
This journey through the six steps of painting trees en plein air has equipped you with valuable techniques and insights. From setting up your easel to adding those final, sparkling highlights, each stage has contributed to creating a piece that not only represents the visual aspects of the scene but also conveys the atmosphere and emotion of the moment.
Remember, plein air painting is as much about the experience as it is about the final product. Each time you paint outdoors, you’re not just creating art – you’re forging a deeper connection with the natural world around you.
Continuing Your Artistic Journey
Your plein air adventure doesn’t have to end here. To further develop your skills and explore new techniques in landscape painting:
- Practice regularly: Try to paint outdoors as often as you can, in various locations and weather conditions.
- Experiment with different subjects: While trees are a wonderful subject, don’t hesitate to tackle other elements of nature in your plein air sessions.
- Join a plein air group: Painting with others can provide inspiration, feedback, and a sense of community.
Free Painting Tutorial Videos
For those eager to dive deeper into the world of landscape painting, be sure to check out my free landscape painting tutorial videos by joining my FREE art group. These resources offer additional techniques, tips, and inspiration to help you continue growing as an artist.
Thank you for joining me on this artistic journey. Your dedication to capturing the beauty of nature through art is truly inspiring. Until our brushes meet again, keep observing, keep creating, and most importantly, keep enjoying the wonderful world of plein air painting!

