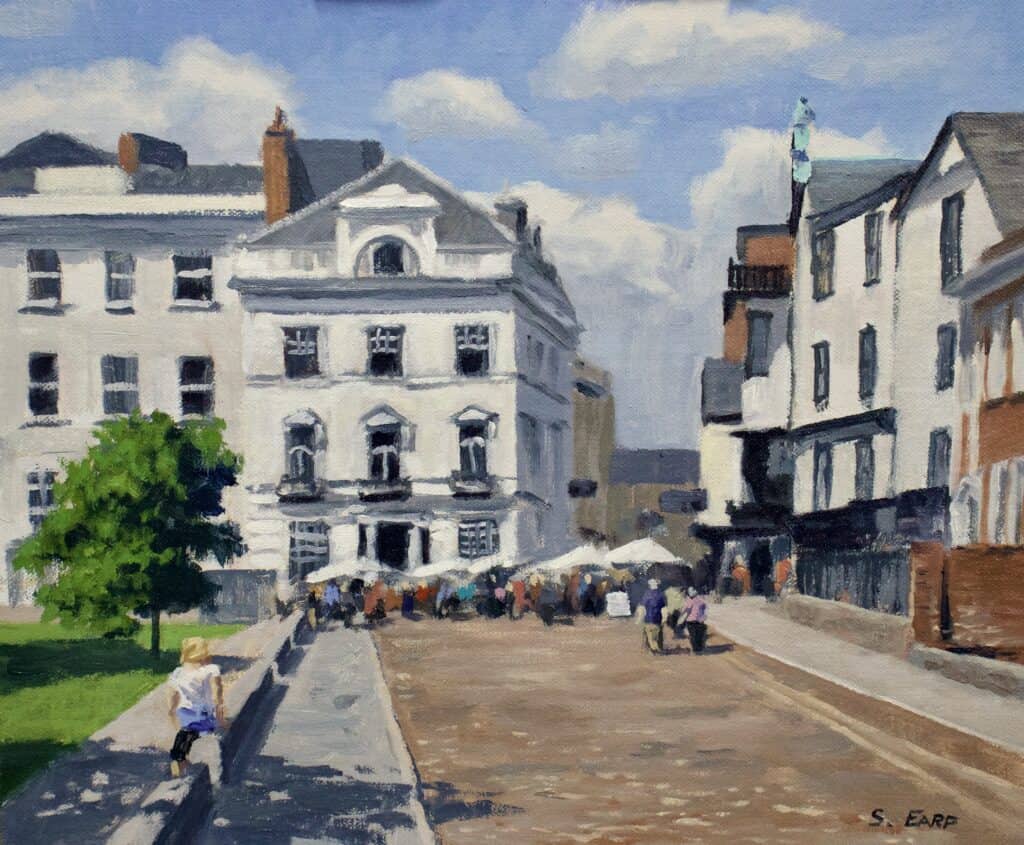
In this comprehensive guide, I’ll explain my process for creating a captivating old street scene using oil paints.
As an artist passionate about preserving the essence of bygone eras, I’ve been drawn to the allure of old street scenes. There’s something magical about capturing the weathered facades, cobblestone paths, and timeless atmosphere of historical urban landscapes.
Whether you’re a seasoned artist looking to refine your technique or a beginner eager to dive into architectural painting, this tutorial will provide valuable insights and practical tips to bring your vision to life.
About the Author
For those new to my blog, allow me to introduce myself. I’m Samuel, an oil and gouache painter with a deep passion for landscapes and traditional realism. Through years of experience and countless hours at the easel, I’ve developed techniques that I’m excited to share with fellow art enthusiasts.
In this post, we’ll explore:
- Essential materials for painting street scenes
- Techniques for accurately depicting architectural details
- Methods to create depth and atmosphere in your artwork
- Step-by-step instructions to guide you through the painting process
So, grab your brushes, set up your easel, and let’s embark on this artistic journey together.
Materials and Setup
Essential Materials:
- 10×12 inch linen panel (oil-primed, medium weave)
- Oil paints (colors specified below)
- Brushes (various sizes, both flat and round)
- Palette
- Palette knives
- Liquin Original medium
- Odorless mineral spirits or turpentine
- Paper towels or rags
- Easel
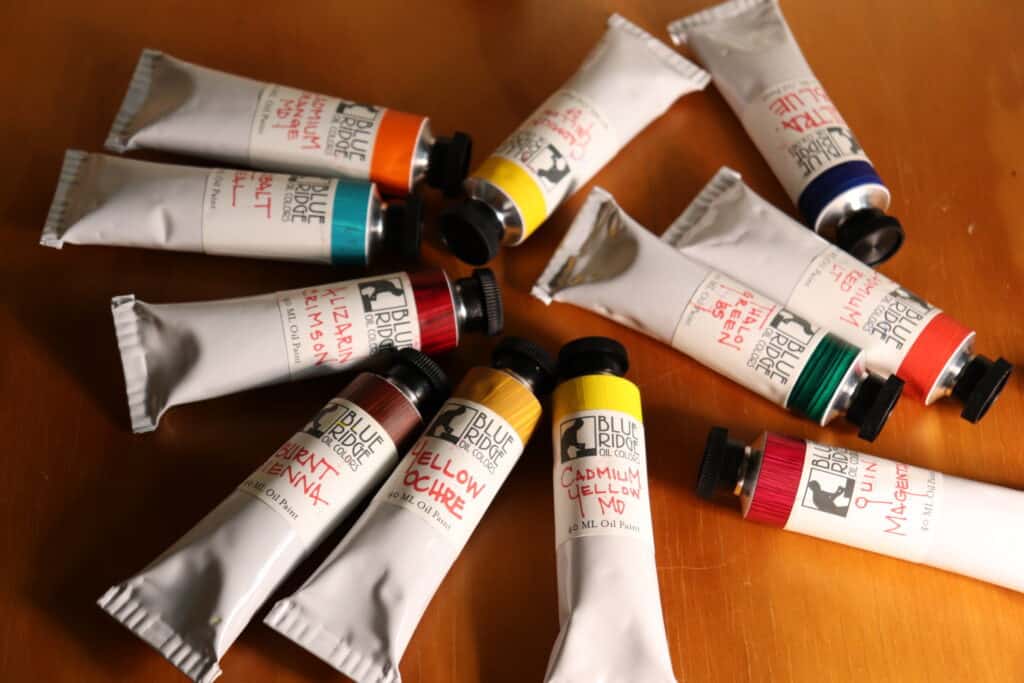
Paint Colors:
- Titanium White
- Burnt Sienna
- Yellow Ochre
- Cadmium Yellow
- Cadmium Red
- Alizarin Crimson
- Ultramarine Blue
- Phthalo Green
Optional Materials:
- Canvas instead of linen panel
- Acrylic paints (for those preferring an alternative to oils)
- Charcoal or pencil for initial sketching
When it comes to creating a compelling old street scene, the foundation of your artwork lies in the quality of materials you choose. For this painting, I’ve carefully selected a surface that will enhance the final result and make the painting process more enjoyable.
Choosing the Right Surface
I’m working on a 10×12-inch linen panel for this piece. It’s not just any panel, though—I’ve opted for an oil-primed, medium-weave linen mounted to Baltic birch. This combination provides an ideal texture for capturing the intricate details of an old street scene while offering the stability needed for precise brushwork.
The panel I’m using is manufactured by SourceTek, a reputable company based in the USA. Their products are known for their high quality and consistency, which are crucial factors when creating professional-grade artwork. While I can’t provide a direct link, I encourage you to explore their website to learn more about their range of artist panels.
Sketching the Composition on the Canvas
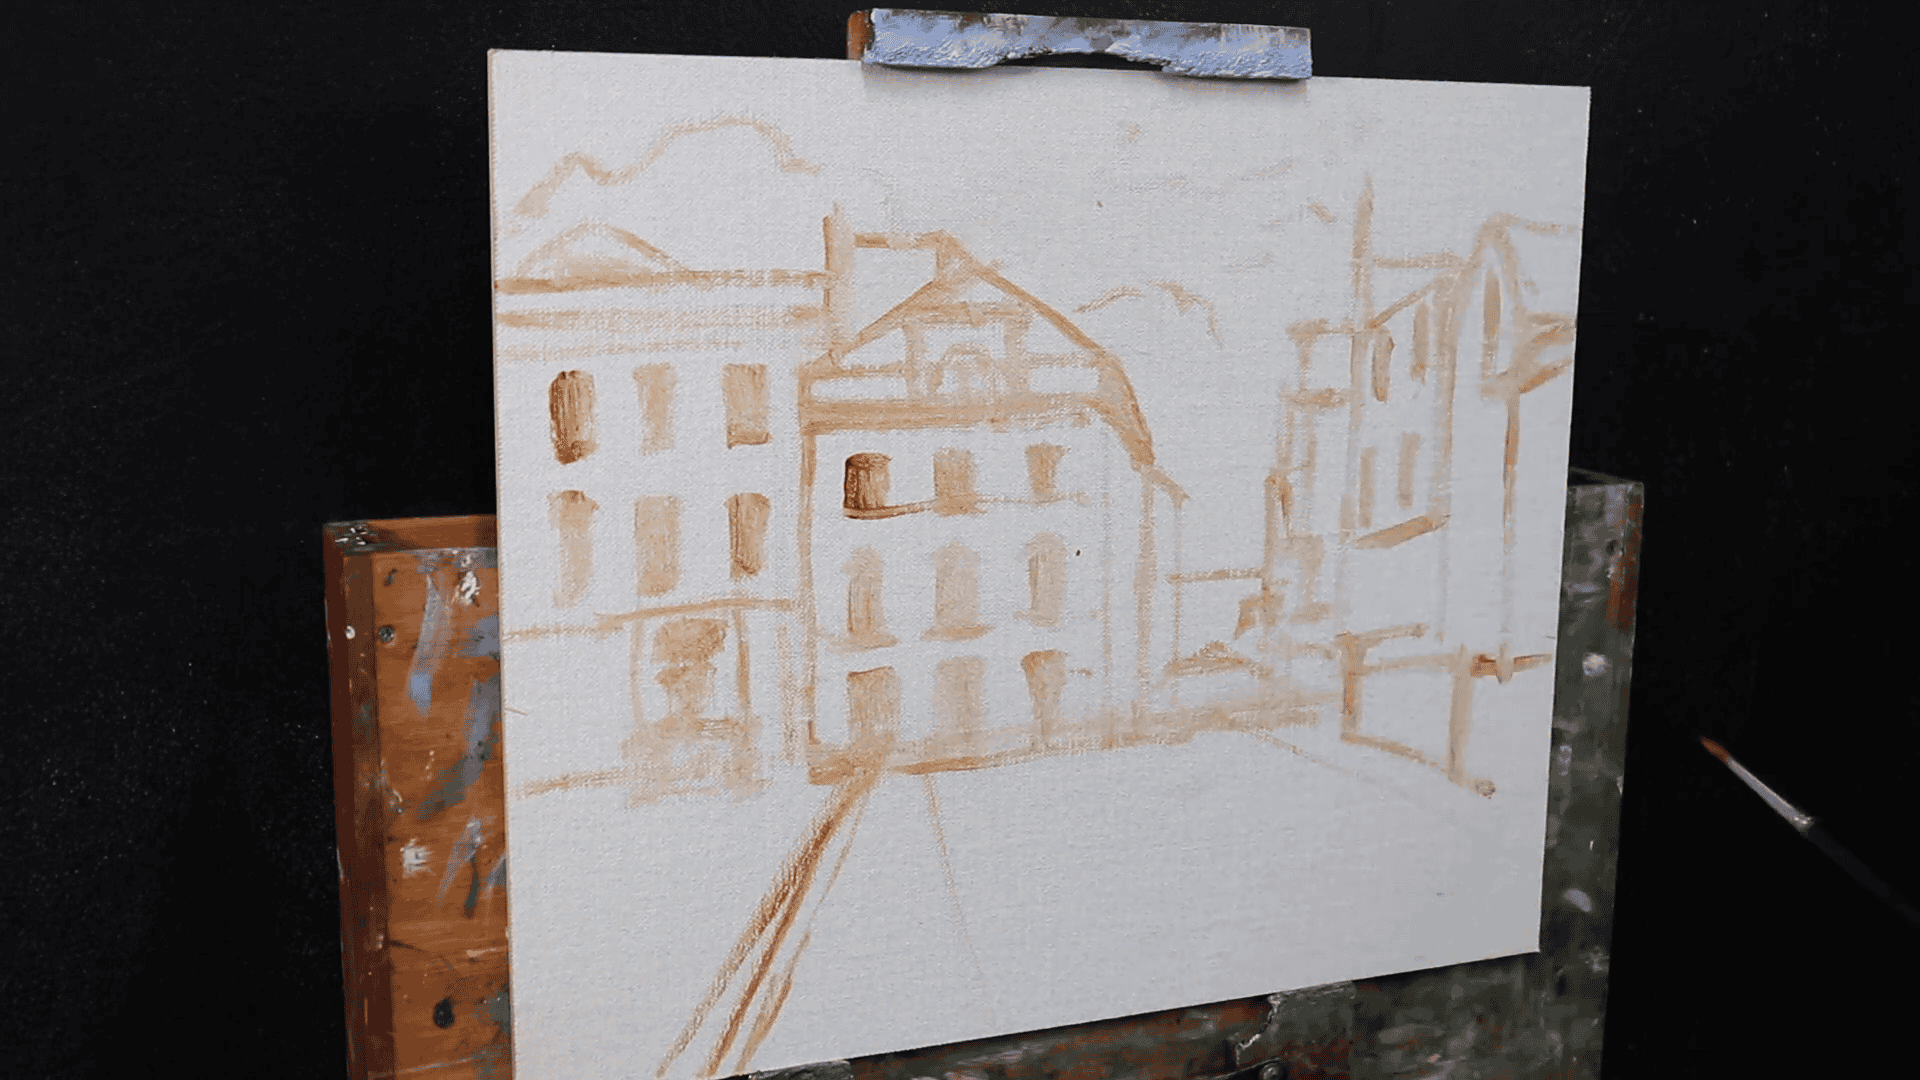
To begin the painting process, I use a mixture of burnt sienna and Liquin Original to sketch out the composition. This combination serves two important purposes:
- Improved Drying Time: Liquin Original is a medium that accelerates the drying process of oil paints. This is particularly useful when laying down the initial sketch, as it allows me to move on to subsequent layers more quickly.
- Enhanced Flow: The addition of Liquin improves the flow of the paint, making it easier to create smooth, precise lines for the architectural elements of our street scene.
Alternative Approaches
While I prefer oils for their rich texture and blending capabilities, this scene can also be effectively rendered using acrylics. If you’re more comfortable with acrylics or are looking for a faster-drying alternative, feel free to adapt this tutorial to your preferred medium.
The key to a successful painting lies not just in the materials you use, but in how you use them. In the next section, we’ll dive into the techniques that will bring our old street scene to life, regardless of your chosen medium.
Finding Inspiration: The Heart of Artistic Creation
Every great painting begins with a spark of inspiration. For me, that spark often comes from other artists and my own personal experiences. In this section, I’ll share the sources of inspiration for our old street scene and guide you through the crucial initial steps of the painting process.
Drawing Inspiration from Masters
As artists, we often find ourselves inspired by the work of others in our field. Recently, I’ve been particularly captivated by Trevor Chamberlain’s paintings. His masterful depictions of urban scenes in England have profoundly impacted my approach to this subject matter.
What draws me to Chamberlain’s work is his ability to capture the essence of a place with a loose and painterly style. His technique allows the viewer to feel the atmosphere of the scene without getting lost in unnecessary details. This approach resonates deeply with my own artistic sensibilities, and I strive to incorporate elements of this style into my work.
Personal Connection to the Subject
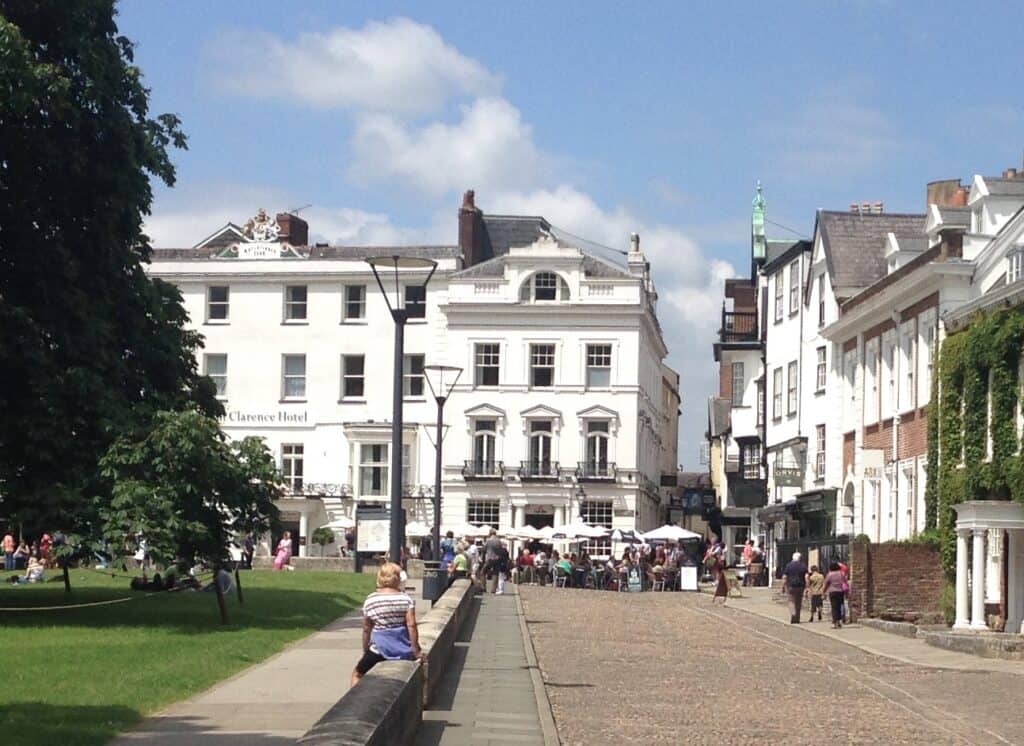
My fascination with old street scenes isn’t just a result of artistic admiration; it’s deeply rooted in my personal history. Having grown up in Exeter, a city in England renowned for its rich historical architecture, I developed a keen eye for the beauty of aged buildings and winding cobblestone streets from a young age.
During a visit to my hometown, I took the opportunity to capture numerous reference photos. These images serve as a bridge between my memories and my art, allowing me to infuse my paintings with both accuracy and emotion.
Choosing the Perfect Reference
Out of the many photos I took, one particular image stood out as the ideal basis for this painting. When selecting a reference photo for an old street scene, consider the following factors:
- Composition: Look for an image with a strong focal point and interesting architectural elements.
- Lighting: Pay attention to the way light and shadow play across the buildings and street.
- Atmosphere: Choose a photo that captures the mood you want to convey in your painting.
- Historical elements: Seek out details that speak to the age and character of the street.
Initial Steps: From Photo to Sketch
With our inspiration and reference photo in hand, it’s time to begin the painting process. Here’s how I approach the initial stages:
- Analyze the composition: Study the reference photo, identifying key elements and areas of interest.
- Simplify: Decide which details to include and which to omit for a more impactful painting.
- Sketch lightly: Using the burnt sienna and Liquin mixture mentioned earlier, create a basic outline of the major shapes and structures.
- Establish values: Indicate the darkest shadows and brightest highlights to guide your painting process.
This initial sketch is just a roadmap. As we progress through the painting, we’ll refine and adjust our composition, always keeping in mind the loose, painterly style that makes old street scenes so captivating.
In the next section, we’ll dive deeper into the techniques for capturing the unique textures and atmospheres that bring an old street scene to life.
Laying the Foundation: Establishing Values and Shadows
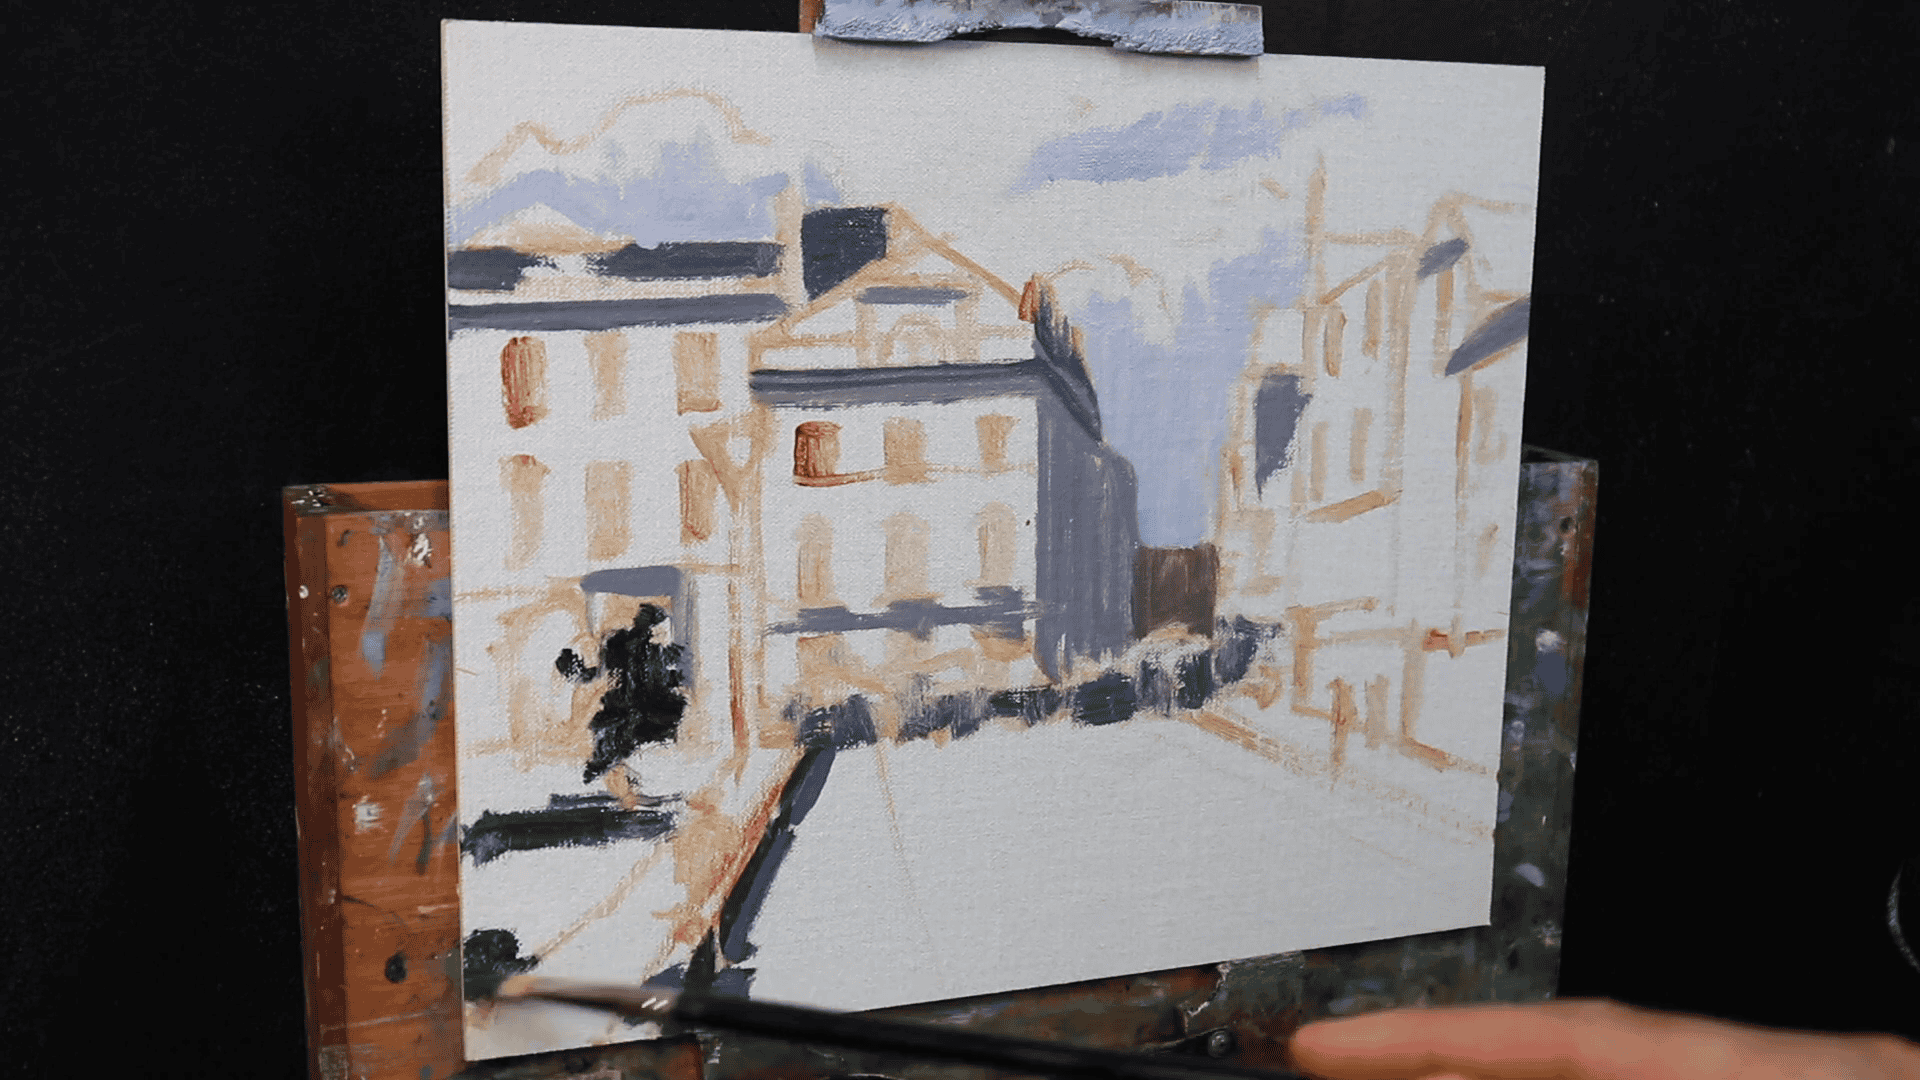
The Importance of Starting Dark
As we begin to bring our old street scene to life, it’s crucial to establish a strong foundation. In this section, I’ll guide you through laying down the initial dark values and shadows, which will serve as the backbone of our painting.
When painting an old street scene, I’ve found that beginning with the darkest values provides several advantages. It helps establish the overall mood and atmosphere, creates a framework for adding lighter values later, and allows for more accurate judgment of color relationships as the painting progresses.
Focusing on the Focal Point
In our street scene, the main focal area is a historical building. By starting with this central element, we can ensure that it receives the attention it deserves and that the rest of the composition supports it effectively.
Creating the Perfect Dark Mix
To achieve the rich, nuanced darks that give old street scenes their character, I use a carefully considered mixture of colors. Here’s my go-to recipe:
- Ultramarine Blue: Provides depth and coolness
- Burnt Sienna: Helps desaturate the color and adds warmth
- Titanium White: Allows for value adjustment
- Alizarin Crimson (occasional): Introduces a subtle violet tint for variety
This combination allows for a range of dark values that can effectively represent shadows, recessed areas, and the weathered surfaces of old buildings.
Technique Tips for Applying Dark Values
When applying these dark values, I recommend using a larger brush to encourage a looser, more painterly style and prevent getting caught up in small details too early. Vary your pressure – lighter touch for softer edges, firmer pressure for more defined areas. Think in shapes, focusing on the overall forms of shadows rather than individual architectural details at this stage. You can always darken areas later, but it’s harder to lighten them, so leave some areas lighter where you anticipate bright highlights.
Building Depth with Violet Tints
The addition of alizarin crimson to create a violet tint is a subtle but powerful technique. Violet shadows can suggest depth and atmospheric perspective, provide a pleasing contrast to the warmer tones that we’ll introduce later, and add interest to prevent the dark areas from appearing flat.
Assessing Your Work
As you apply these dark values, continually step back from your painting to assess the overall effect. This initial stage sets the tone for the entire piece, so take your time to get it right.
In the next section, we’ll explore how to build upon this foundation, adding mid-tones and beginning to bring out the unique textures that make old street scenes so captivating.
Painting the Sky and Background
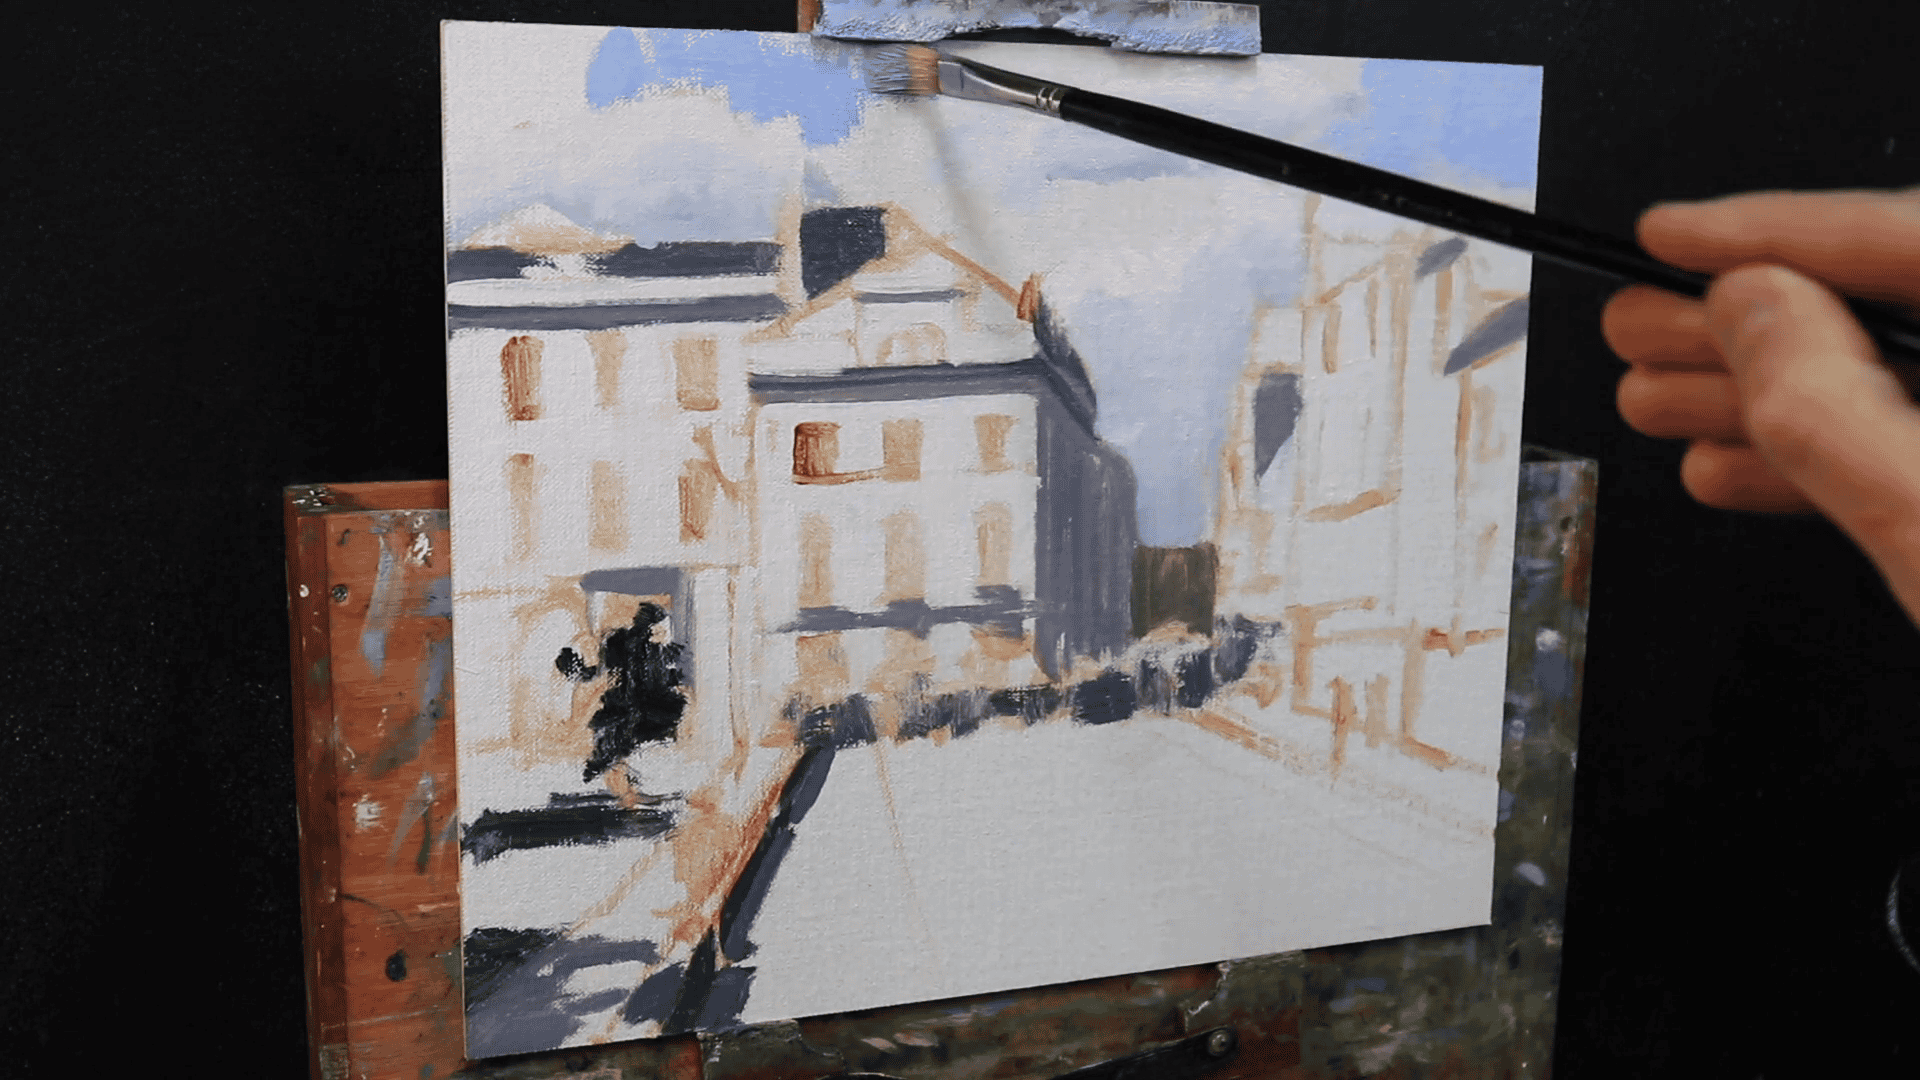
Working from Background to Foreground
In creating a captivating old street scene, establishing a sense of depth is crucial. To achieve this, I always work from the background to the foreground, starting with the sky. This approach allows me to set the stage for the entire composition and ensures that the elements in the foreground will stand out effectively.
Crafting the Perfect Sky Mixture
For the sky in this piece, I use a carefully crafted mixture of ultramarine blue, a touch of phthalo green, and titanium white. This combination creates a soft, atmospheric backdrop that suggests the time of day and weather conditions of our scene. The slight addition of phthalo green helps to neutralize the blue, preventing it from becoming too intense and competing with our focal point.
Creating Natural Color Gradation
As I apply this mixture to the canvas, I pay close attention to the gradation of color. Typically, the sky appears lighter near the horizon and darker overhead. By subtly adjusting the ratio of white in my mixture, I can create this natural gradation, enhancing the sense of depth in the painting.
Maintaining Color Harmony
One of the key principles I follow in my work is maintaining color harmony throughout the painting. This means that the colors used in the sky will influence the palette for the rest of the scene. By incorporating elements of the sky color into the shadows and highlights of the buildings and street, I create a cohesive and believable atmosphere.
The Supporting Role of the Sky
It’s worth noting that the sky in an old street scene often plays a supporting role rather than being the main focus. As such, I aim for a neutral, unobtrusive sky that complements the architectural elements without overshadowing them.
The Power of Neutral Grays
This is where the beauty of using neutral grays comes into play. By varying the mixture of my base colors, I can easily achieve the desired hue and value, allowing for subtle adjustments that support the overall mood of the scene.
Planning for Architectural Elements
As I work on the sky and background, I keep in mind the architectural elements that will be painted later. I leave space for chimneys, rooflines, and any other features that might intersect with the sky. This foresight helps to create a more integrated final composition.
The Key to a Convincing Sky
The key to a convincing sky in an old street scene is subtlety. It should provide context and atmosphere without drawing attention away from the main subject. In the next section, we’ll build upon this foundation, bringing the architectural elements of our street scene to life with mid-tones and highlights.
Capturing Local Color: Bringing Authenticity to Your Scene
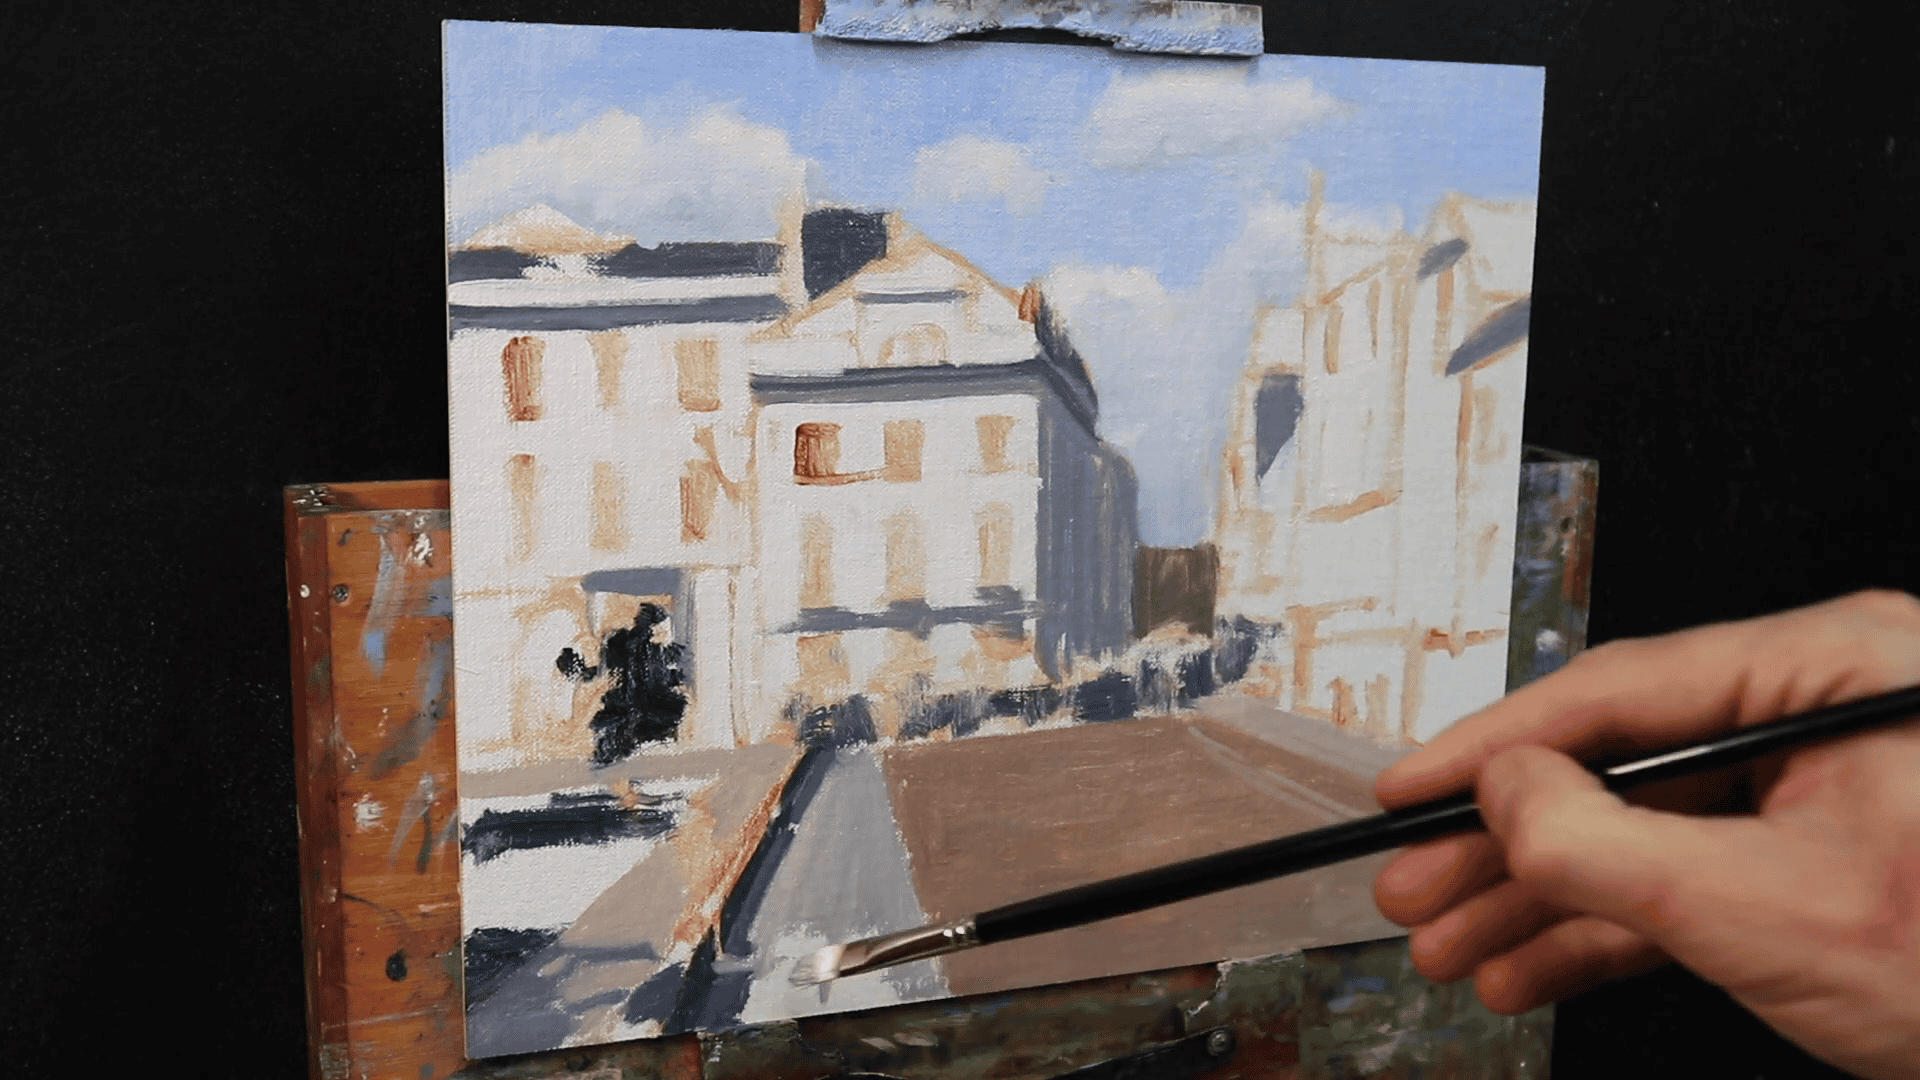
The Importance of Local Color
One of the most powerful tools in an artist’s arsenal when painting a street scene is the use of local color. Local color refers to the actual color of an object under neutral lighting conditions. In our case, it’s the colors that are characteristic of the streets and buildings in Exeter, the city that inspired this painting. By accurately representing these colors, we add a layer of authenticity and regional character to our artwork.
The Palette of Exeter’s Streets
Exeter, like many historical English cities, has a distinct color palette that’s deeply rooted in its architectural heritage. The red bricks that are typical of Exeter’s buildings and streets are a defining feature of the city’s visual identity. To capture this essence, I’ve developed a specific color mixture that I use for the street and cobblestones:
- Burnt Sienna: This provides the base warm, reddish-brown tone that’s characteristic of the bricks.
- Yellow Ochre: Adding this helps to bring in some of the earthy, golden tones often seen in weathered brickwork.
- Titanium White: This is used to adjust the value and create variations in tone.
- Ultramarine Blue: A touch of this helps to cool and neutralize the mixture where needed.
The key is to blend these colors in varying proportions to create a range of hues that accurately represent the varied tones of the bricks and cobblestones. Some areas might be more reddish, while others have a more golden or even slightly purple hue depending on how they’ve weathered over time.
Applying the Local Color
When applying this mixture to the street and cobblestones, I use a combination of techniques:
- Base Layer: I start with a general wash of the mixed color, laying down the foundational tone for the street.
- Texture Building: Using a dry brush technique, I layer on variations of the mixture to suggest the uneven surface of cobblestones.
- Shadow and Light: I adjust the mixture with more ultramarine blue for shadowed areas, and more titanium white and yellow ochre for areas catching the light.
- Weathering Effects: To suggest years of wear, I add subtle variations in color. A touch more burnt sienna in some spots can indicate newer repairs, while a bit more blue and white can suggest areas worn smooth by years of foot traffic.
The goal isn’t to paint each individual cobblestone, but to create the impression of a textured, aged surface that feels authentic to Exeter’s streets.
Integrating with the Rest of the Scene
As you apply these local colors to the street and cobblestones, keep in mind how they interact with the rest of your painting. The reflections from the red bricks will influence the color of shadows on nearby surfaces and may even tint the underside of overhanging architectural features.
By thoughtfully incorporating these local colors, we’re not just painting a generic old street – we’re capturing a slice of Exeter’s unique character and history. This attention to regional detail is what can elevate a good painting to a great one, allowing viewers to feel as if they’re truly standing on an Exeter street, surrounded by centuries of history.
Adding Details and Texture
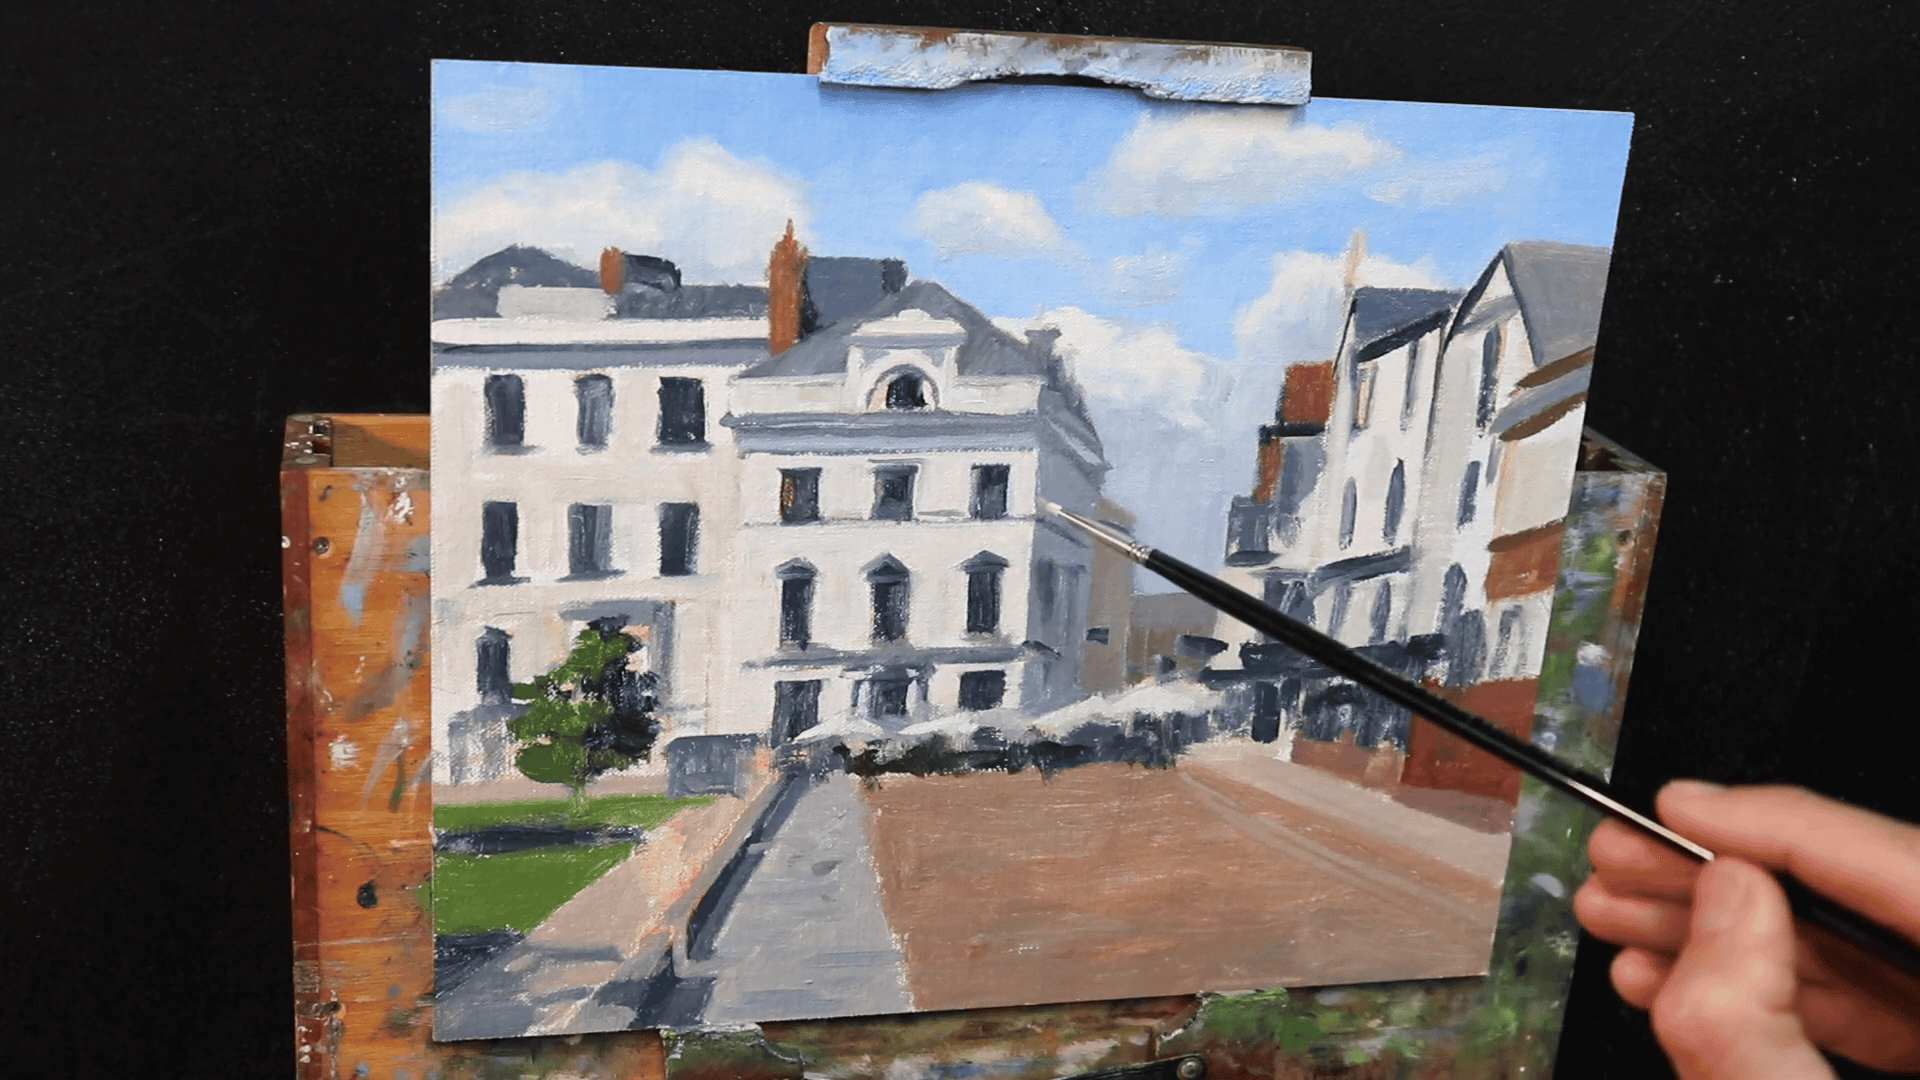
Building Up the Architectural Elements
With our background established, it’s time to bring the heart of our old street scene to life – the buildings. This stage is where the character of our scene really begins to emerge, as we add the details and textures that make old architecture so captivating.
I start by focusing on the sunlit areas of the buildings. It’s tempting to reach for pure titanium white at this stage, but I’ve learned that restraint here pays dividends later. Instead, I create a mixture of titanium white, ultramarine blue, burnt sienna, and a dash of alizarin crimson. This combination gives me a range of warm and cool light tones that are perfect for capturing the play of sunlight on old stonework and brick.
Why avoid using the brightest whites too early? I’ve developed this technique over years of landscapes. By holding back on the purest whites, I give myself room to add those final bright highlights that really make a painting pop. These last touches of pure white will create the illusion of sunlight glinting off window panes or catching the edge of a weathered cornice.
Techniques for Texturing Old Surfaces
When painting an old street scene, texture is key to conveying the age and character of the buildings. Here are some techniques I use to achieve this:
- Dry brushing: I load a relatively dry brush with paint and drag it lightly over the surface. This technique is excellent for suggesting the rough texture of old brick or stone.
- Stippling: For finer textures, like the pitted surface of old concrete, I use a stippling technique. This involves gently tapping the canvas with the tip of the brush, building up texture through many small marks.
The goal here isn’t photorealistic reproduction but rather to capture the essence and feeling of these old structures. Let your brushstrokes be visible – they add to the painterly quality that makes oil paintings so appealing.
As you work on the details, continually step back from your painting to assess the overall effect. It’s easy to get lost in the minutiae, but we want to ensure that these details are serving the composition as a whole.
In the next section, we’ll look at how to bring all these elements together, adding the final touches that will really make our old street scene come alive.
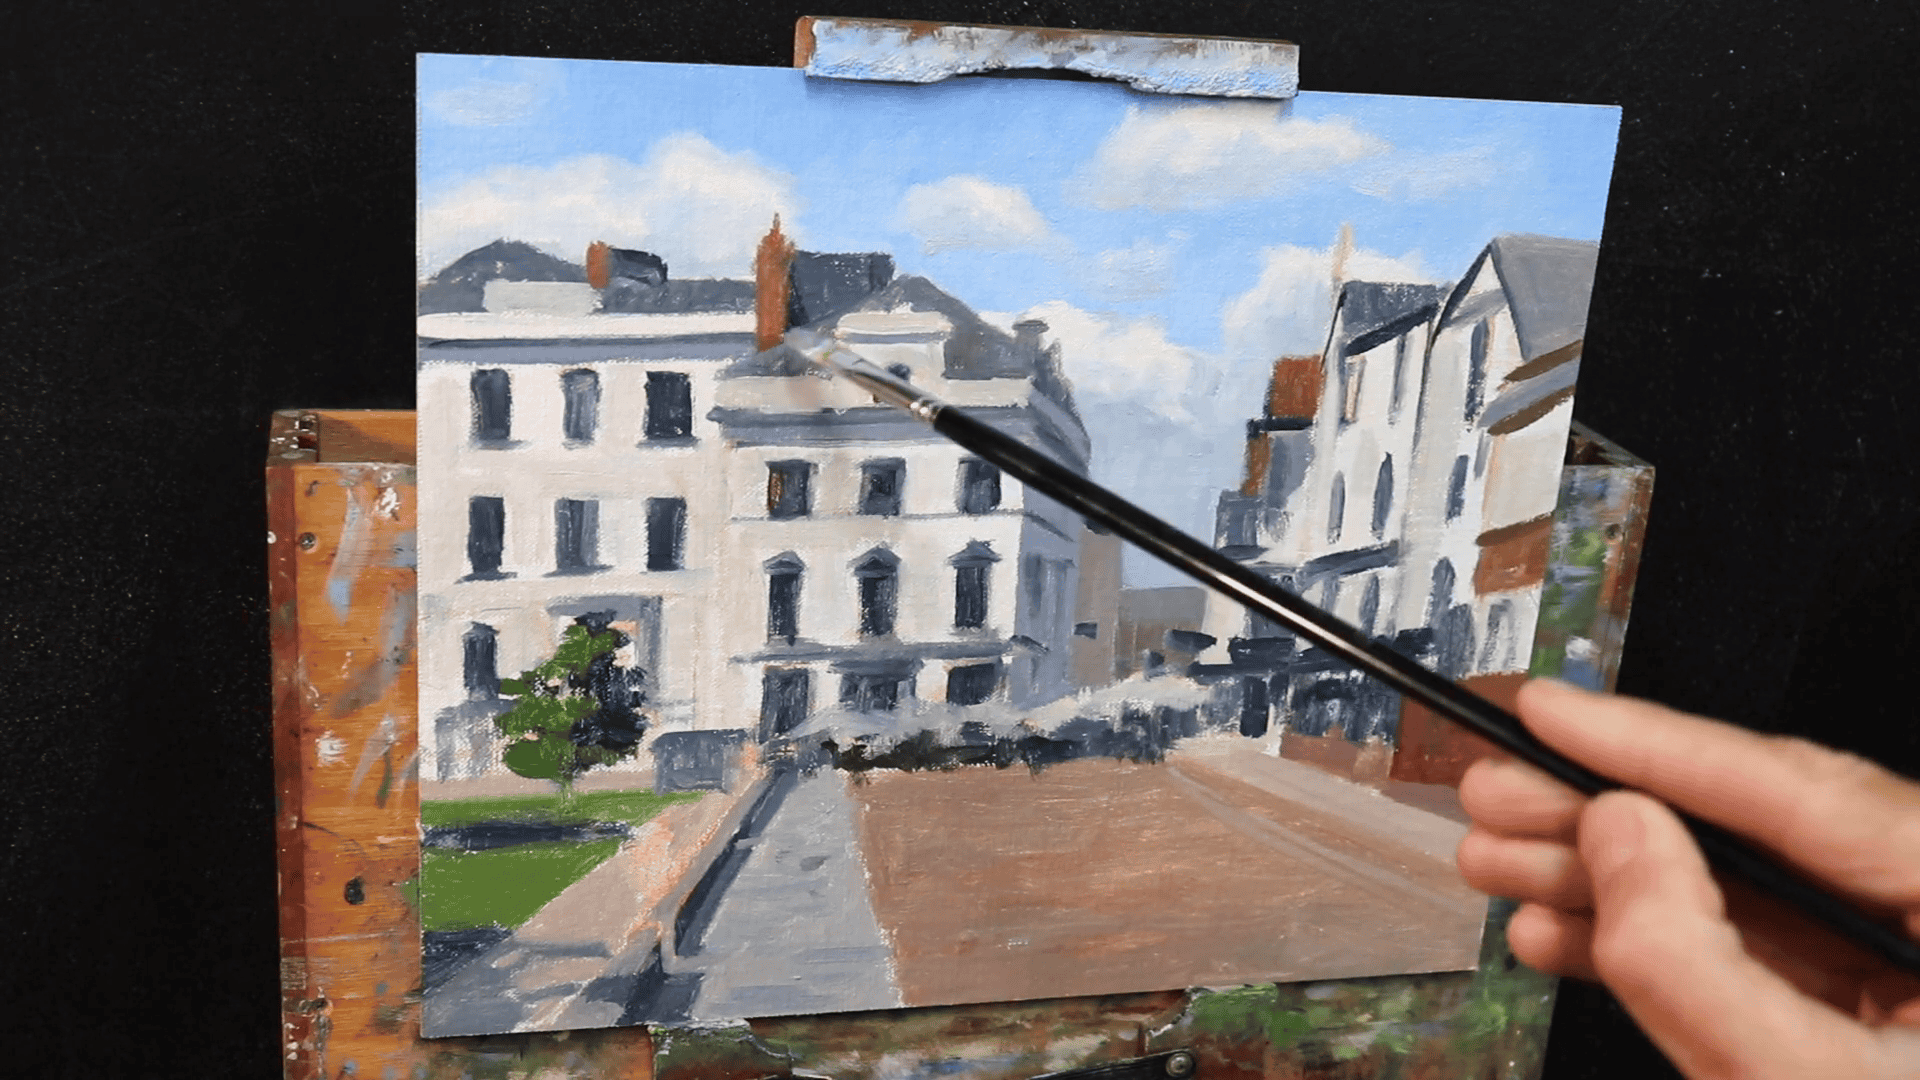
Painting Greenery: Adding Life to Your Street Scene

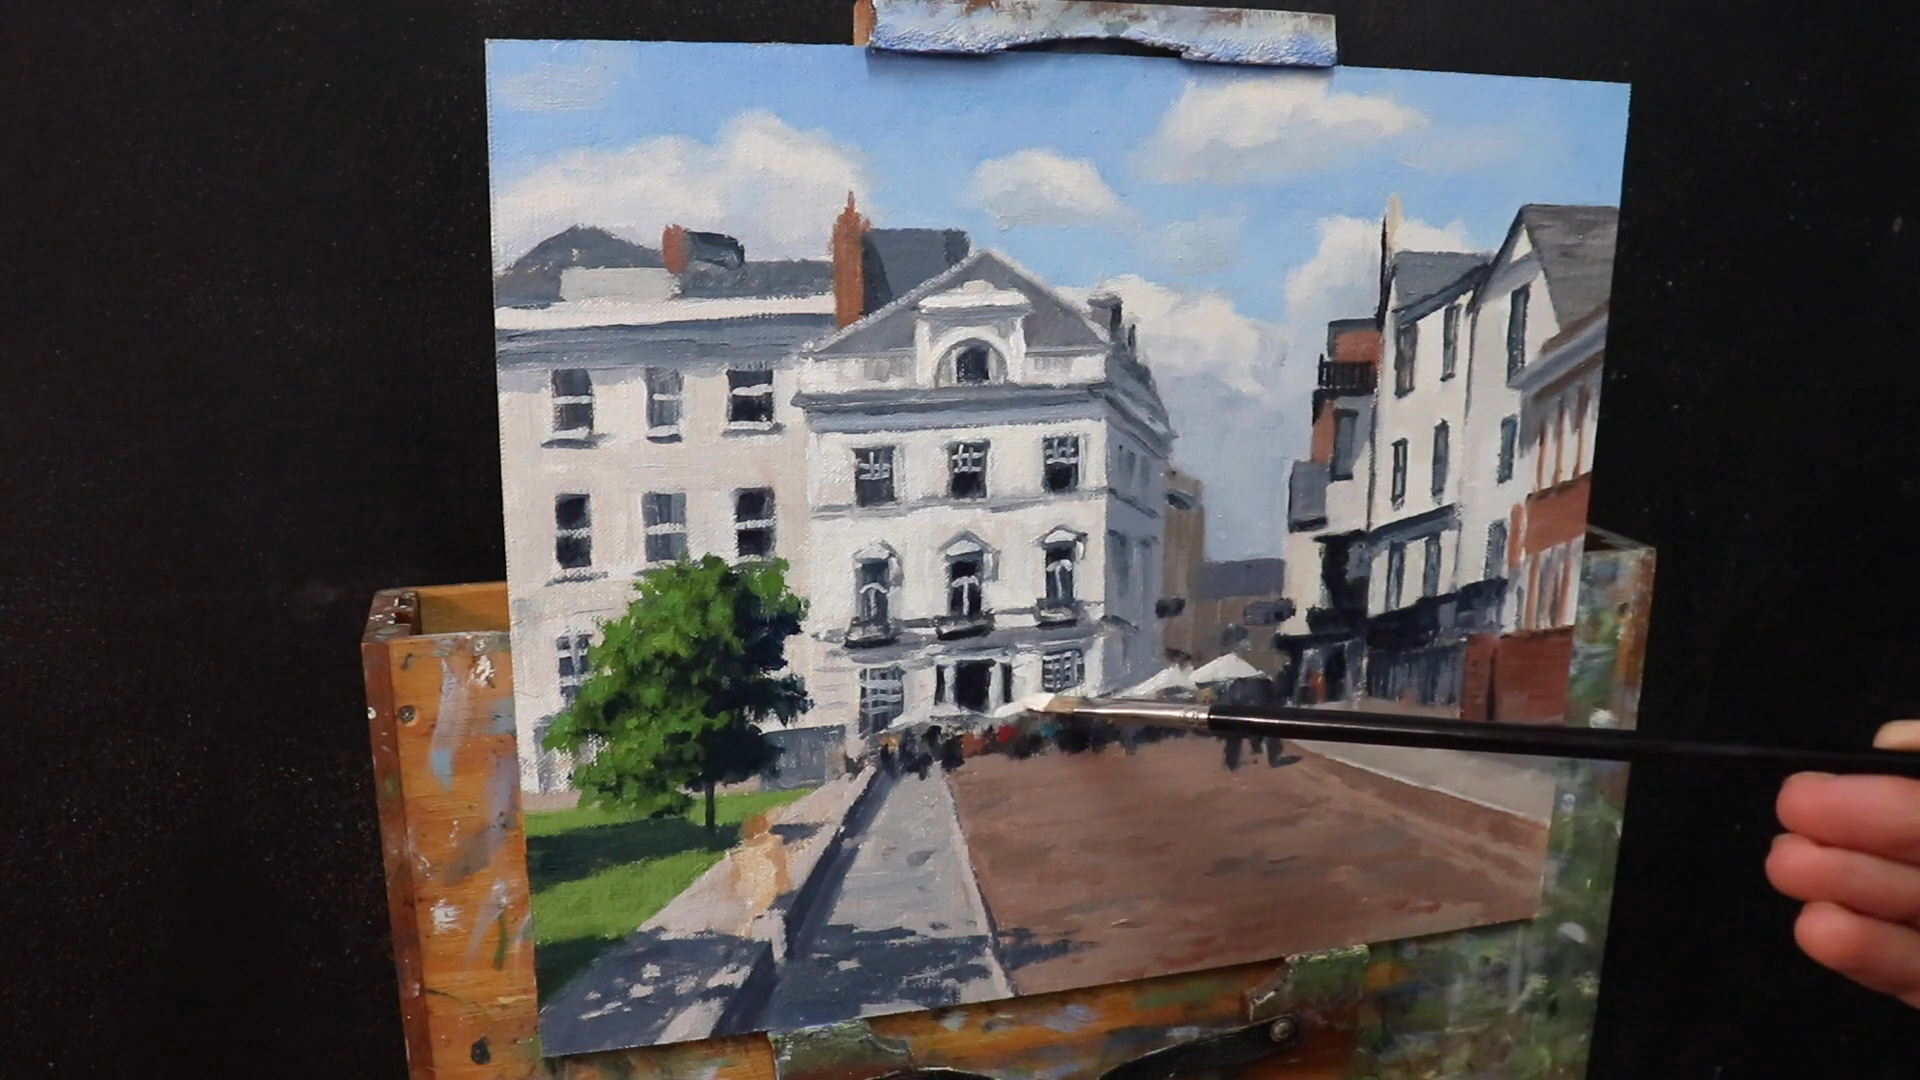
The Role of Foliage in Urban Landscapes
While buildings and cobblestones form the backbone of our old street scene, it’s the addition of greenery that truly breathes life into the painting. Trees, shrubs, and other vegetation not only add visual interest and color contrast but also help to soften the hard edges of urban architecture, creating a more inviting and dynamic composition.
In our Exeter street scene, we’re focusing on a horse chestnut tree on the left side of the painting. This majestic tree species, common in English cities, will serve as a focal point and add a touch of nature to our urban setting.
Creating a Natural Palette
To capture the lush, varied tones of foliage, I use a carefully crafted mixture of colors:
- Shadow Areas:
- Ultramarine Blue
- Yellow Ochre
This combination creates a rich, deep green that’s perfect for the shadowed areas of the foliage. The yellow ochre adds warmth and prevents the shadows from appearing too cool or artificial.
- Highlights:
- Cadmium Yellow
- Phthalo Green
- A touch of Cadmium Red (for balance)
For the areas of the foliage catching the light, I introduce cadmium yellow and phthalo green. The cadmium yellow brings brightness and warmth, while the phthalo green provides intensity. However, green can quickly become overwhelming in a painting, which is why I incorporate a small amount of red into the mixture. This helps to neutralize the green slightly, preventing it from looking too vivid or unnatural.
Techniques for Painting Foliage
When applying these colors to create convincing foliage, I employ several techniques:
- Layering: I start with a base layer of the shadow color, then gradually build up lighter tones. This creates depth within the foliage.
- Dabbing: Using a bristle brush, I dab on paint to create a textured effect that suggests clusters of leaves.
- Dry Brushing: For highlights, I use a dry brush technique to lightly drag brighter colors over the base layers lightly, suggesting leaves catching the sunlight.
- Edge Variation: I vary the edges of the foliage mass, creating some sharp edges and some soft, to give a natural, organic feel.
- Color Variation: Within the foliage, I introduce subtle variations in color. This might include touches of burnt sienna to suggest early autumn colors, or hints of pure yellow to indicate new growth.
Integrating the Greenery
As you paint the horse chestnut tree, consider how it interacts with its surroundings:
- The tree will cast shadows on nearby buildings and the street. These shadows should contain a hint of green, reflecting the color of the leaves.
- Branches peeking through the foliage can be suggested with quick, dark strokes.
- Consider how the light filtering through the leaves might create dappled patterns on the ground or buildings.
The goal isn’t to paint every leaf, but to create the impression of a lush, living tree that complements and enhances our street scene. The horse chestnut, with its broad canopy and distinctive palmate leaves, adds a quintessentially English touch to our Exeter streetscape.
By thoughtfully incorporating this greenery, we add another layer of depth and interest to our painting, creating a harmonious balance between the natural and built elements of our old street scene.
Detailing the Buildings: Bringing Architecture to Life
The Art of Selective Detail
When it comes to painting buildings in an old street scene, the management of details is crucial. It’s a delicate balance between providing enough information to convey the character and age of the structures, while avoiding an overly static or photorealistic look. As the famous saying goes, “It’s not about what you put in your painting, but what you leave out. Simplifying your scene can make your painting look more lively.”
This approach to selective detail is at the heart of creating a painting that captures the essence of an old street without becoming bogged down in minutiae. Let’s explore how to achieve this balance.
Tools of the Trade
My choice of brushes plays a significant role in how I approach detailing buildings:
- Blocking-in Stage: For the initial stages, I rely on larger flat brushes. I’m particularly fond of Rosemary & Co. brushes for this purpose. Their quality and versatility allow me to lay down broad strokes of color efficiently, establishing the basic shapes and values of the buildings.
- Fine Details: As I progress to adding finer details, I switch to smaller brushes. A number zero synthetic round brush is my go-to for elements like window panes, railings, and other architectural intricacies. Its fine tip allows for precise control, essential for these delicate touches.
Techniques for Architectural Details
Here’s how I approach different elements of the buildings:
- Walls and Facades:
- I start with broad strokes to establish the base color and tone.
- Then, I use a dry brush technique to suggest texture, whether it’s the roughness of stone or the weathered look of old brick.
- Windows:
- I begin by painting the overall shape of the window as a dark area.
- Then, I add lighter touches to suggest reflections or the play of light on glass.
- For window frames, I use my fine brush to add crisp, straight lines.
- Architectural Features:
- For elements like cornices, doorways, or decorative stonework, I first establish their basic shape with a medium brush.
- Then, I go in with a smaller brush to add highlights and shadows that bring out their three-dimensional quality.
- Weathering and Age:
- To convey the age of the buildings, I add subtle variations in color and tone.
- I might use a stippling technique to suggest areas of worn stone or flaking paint.
The Power of Suggestion
The key is not to paint every brick or stone, but to suggest them. A few well-placed lines or dabs of color can imply a wealth of detail without explicitly depicting it. This approach not only saves time but also engages the viewer’s imagination, allowing them to fill in the gaps and connect with the painting on a deeper level.
Creating Focal Points
Not all parts of a building need equal attention. I choose one or two areas to make my focal points – perhaps an intricate doorway or a particularly weathered section of wall. These areas receive more detailed treatment, while the rest of the building is painted more suggestively.
Final Touches
As I near completion, I step back frequently to assess the overall effect. Are the details supporting the composition as a whole? Is there a good balance between areas of high detail and more broadly painted sections? These final adjustments are crucial in ensuring that the detailed elements enhance rather than overwhelm the painting.
By following these principles, you can create buildings that feel authentic and lived-in, full of character and history, without getting lost in excessive detail. The result is a lively, engaging street scene that captures the essence of old Exeter while maintaining a fresh, painterly quality.
Final Touches and Highlights: Bringing Your Street Scene to Life
Refining the Light and Shadow
As we approach the final stages of our painting, it’s time to focus on the elements that will truly make our old street scene come alive. This is where we add those crucial highlights and refine the details that will give our painting depth, atmosphere, and a sense of lived-in realism.
Highlighting Building Facades
I create a lighter mix using titanium white with a touch of yellow ochre for the white areas of buildings. This warm white helps to suggest sunlight hitting the walls without appearing too stark or flat. I apply these highlights with deliberate brush strokes, paying attention to the direction of the light source to ensure consistency across the painting.
Varied Rooftop Colors
Rooftops offer a great opportunity to add visual interest and suggest different materials and weathering:
- For terracotta or clay tiles, I use more burnt sienna to achieve a warm, reddish tint.
- For slate or older tiles, I lean towards ultramarine blue mixed with a bit of burnt umber for a cooler tone.
- I vary these colors slightly across different buildings to avoid monotony and suggest age differences.
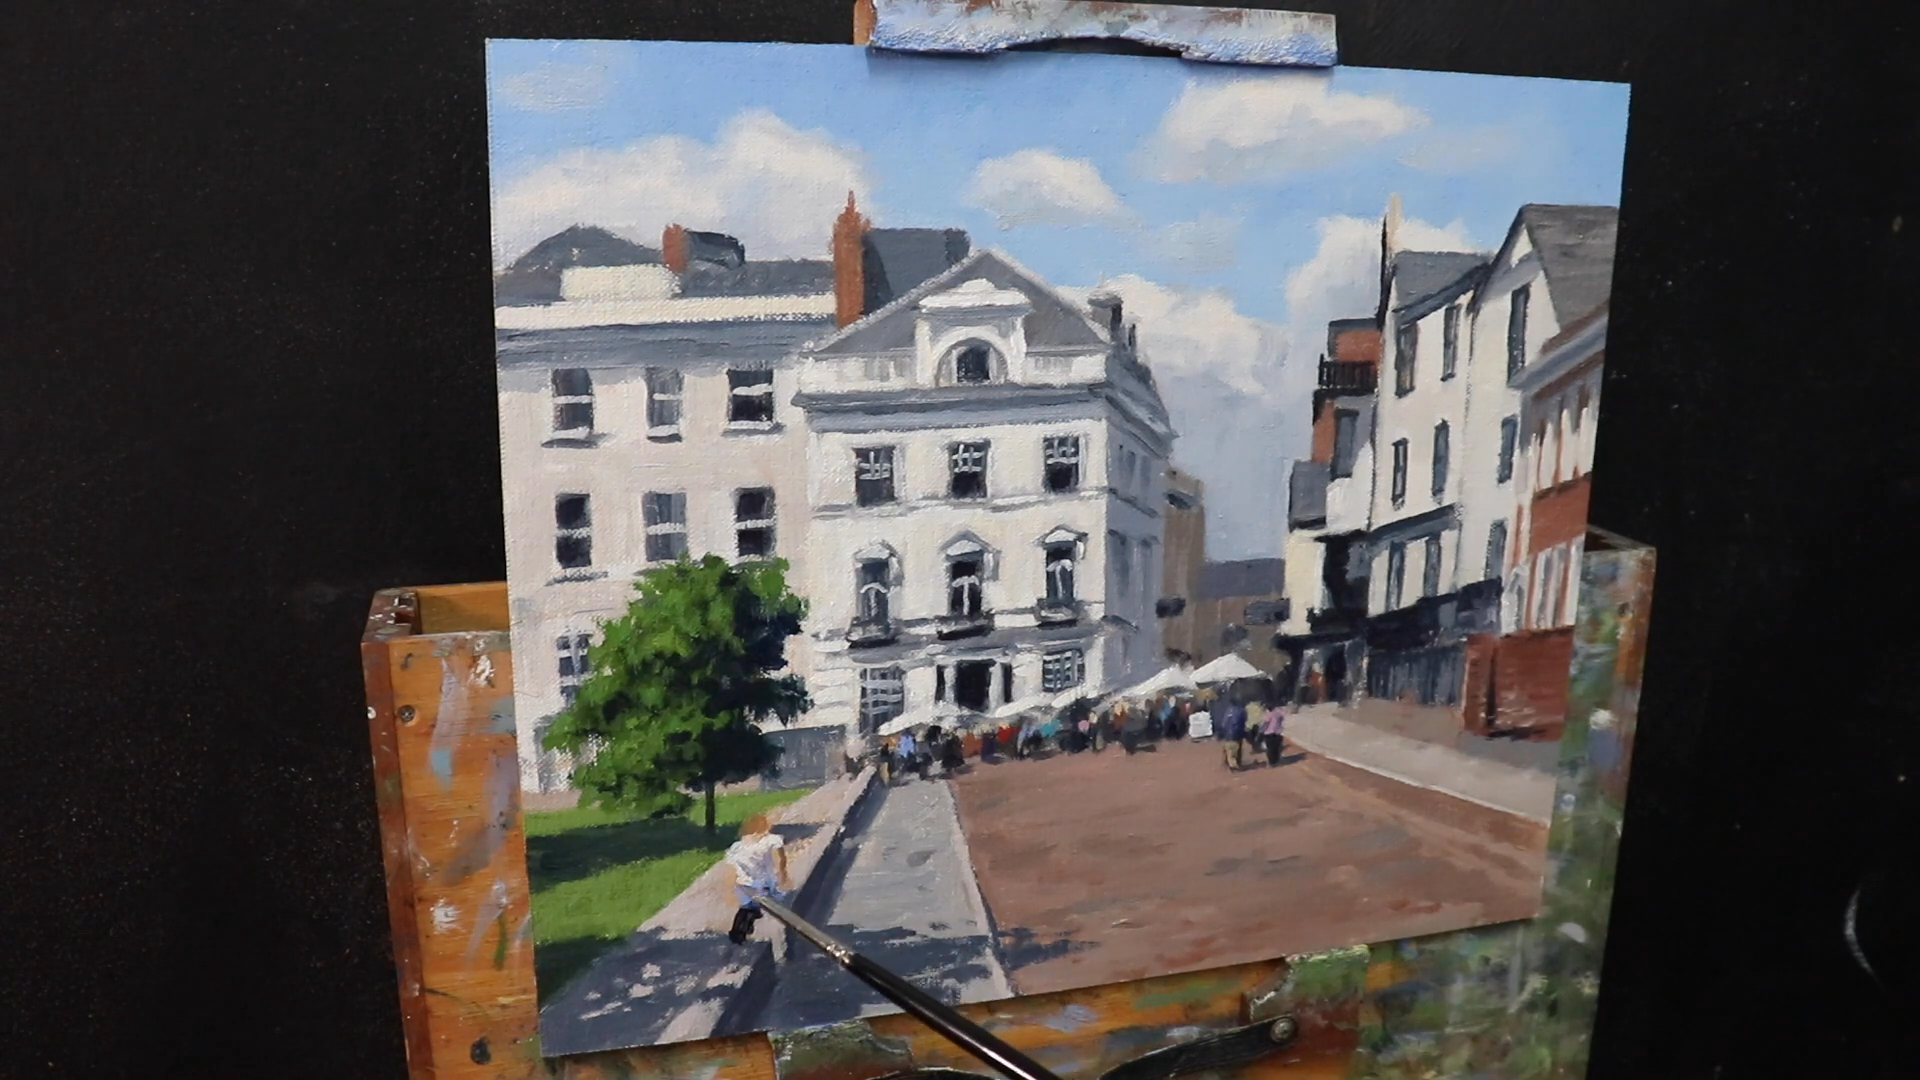
Adding Life to the Scene
People and Movement
No old street scene is complete without the human element. Adding people and umbrellas brings a sense of scale and life to our painting:
- I use my smallest brushes for these details, often a 00 or even 000 size.
- When painting figures, I focus on capturing the essence of their form and movement rather than precise details.
- For umbrellas, a few well-placed strokes of color can suggest their shape and add points of interest throughout the composition.
Atmospheric Effects
To enhance the overall mood of the scene:
- I might add a light glaze over certain areas to unify the color scheme or suggest atmospheric haze.
- Small touches of pure white can suggest glints of sunlight on metal or glass surfaces.
- Softening some edges, particularly in the distance, can enhance the sense of depth.
The Importance of Fresh Perspective
One technique I’ve found invaluable is to leave the painting for a few days and return to it with fresh eyes. This break allows me to see the work anew and notice areas that might need adjustment:
- I might spot areas where the contrast needs boosting or where colors need to be harmonized.
- Sometimes, I realize that certain details can be simplified for a more cohesive overall effect.
- This fresh perspective often reveals the final touches needed to truly complete the piece.
Final Harmonization
The last step is to ensure all elements of the painting work together harmoniously:
- I check that the color palette is consistent throughout, adjusting any areas that seem out of place.
- I ensure that the level of detail is balanced, with more focus on the focal points and less on peripheral areas.
- I make sure the overall values create a pleasing composition, adding darkest darks or lightest lights if needed.
These final touches are what transform a good painting into a great one. It’s about refining and enhancing what’s already there, not adding unnecessary details. As you make these final adjustments, keep in mind the overall atmosphere and mood you want to convey in your old street scene.
By taking the time to carefully consider and apply these final touches, you’ll create a painting that not only captures the physical details of an old Exeter street but also evokes the feeling of standing there, immersed in its history and character.
Conclusion: Capturing History on Canvas

The Rewards of Painting Street Scenes
As we wrap up this guide on painting an old street scene, it’s worth reflecting on why these subjects are so captivating for both artists and viewers alike. Street scenes, particularly those depicting historical settings, offer a unique opportunity to capture not just a visual representation, but the very essence of a place and its rich history.
The Allure of Historical Street Scenes
- Storytelling Through Art: Each brushstroke contributes to telling the story of the street, its buildings, and the generations who have walked its paths.
- Preserving Memory: These paintings serve as visual records, preserving the character of places that may change over time.
- Connecting Past and Present: By painting historical scenes, we create a bridge between the past and the present, allowing viewers to step back in time.
- Technical Challenge: The complexity of architectural details, varying textures, and the play of light in street scenes provides a satisfying technical challenge for artists.
- Personal Interpretation: While based on real locations, these paintings allow for personal interpretation and artistic license, blending reality with the artist’s vision.
Inspiration for Fellow Artists
To those inspired to try their hand at painting similar scenes:
- Start with places you know well or have a personal connection to – your familiarity will shine through in your work.
- Don’t be intimidated by complex architecture, it’s about capturing the feeling of the place, not creating an architectural drawing.
- Experiment with different times of day or weather conditions to find what resonates with you.
- Consider sketching on location if possible, to capture the immediate feel of the place.
- Most importantly, enjoy the process of discovery as you bring these historical streets to life on your canvas.
Continuing Your Artistic Journey
For those eager to delve deeper into these techniques and explore more aspects of painting, I invite you to join me on Patreon. There, you’ll find full-length tutorials uploaded monthly, offering in-depth insights into my painting process, techniques, and tips for tackling various subjects and challenges in oil painting.
Every great painting starts with a single brushstroke. Whether you’re a beginner or an experienced artist, I hope this guide has inspired you to pick up your brush and start capturing the charm and character of old street scenes. Happy painting!
Painting street scenes, particularly old historical ones, can be incredibly rewarding. They offer a chance to capture the essence of a place and its history. Through our brushes, we breathe life into the weathered stones, aged bricks, and time-worn cobblestones that have witnessed countless stories unfold.
As we’ve explored in this guide, creating a compelling old street scene involves more than just technical skill. It requires a keen eye for detail, an understanding of light and shadow, and the ability to selectively simplify complex scenes. We’ve journeyed through the process of laying the foundational values, building up the architectural elements, incorporating local color, adding life with greenery, and finally, refining our work with those crucial final touches.
The goal isn’t to create a photorealistic representation, but rather to evoke the feeling and atmosphere of the place. Your painting should invite viewers to imagine themselves standing on that street, feeling the history around them, hearing the echoes of footsteps on cobblestones, and sensing the stories held within those old walls.
I hope this guide has inspired you to try your hand at painting similar scenes. Whether you’re capturing the quaint streets of Exeter or bringing to life the historical charm of your own hometown, remember that each painting is a unique interpretation filtered through your artistic vision.
