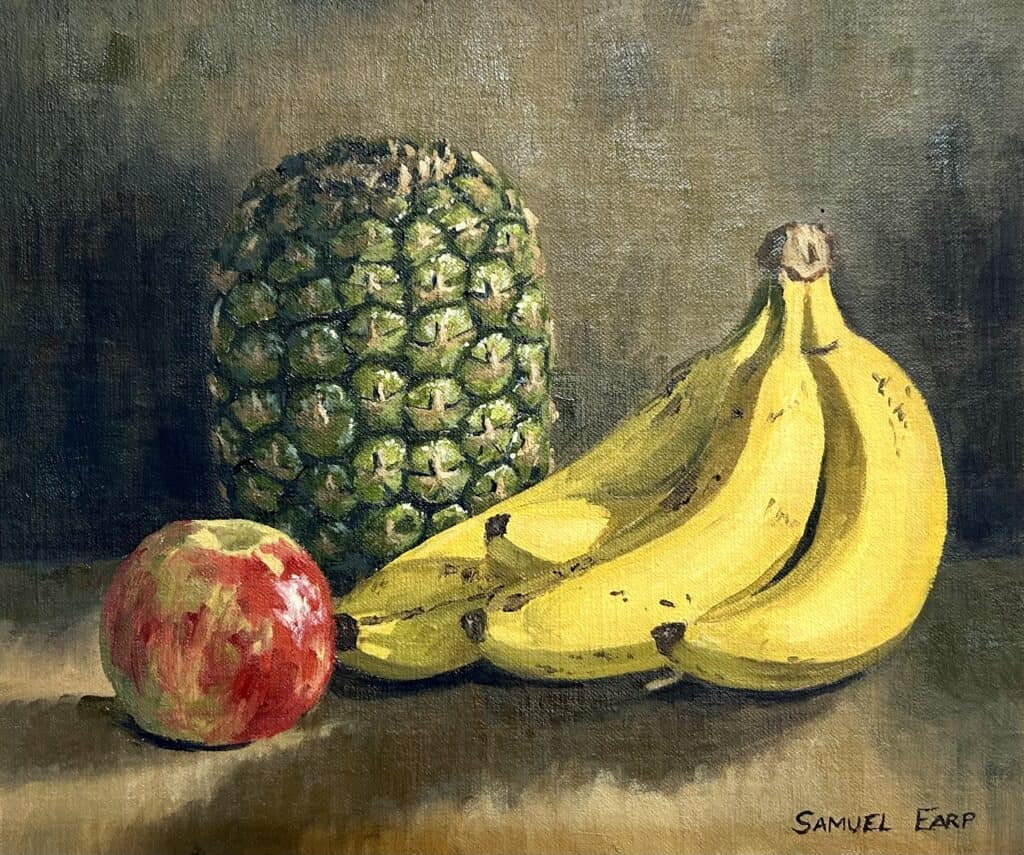
Have you ever looked at a still-life painting and wondered how the artist created such a breathtaking work of art? Many artists love to paint this type of subject, and whether a beginner or an experienced painter, this painting demonstration is for you.
In this painting guide, I show you step-by-step how to paint a still life with an arrangement of fruit, including pineapple, apple and bananas. I take you through each step of the painting process of a still life, from the supplies you will need to master brushwork techniques.
You’ll learn how to create the color palette used for this artwork and tips for adding depth to your painting. By the end, you’ll have everything you need to start creating stunning still-life paintings and, hopefully, some new techniques. So grab your brushes and get started.
Suitable for oils and acrylics.
Bookmark this post on Pinterest!
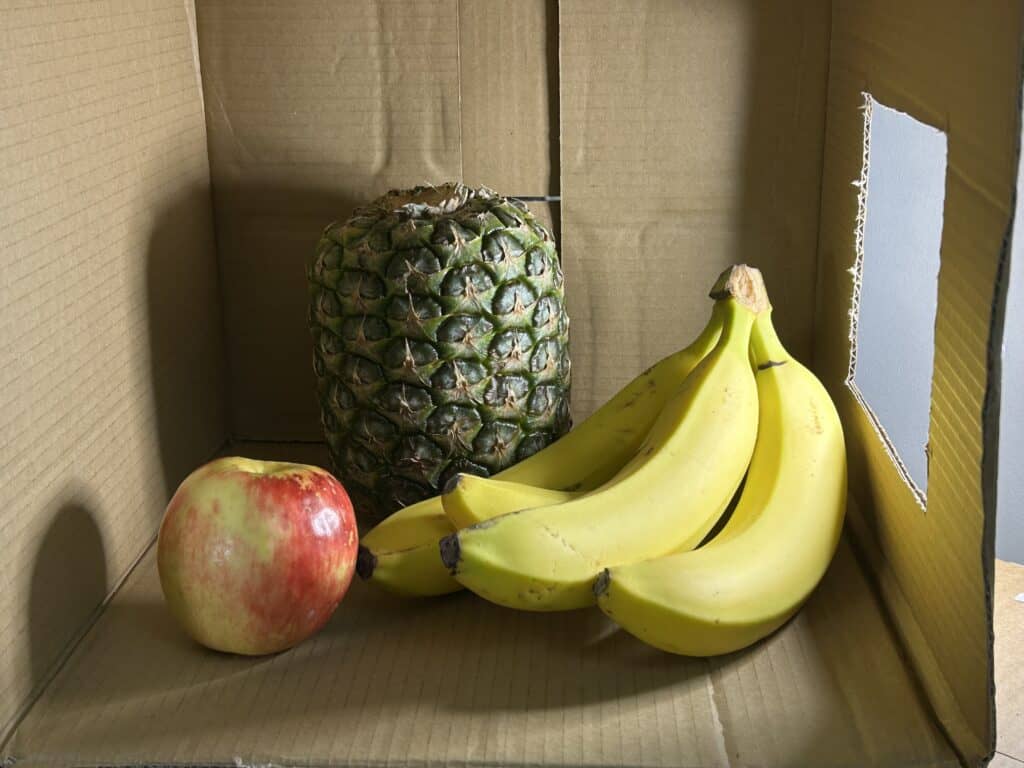
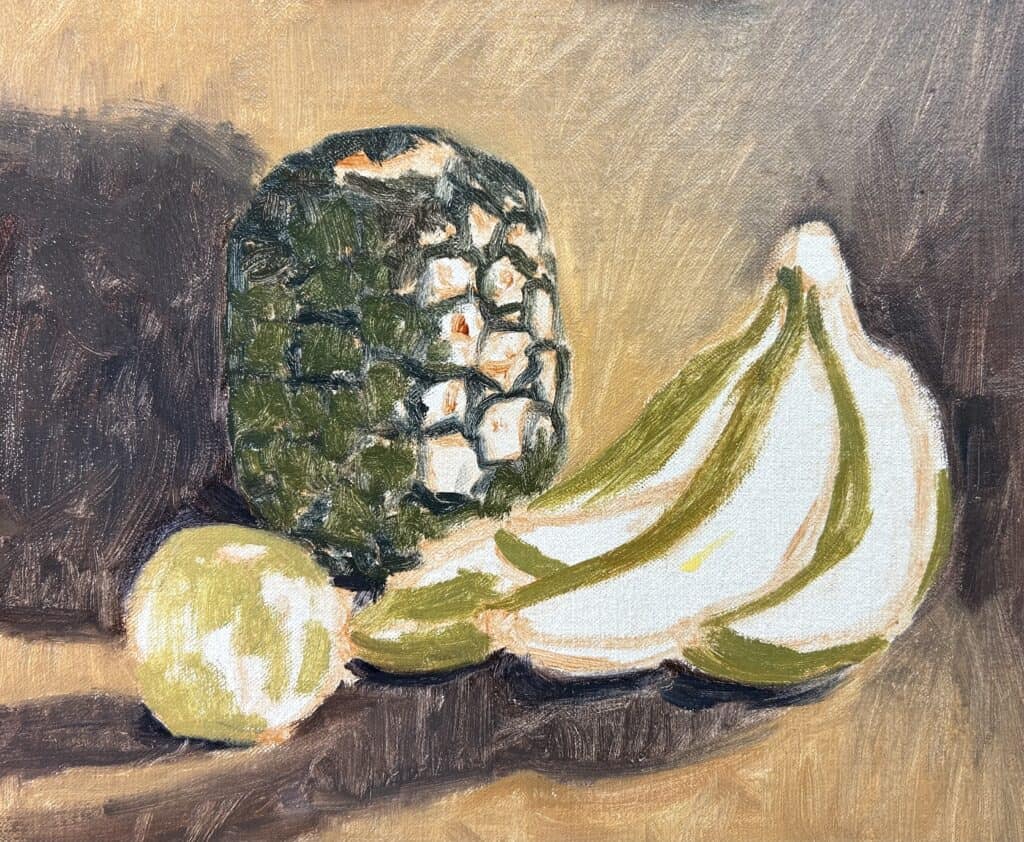
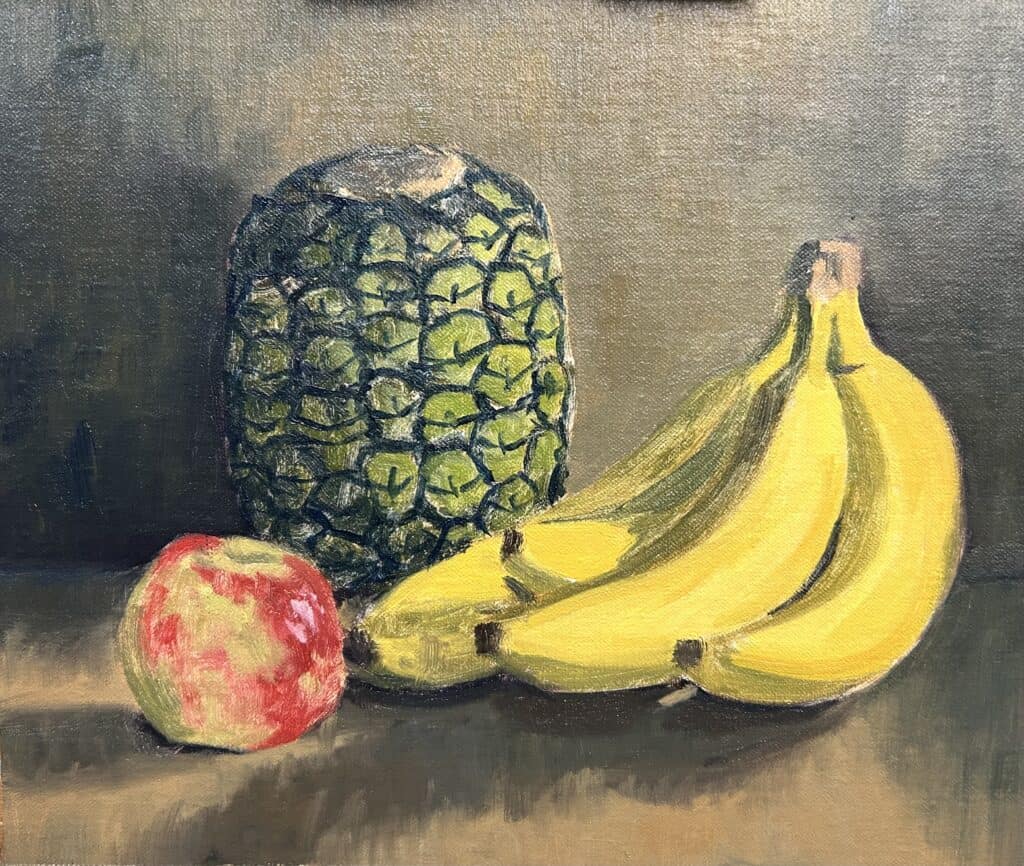
Reference Photo
Whilst I painted this still life painting from life I still took some reference photos. Feel free to use this photo if you would like to paint this yourself.
Choosing Your Painting Supplies
Still life’s are excellent subjects to paint and, throughout history has always been a popular subject.
There are often everyday objects around your home that you can paint but before diving into your own still life or art, choosing the right supplies is essential. Here are some tips for selecting your painting supplies:
1. Choose the right paint:
I have used oil paints for this painting, but you could easily paint something like this in acrylics instead.
If you are painting this using oils, I recommend using artist-quality oil paint, even if you have never painted before in your life. Artist’s quality oils go further, the quality is much higher than a student’s paint and you will have a much better painting experience.
2. Pick the Right Brushes
Different brush shapes and sizes work better depending on the type of painting techniques and styles you are using. Generally, you’ll want a variety of brushes to create different textures and strokes.
Flat and Filbert brushes are great for creating bold, loose brush strokes for large shapes and textures. Rounds, daggers and synthetic brushes are excellent for fine detail.
3. Select your canvas
The type of canvas you choose will affect the texture and overall feel of your painting. I prefer to paint on Belgian linen, but a good-quality canvas will work just as well.
You can paint on stretched canvas, panels and even loose canvas which you can tape to a board.
4. Gather additional materials
In addition to paint and brushes, you will need an easel, palette, a palette knife (optional), and rags. Make sure you are painting in a well-ventilated space using oil paint.
Creating Your Color Palette
Choosing the right colors is essential when painting a still life. I prefer a simple limited palette of colors as it makes color mixing and harmony much easier to achieve.
Colors Used
I painted this artwork using oil paint and the colors I used in this particular painting are as follows:
Titanium white
Burnt sienna
Yellow ochre
Cadmium yellow
Cadmium red
Alizarin crimson
Ultramarine blue
Phthalo green
Brushes
Here is a list of the brushes I used in this painting:
No.5 flat
No.3 flat
No.2 flat
No.3 filbert
No.1 round
No.0 round
1/4″ synthetic dagger

Setting Up Your Still Life
Create a Lightbox
Consider the lighting in your workspace and the overall atmosphere you want to convey in your painting.
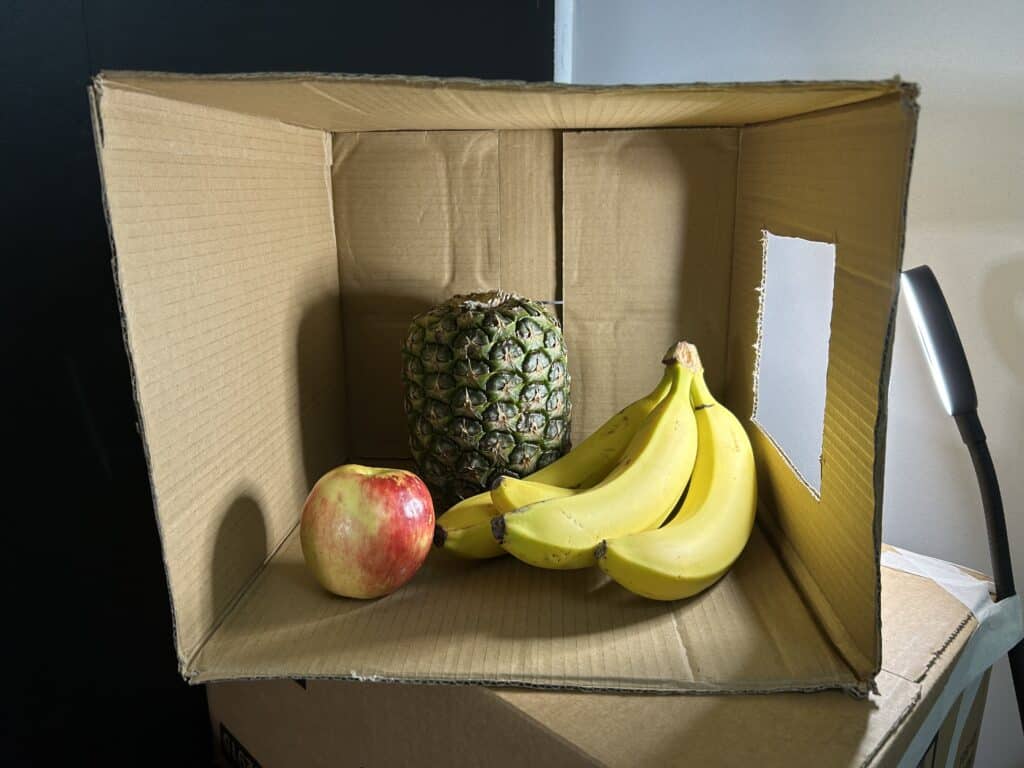
I created a lightbox for my still life using a cardboard box with a hole cut out in the side. I then set up a ring light next to it so the light could shine through the opening.
I painted fruit for this still life, and the ring light I used will cast a good amount of light on the fruit to create some highlights, halftones, and shadows.
Composition
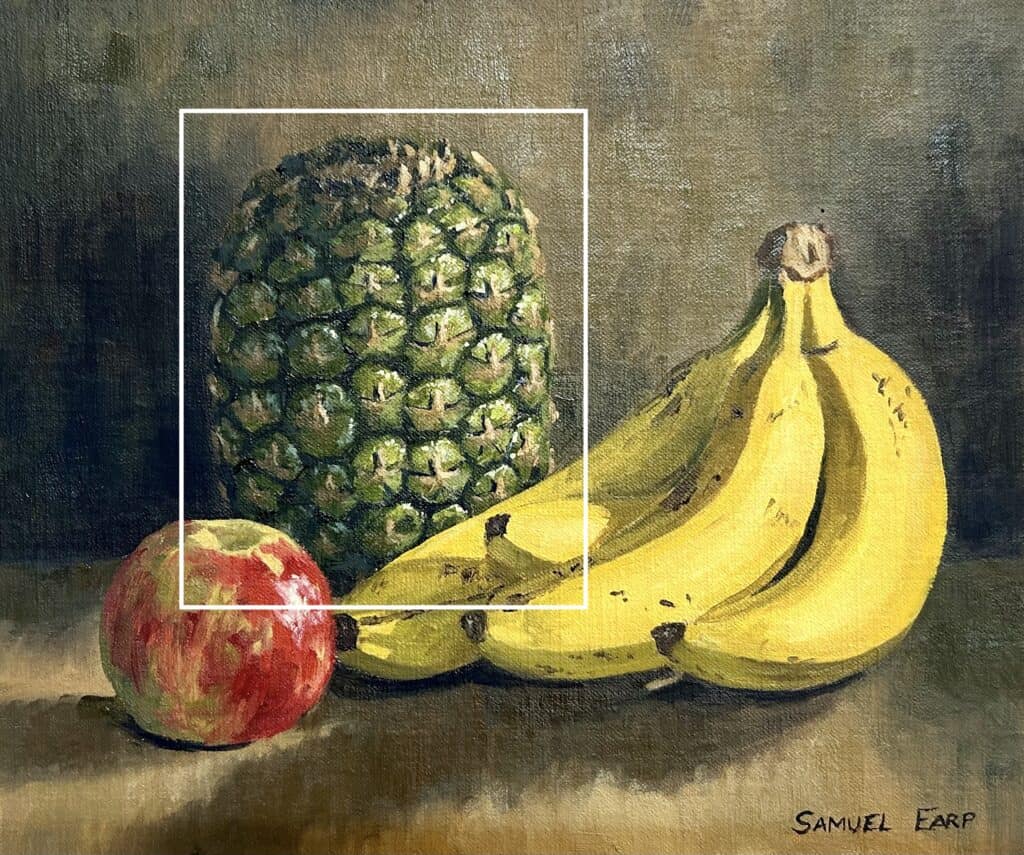
In this artwork, I have made the pineapple the main focal area of the painting and placed it left of center. The bananas also draw the eye into the picture.
As I was painting from life, I was able to paint direct from the image of the composition I had created with my fruit arrangement.
Sketching
Normally if I am painting landscapes or seascapes for example, before diving into actually painting, it’s important to sketch out your composition first. This will help you plan out the placement of each object and ensure that the proportions are correct.
Things to Avoid in Composition
Never have your focal area in the middle of the composition, as this causes a displeasing static in the painting.
Learn More About Composition
If you would like to learn more about composition, check out this article:
5 Composition Ideas to Improve Your Landscape Painting
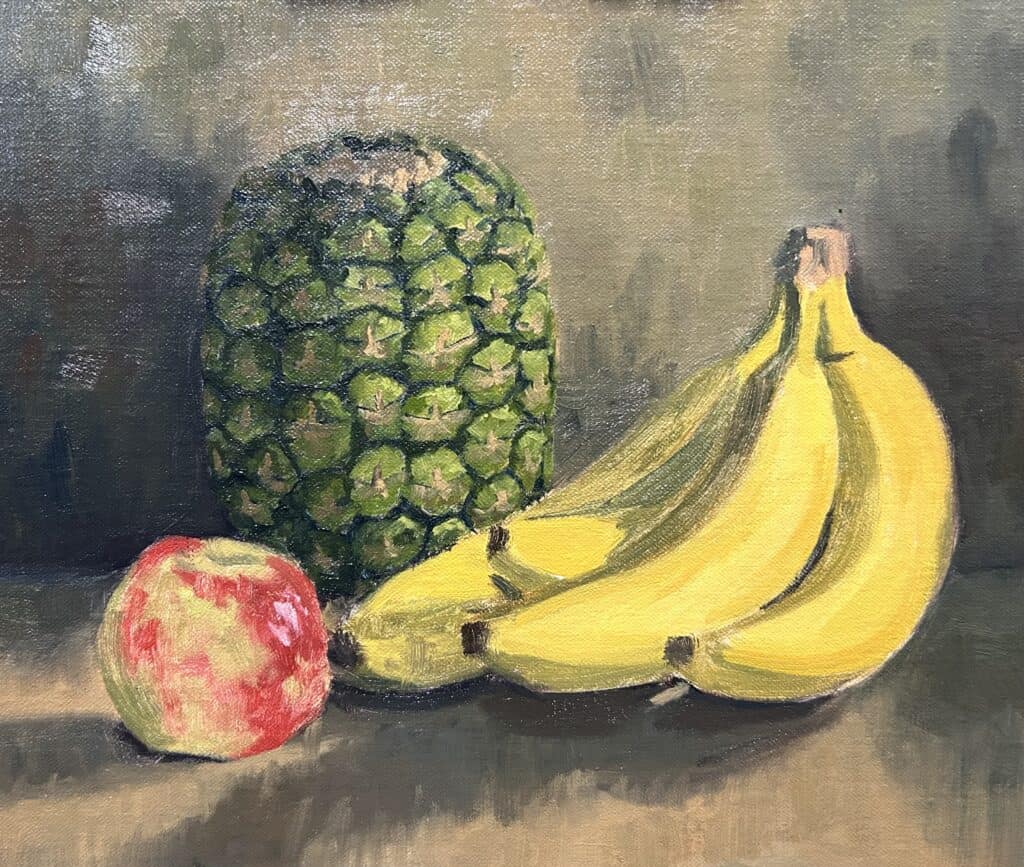
Painting Your Still Life
Step 1: Sketching the Composition on Your Canvas
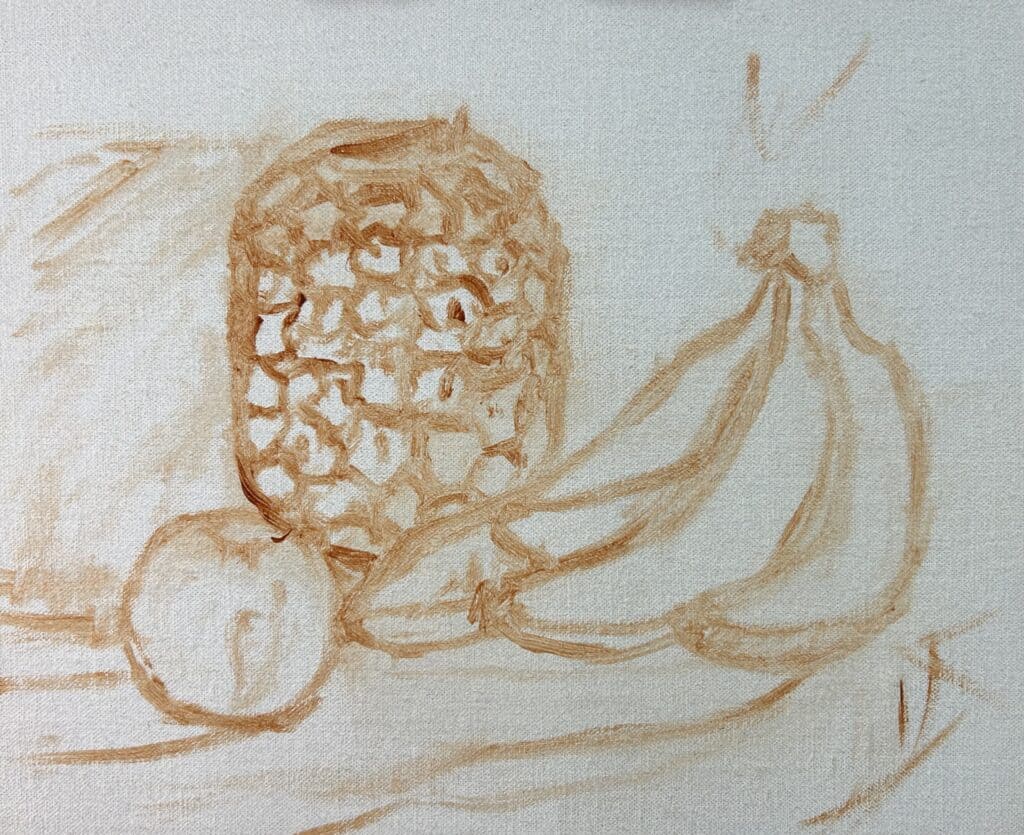
I am painting on a 10″ x 12″ medium weave, oil-primed Belgian linen mounted to a panel.
I sketched out my composition using burnt sienna mixed with Liquin Original, which helps to speed up the drying time and thins out the paint.
Step 2: Blocking-In the Painting
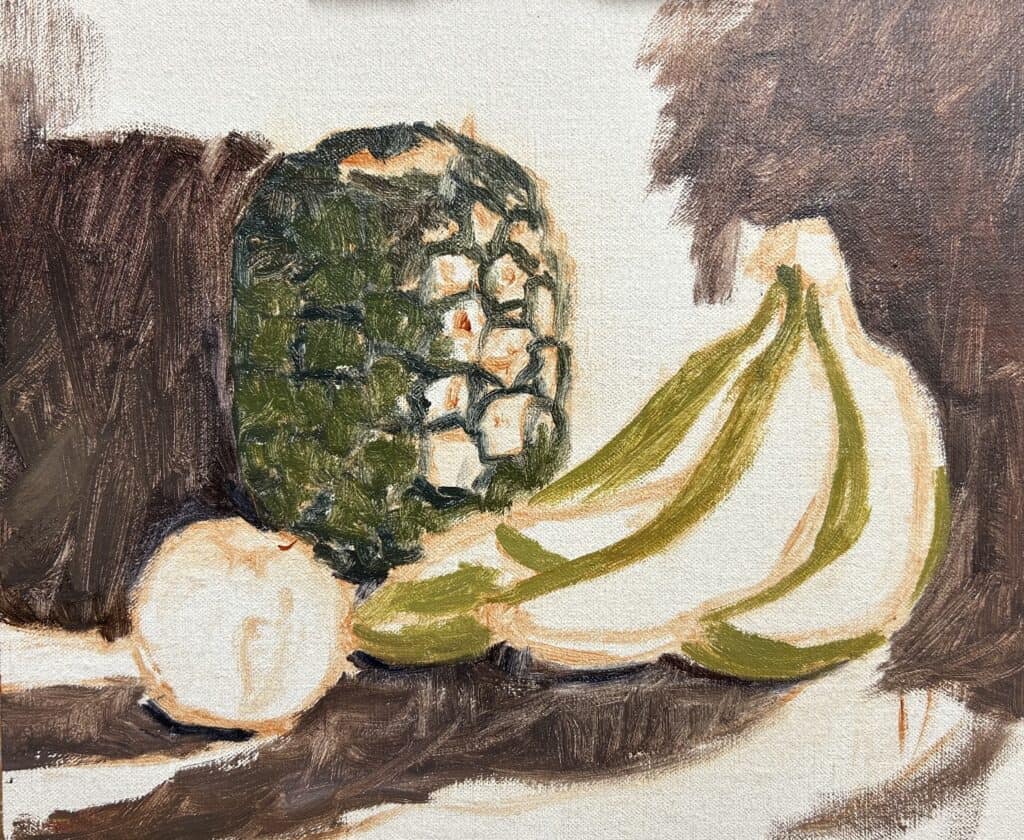
I begin blocking-in the painting by starting with the background. I’ve used a mix of ultramarine blue with burnt sienna, alizarin crimson and a little titanium white.
For the shadows in the pineapple, I used to mix ultramarine blue with yellow ochre, a little cadmium yellow, and a little titanium white. I’ve also used the same colors for the shadows in the bananas but with more titanium white in the mix.
Step 3: Painting the background
I paint the background areas that are in light using a mix of yellow ochre, ultramarine blue, burnt sienna and titanium white.
I apply the paint using a No.5 bristle flat brush and making broad gestural brush marks.
ARE YOU STRUGGLING WITH YOUR PAINTING?
JOIN MY ONLINE ART SCHOOL AND UNLEASH YOUR INNER ARTIST.
- Step-by-Step Painting Tutorials
- Helpful Tips and Techniques
- In-depth lesson notes
- Inspiring reference photos
- Instant access to all content, including videos, lesson notes, reference photos and more.
- A vibrant and friendly community, meet other members, ask questions, and share your art.
- Zoom meetings for Q&A’s, painting critiques and painting livestreams.
- Ideal for beginners and experienced painters.
- Lots of inspiration, help and support to take your painting skills to the next level.
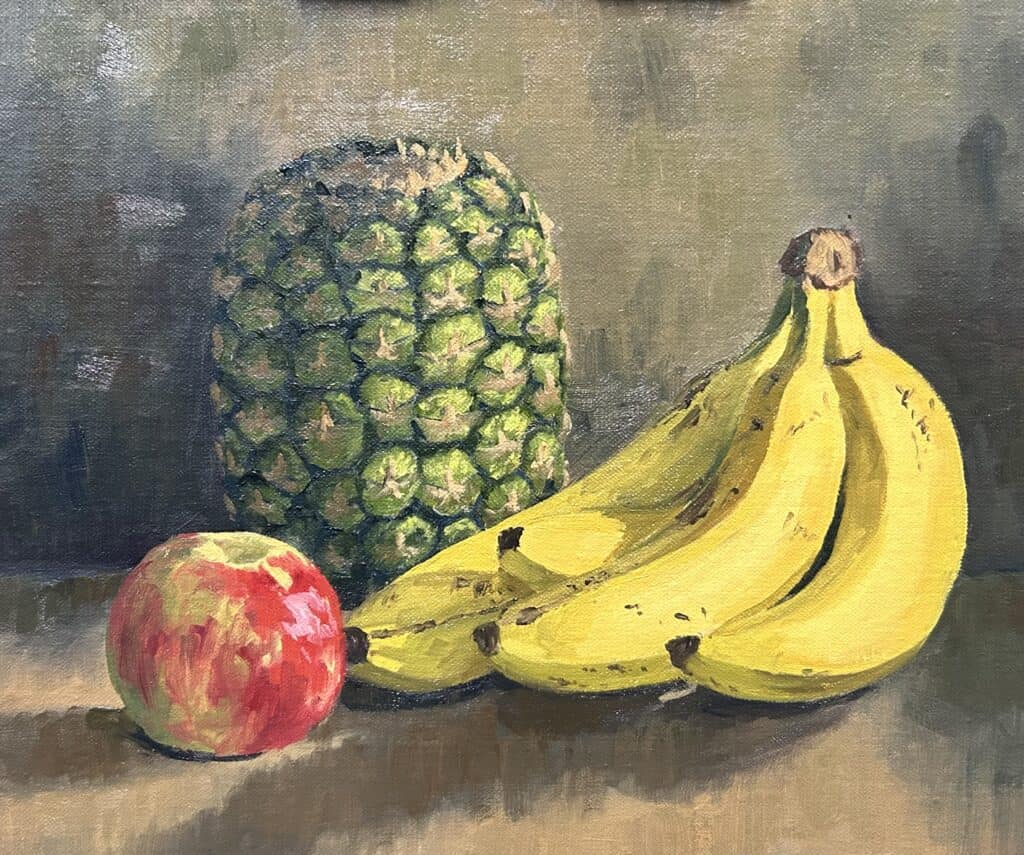
Step 4: Painting the Fruit
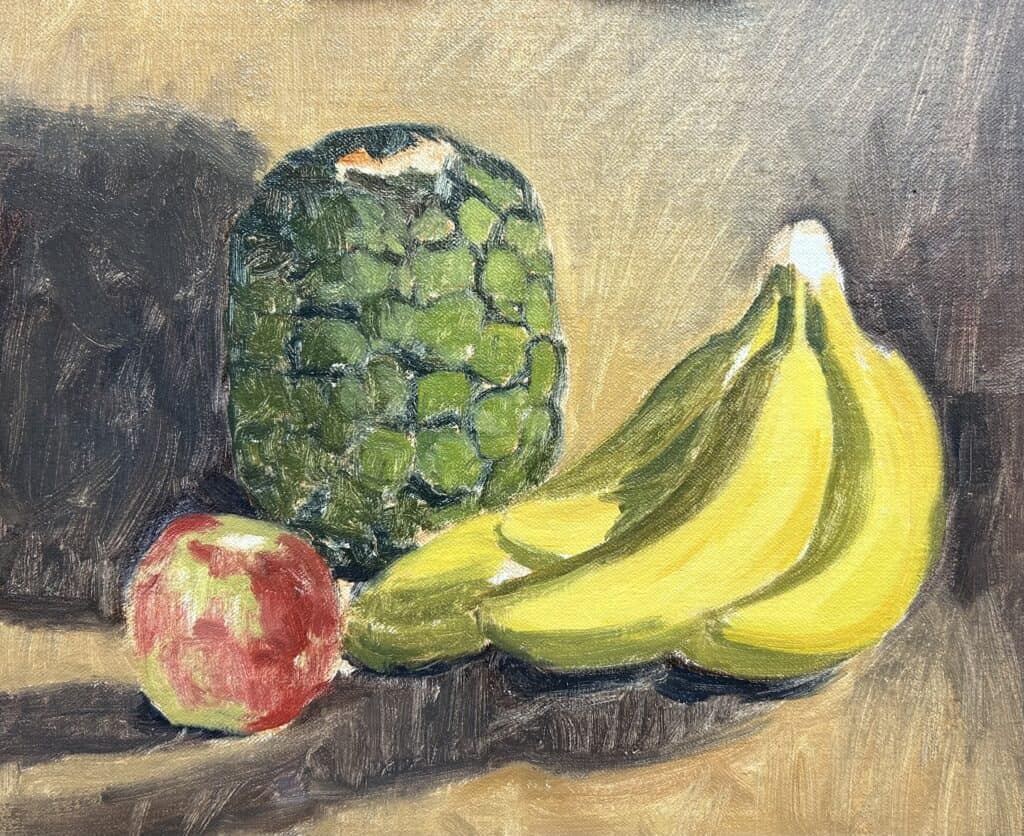
I add more color to the individual segments of the pineapple in light using a mix of yellow ochre, cadmium yellow, ultramarine blue, titanium white and a little cadmium red light.
I mix cadmium yellow, cadmium red light, and titanium white for the bananas in the light.
The Apple is a mix of cadmium red light, alizarin crimson, ultramarine blue, phthalo green and titanium white. I create several different colors and tones for the deep crimson parts of the apple using varying amounts of these colors.
Step 5: Restating the Dark Values
Once I’ve marked the primary colors and zones in the painting, then go back over the picture and restate the dark values. This helps to prepare the artwork so that when it is dry, I can add details.
Step 6: Modelling and Adding Details
The painting is now dry, and so I begin to add details. First, I work on the pineapple as this is the most complex form in the picture.
I paint the individual grooves between each pineapple segment using a mix of ultramarine blue and yellow ochre paints. I used a No.3 Filbert brush to apply the paint.
I muted the background colors more by adding more titanium white into my color mix. I used the same colors I used earlier: a combination of ultramarine blue, yellow ochre, burnt sienna, and titanium white.
Step 7: Adding Details to the Pineapple.
I take my time building up the details in the segments in the pineapple. I used a mix primarily of combinations of ultramarine blue, cadmium yellow and yellow ochre mixed with titanium white, a little cadmium red light and phthalo green.
I began using smaller brushes, including a No.3 synthetic Filbert brush and a No.0 synthetic pointed round brush.
Step 8: Adding Details to the Apples and Bananas
Next, I added the details to the Apple, using the same mix I used during the blocking-in stage, mostly alizarin crimson, cadmium red light, phthalo green, ultramarine blue and titanium white.
I added fine details to the bananas, such as the brown spots where the bananas are starting to age.
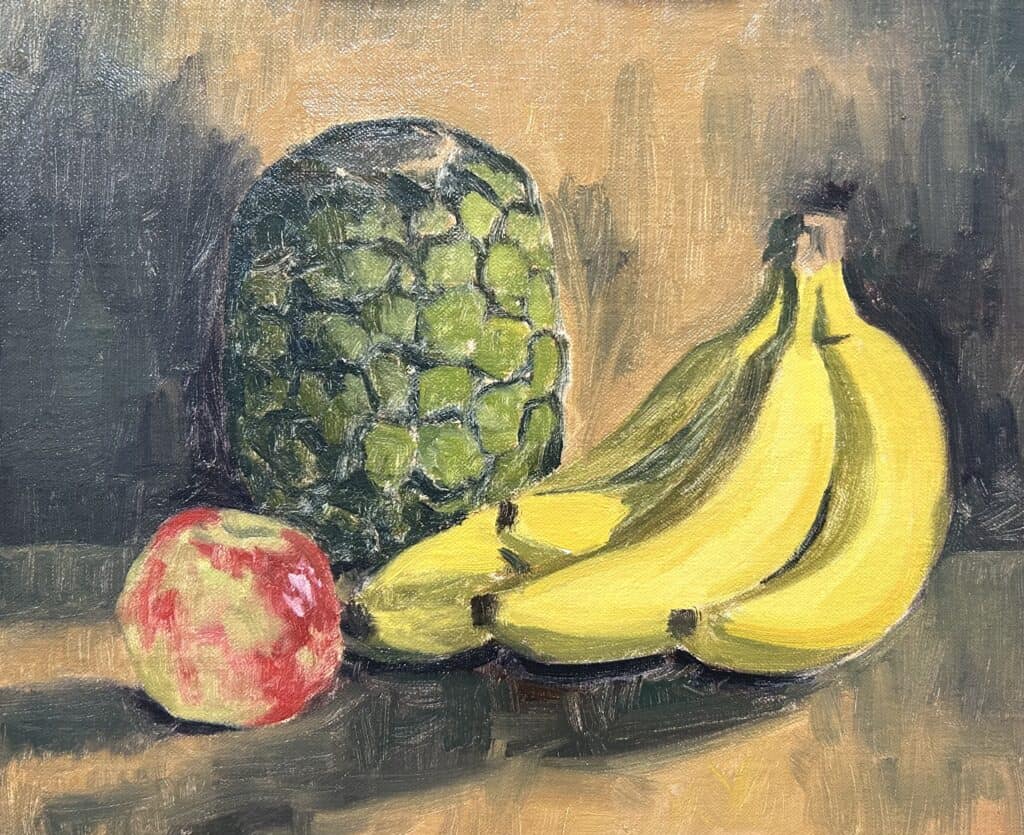
Step 9: Final Details
I finished the painting by adding the final details to the pineapple, and this is where I saved my lightest value color.
Save Your Lightest Value Colors Until Last
I add some fine highlights using a mix of titanium white with a bit of cadmium yellow, which I add to each light pineapple segment.
I add some last highlights to the apple using a mix of titanium white and a little cadmium yellow. Finally, I added some last details to the Bananas.
Finishing the Painting
Step back and look at the whole picture when you’re finished with your painting. Assess whether you’re happy with the colors, composition and overall impression. If necessary, make any final adjustments before adding depth to your artwork.
Conclusion
In conclusion, painting a still life may initially seem a little daunting. Still, with the right approach, color palette, composition, brushwork techniques and materials, it is an enjoyable and rewarding experience.
Start your painting using loose gestural brushmarks and then build up details as you work through the painting.
Save your lightest values and highlights until last to maximize depth in your painting.
Watch The Full Painting Tutorial Video by Joining me on Patreon