This article may contain affiliate links, please read my affiliate disclosure for more information

In this step-by-step painting demonstration, I show you how to paint Australian trees using gouache paint.
Gouache is a great and often overlooked medium to use for paintings. The colours are vibrant and it lends itself to loose gestural brush marks making them look almost like oil paintings. I love using gouache for creating compositions and painting ideas.
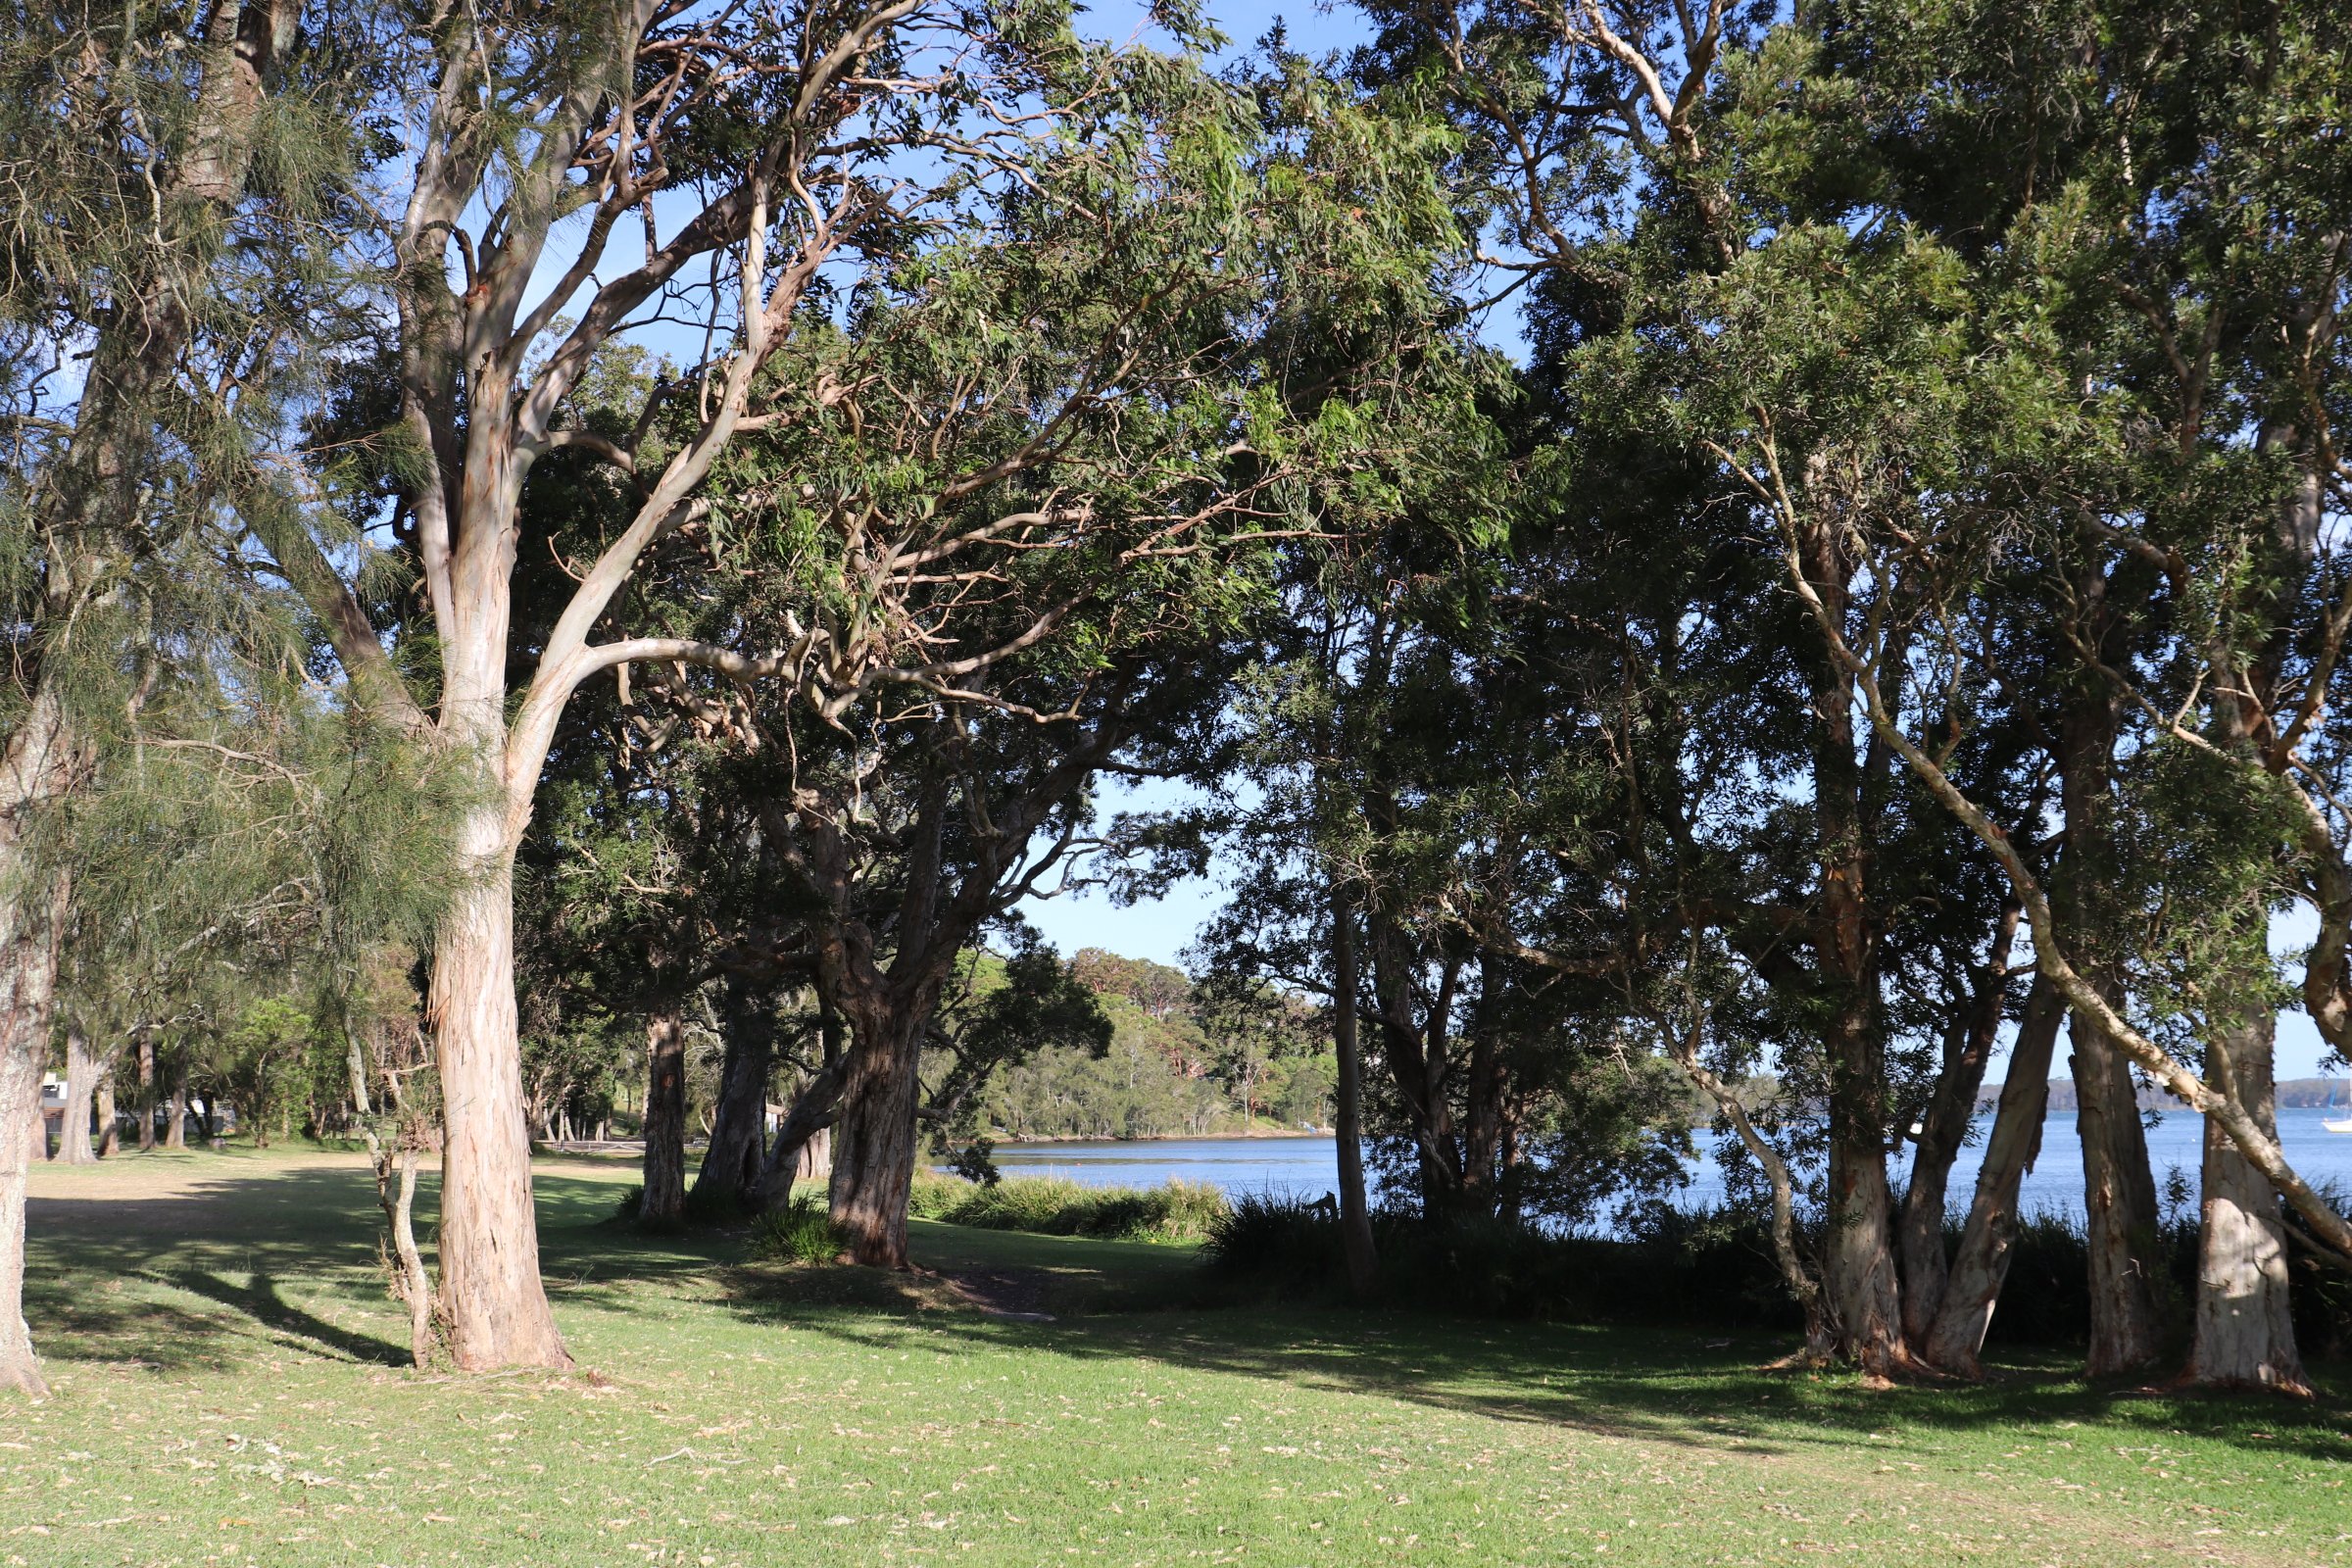
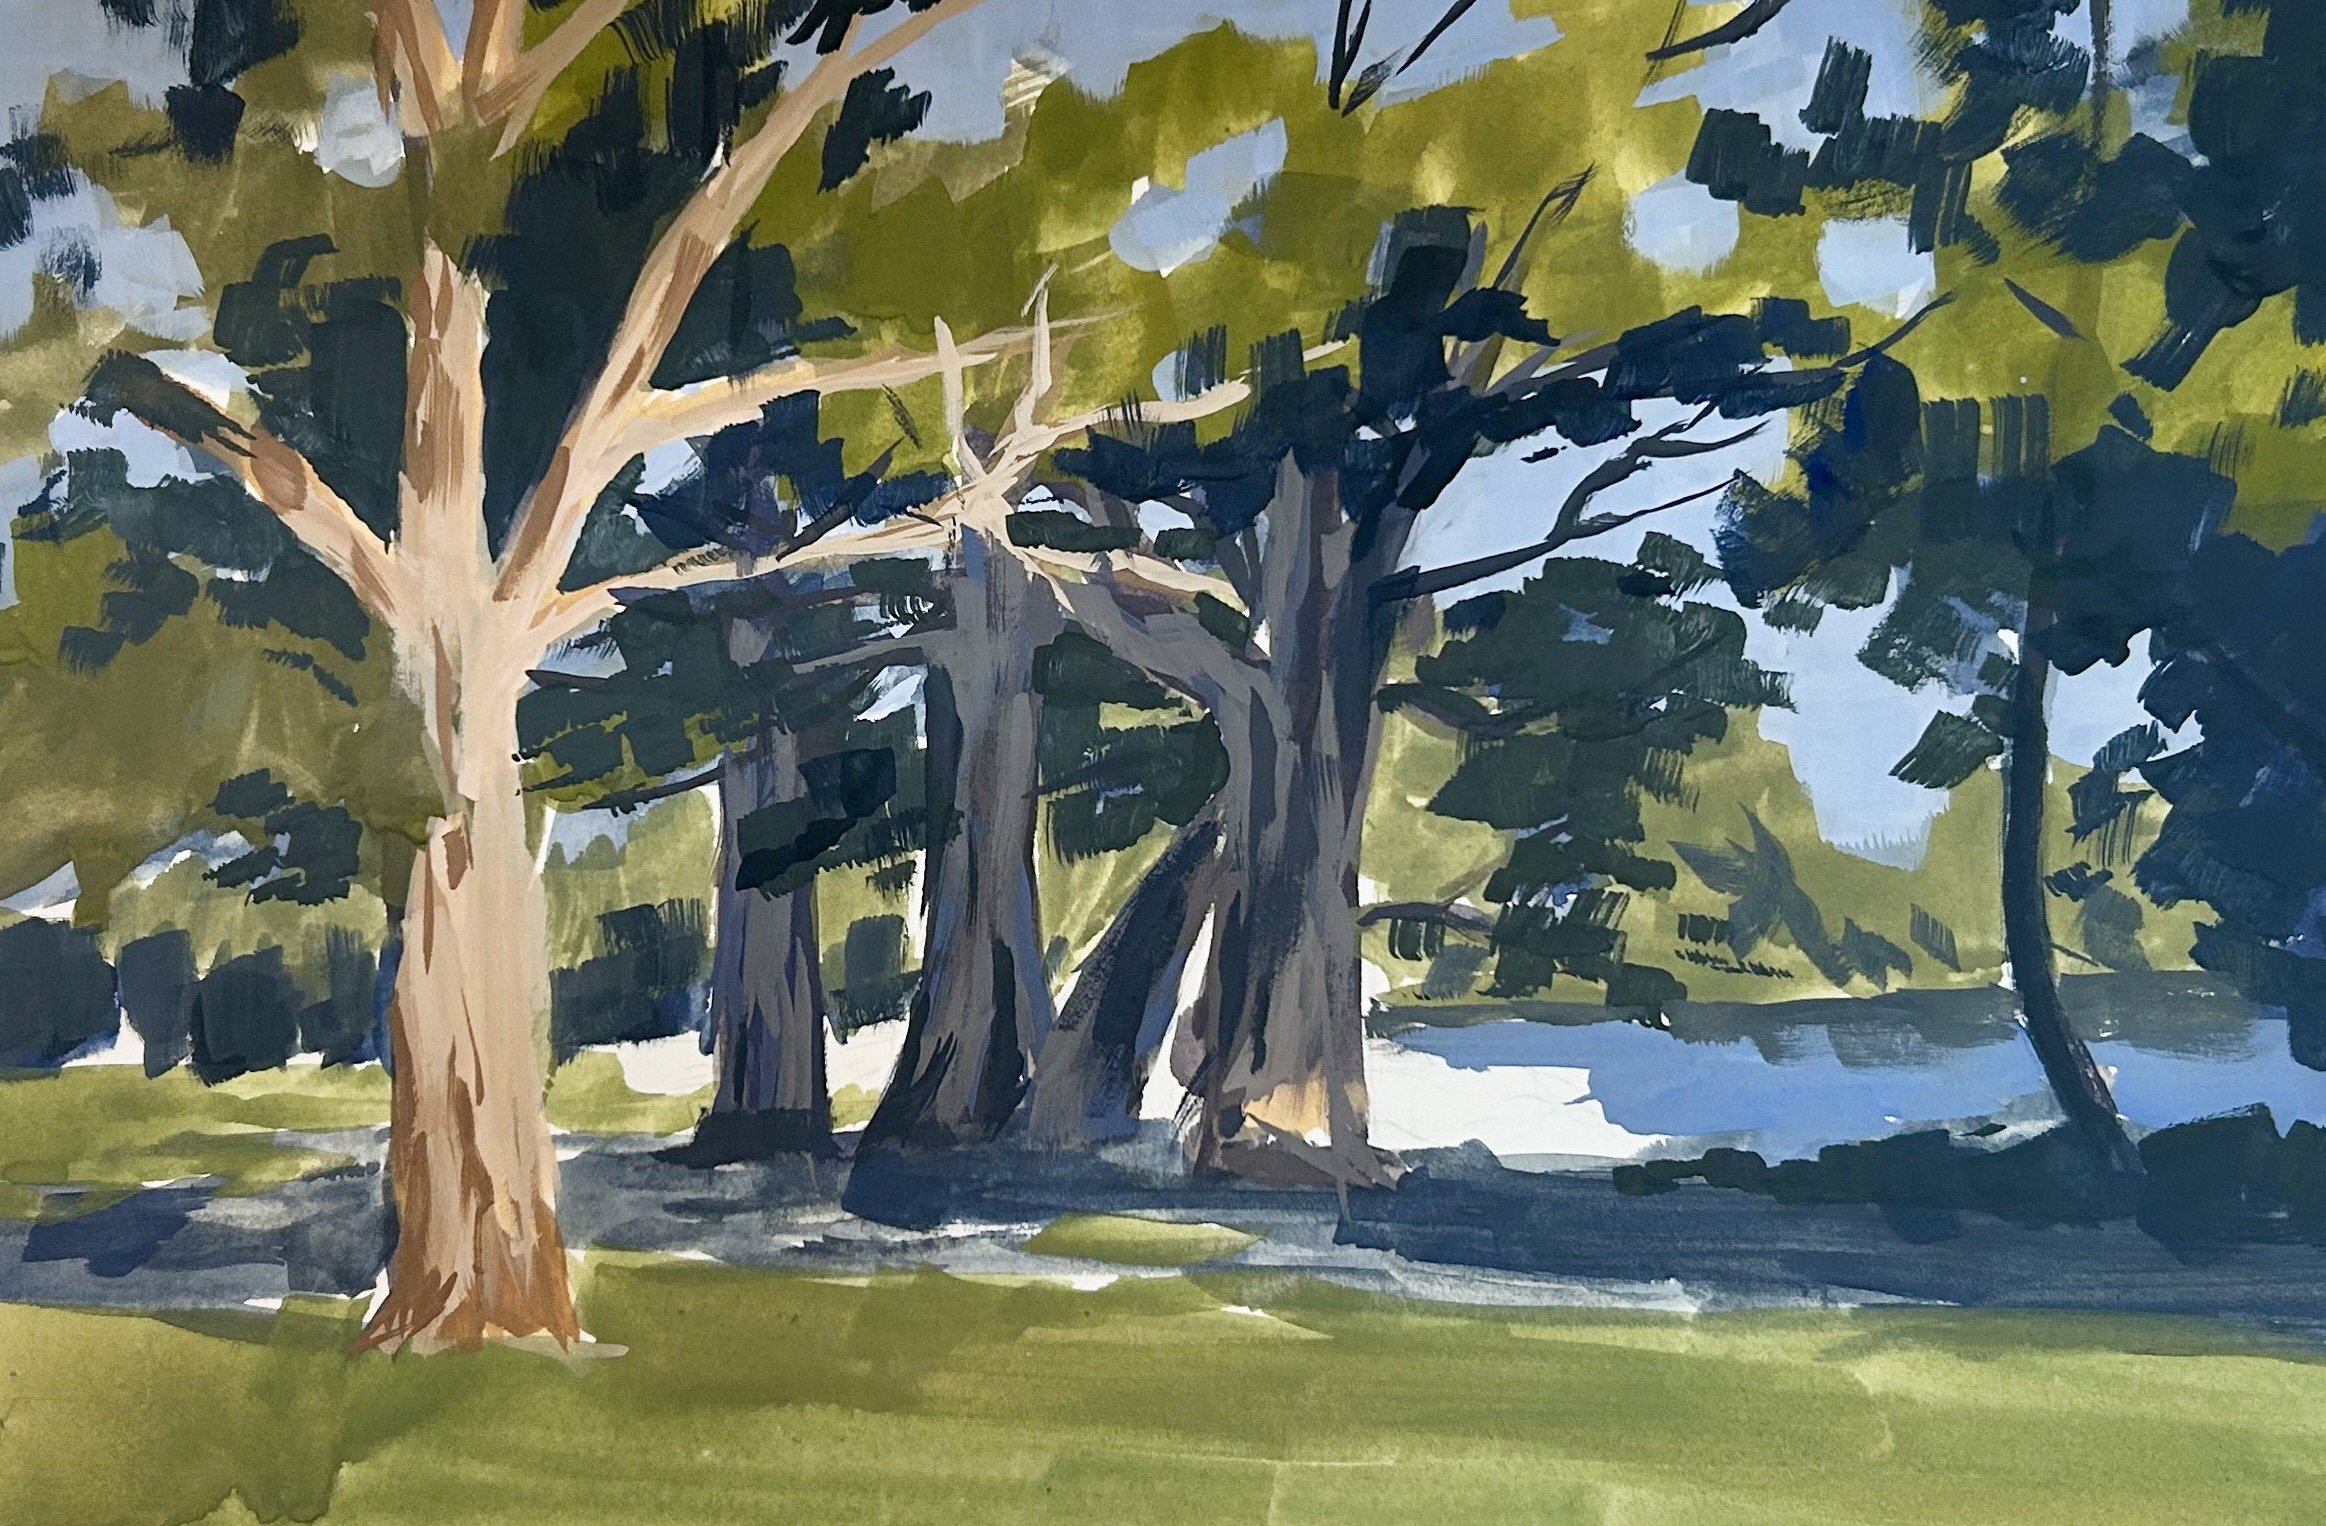
Reference Photo
Please feel free to use or copy this photo if you would like to have a go at painting this art work.
Composition
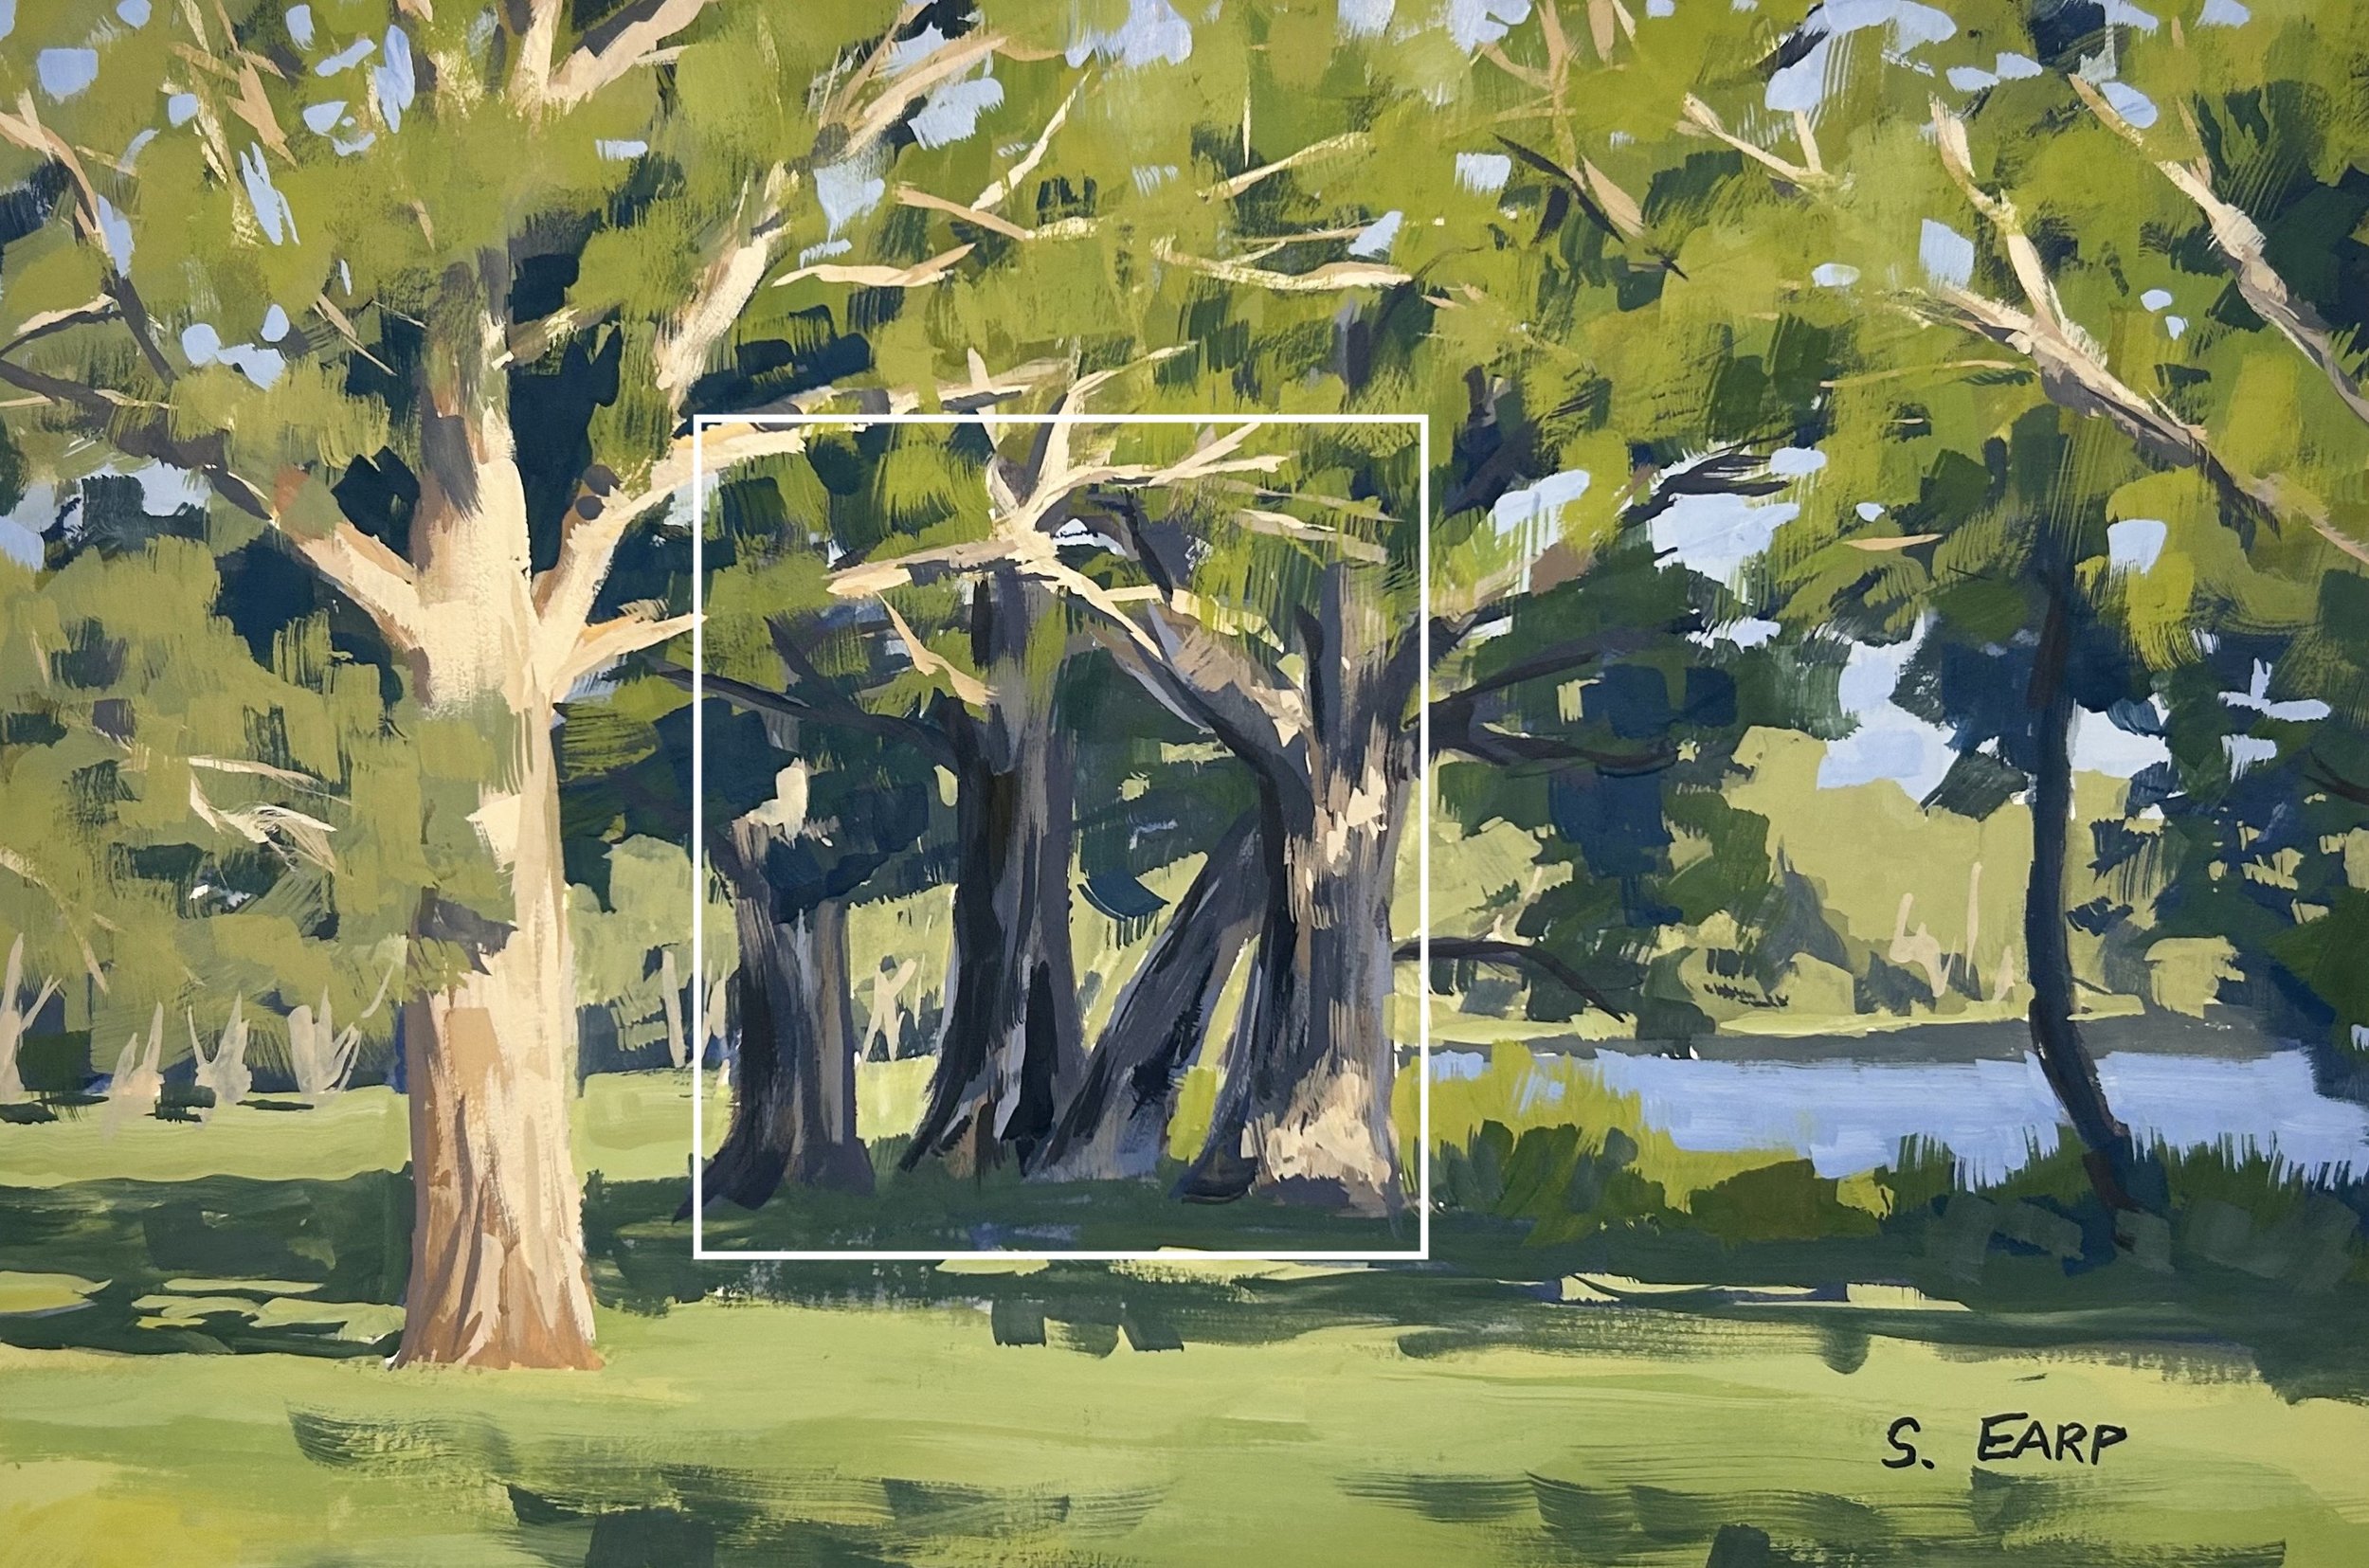
I have made the stand of paperbark trees the main focal area of the painting and I have positioned them to the left of the centre. It is always a good idea to avoid having centred objects in your painting as this will likely spoil the composition.
The gum tree on the left side of the painting is a secondary area of interest. As well as this I have left an opening in the right side of the composition to reveal the lake behind it. This is creating some space within the composition.
Colours
I painted this still life artwork using gouache paint and the colors I used in this particular painting are as follows: I used Winsor and Newton Designer Gouache Paints.
- Permanent white
- Burnt sienna
- Yellow ochre
- Cadmium yellow
- Cadmium red
- Alizarin crimson
- Ultramarine blue
- Viridian
Brushes
Here is a list of the brushes I used in this painting:
- No.12 Synthetic Flat
- No.6 Evergreen Short Flat
- No.4 Evergreen Short Flat
- No.2 Evergreen Short Flat
- No.2 Shiraz Rigger
- 1/4” Evergreen Angular
Painting Demonstration
I am painting on watercolour paper and I lightly sketched out the composition using a 4h pencil. The reason I use a hard pencil is that I don’t want the pencil outline to come through the paint layers.

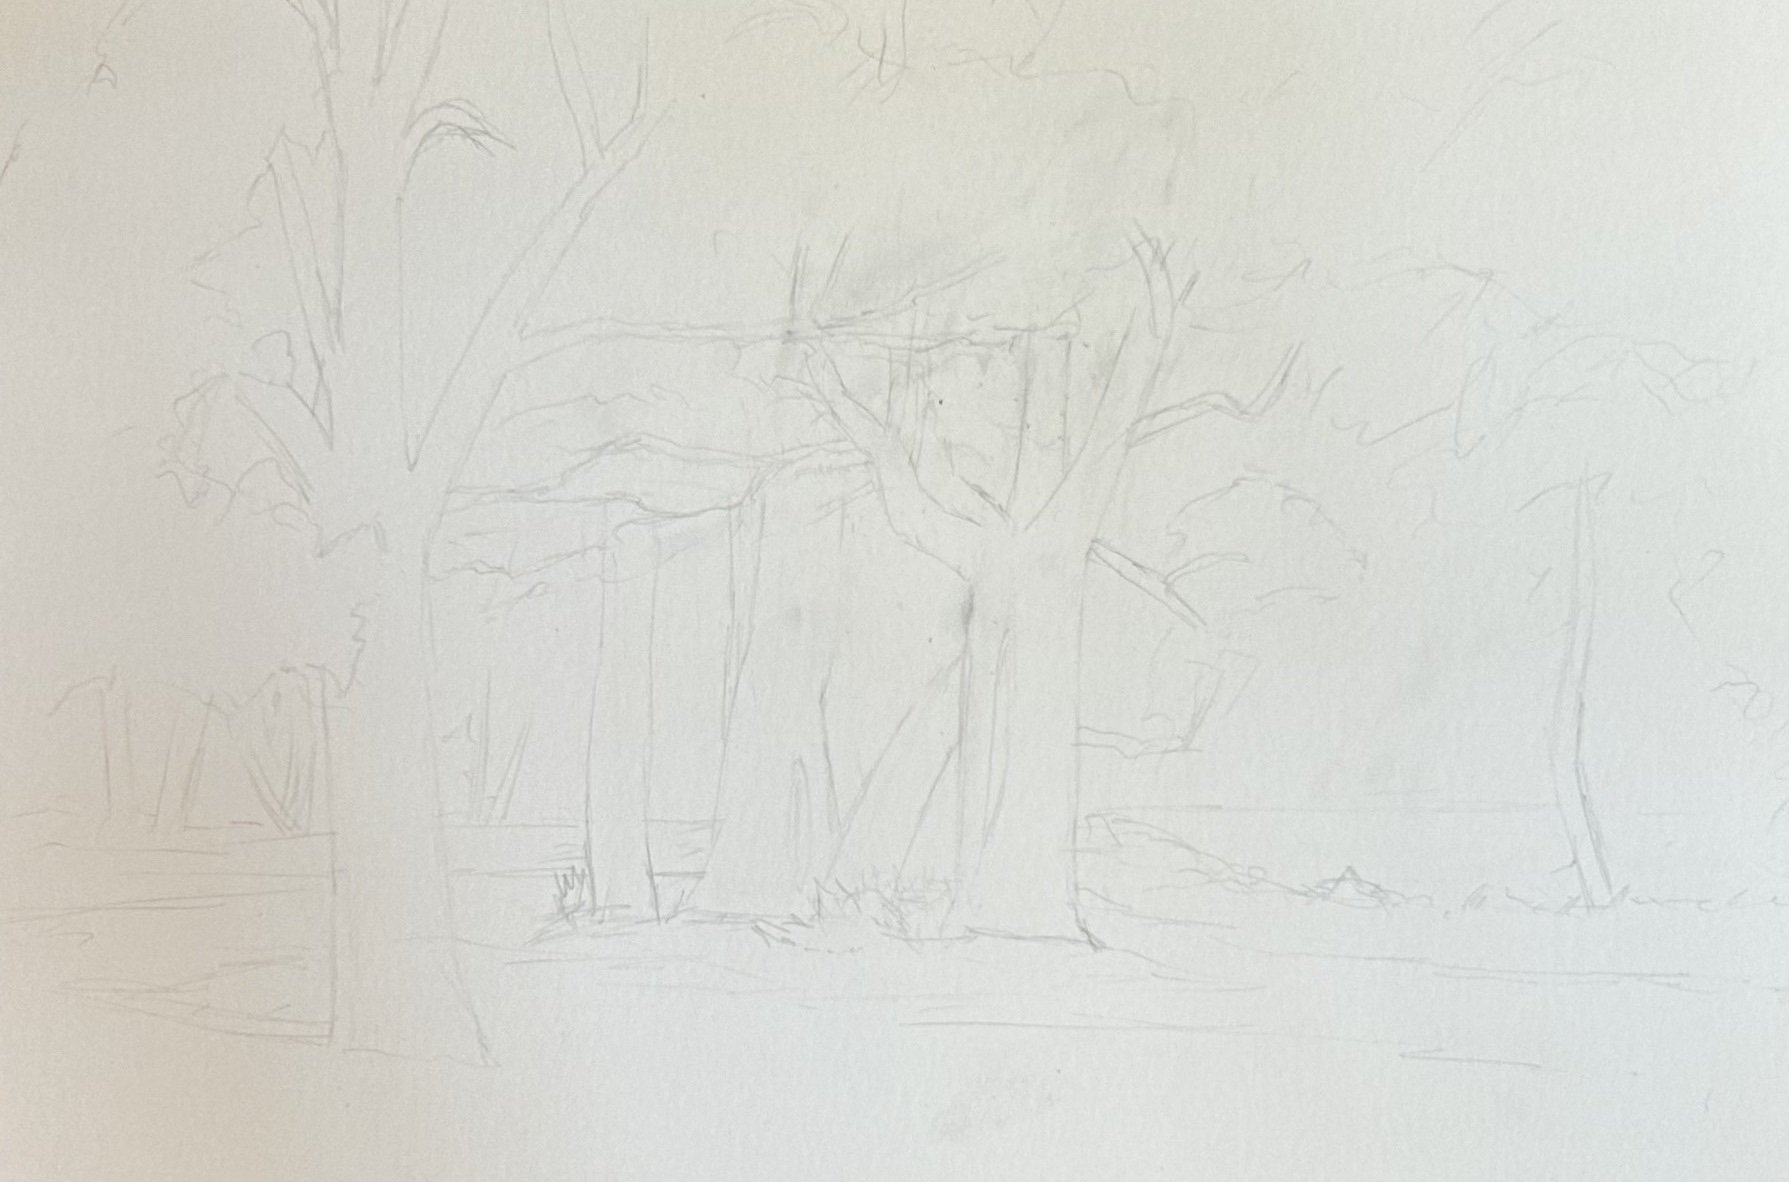
Paint Your Dark Values and Shadows First
Whenever I start a painting I always identify where the dark values and shadows are first in the scene I am painting. Value refers to how light or dark a subject is and by painting in the dark values first I personally find it is much easier to create atmospheric perspective in my paintings. It also makes it easier to add the areas in light and to get the saturation of your colours correct once you have painted your dark values.
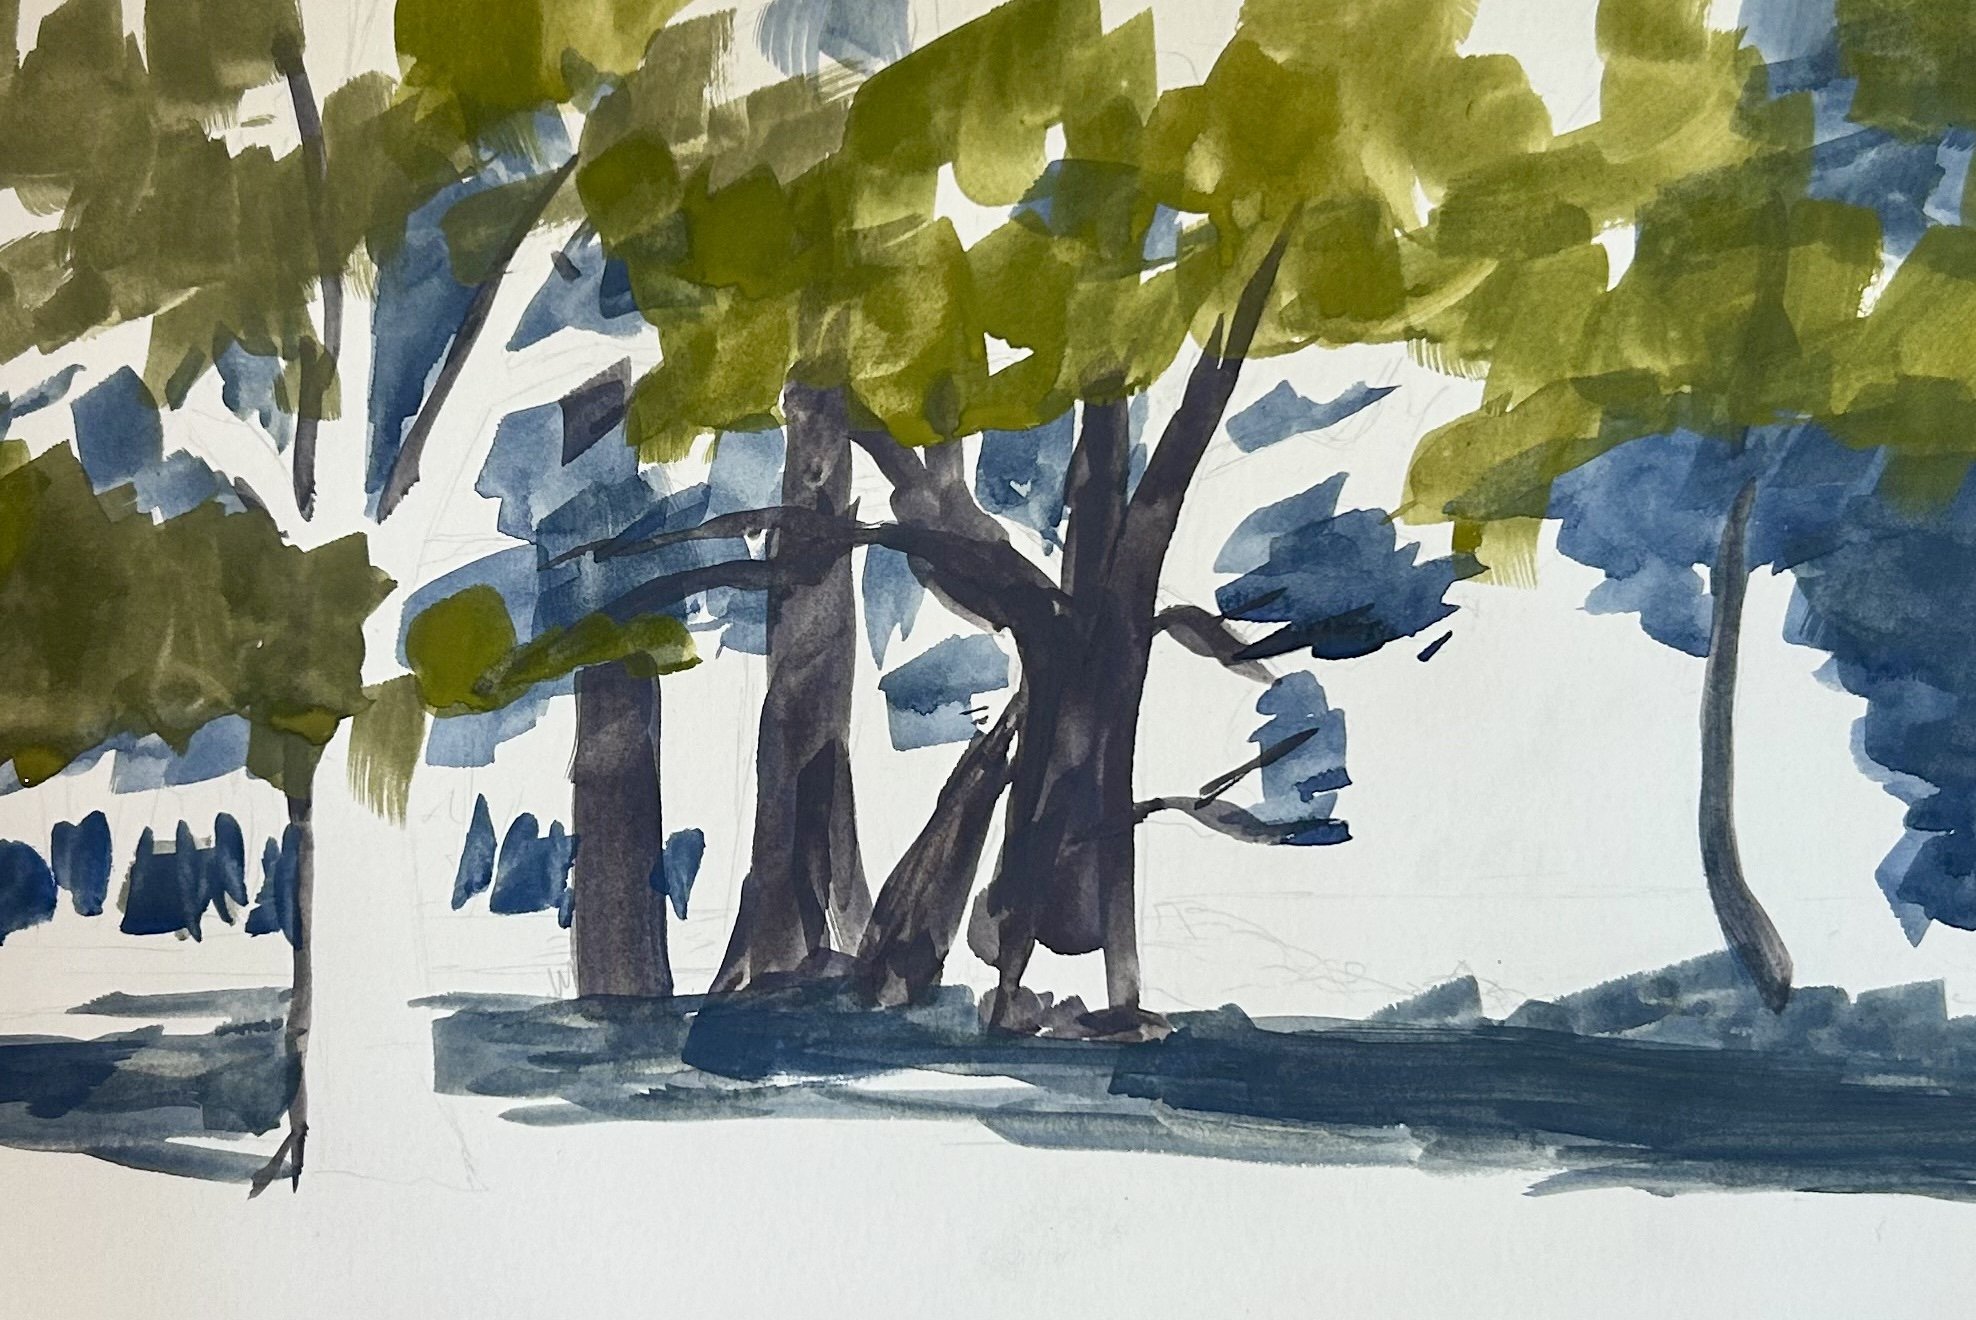
Due to the opaque nature of gouache paint, I approach a painting in a similar way as I would carry out an oil painting in that I paint the dark values and shadows first. However, I start with thin layers of paint that are mixed with plenty of water to create a wash.
Here I have painted the shadows within the foliage and tree trunks first. The tree trunks of the paperbarks are a mix of ultramarine blue, burnt sienna and a little alizarin crimson. The shadow areas of the foliage are a mix of yellow ochre and ultramarine blue.
For the areas of the foliage that are in full sunlight, I have used a mix of yellow ochre, cadmium yellow, ultramarine blue and a little cadmium red.
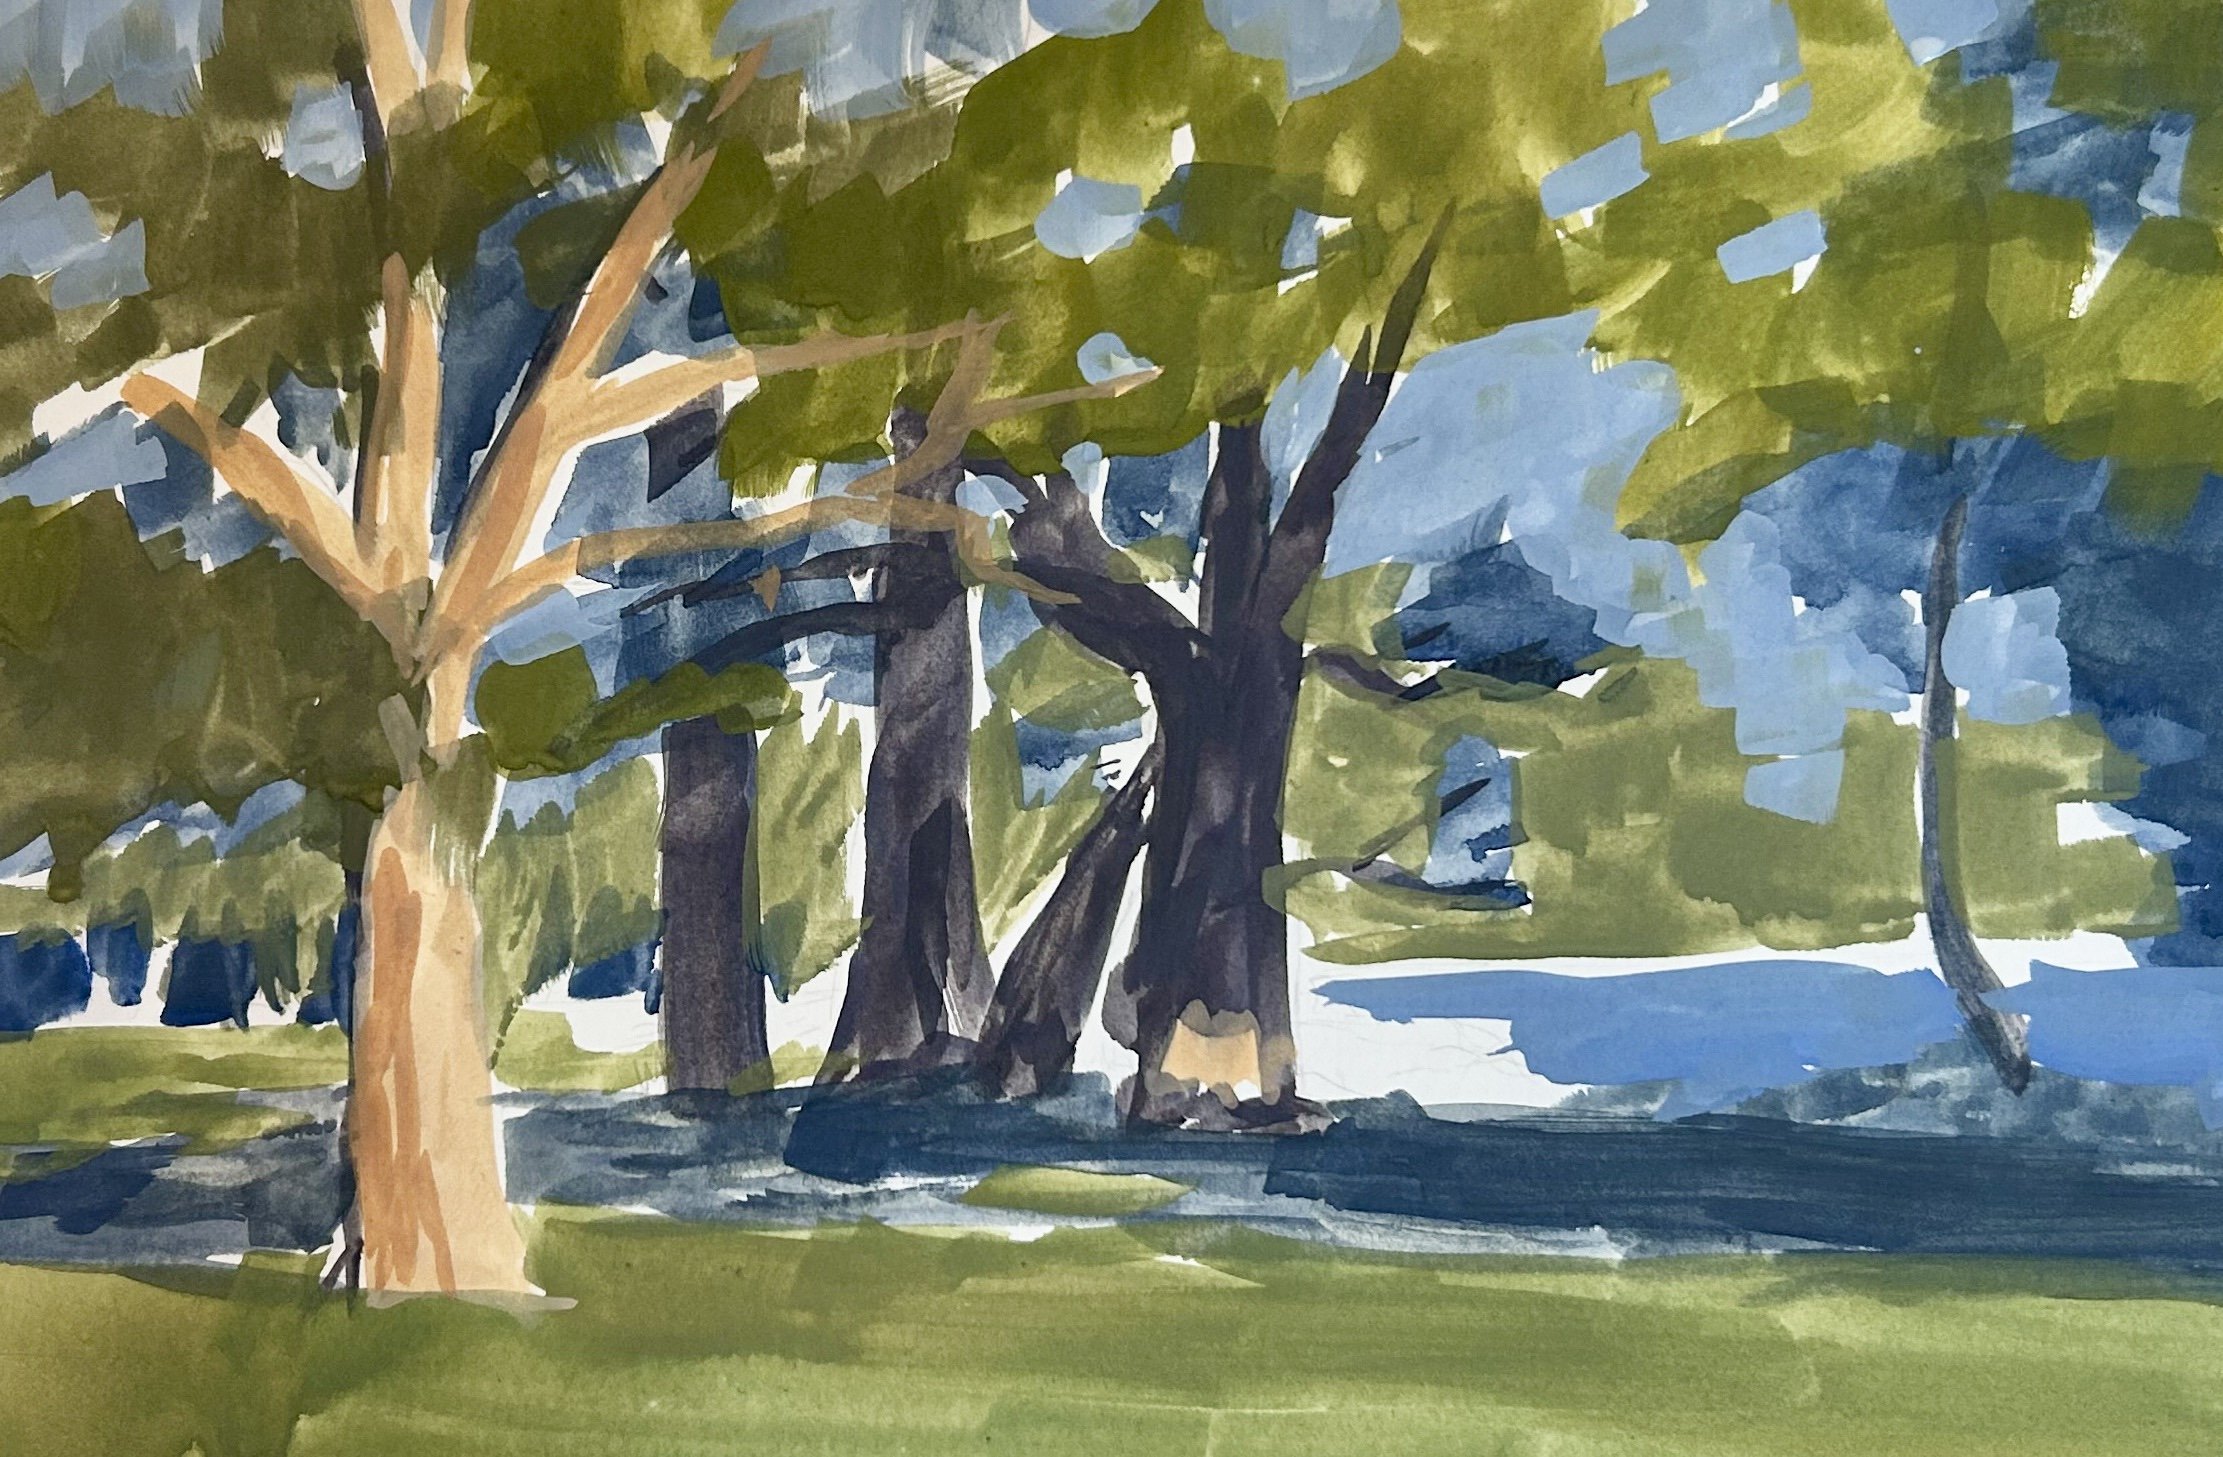
As I am using thin washes of paint in the early stages of a gouache painting it can look a little rough and amateurish. When this happens do not be discouraged as this wash of colour will serve as a solid foundation in the painting and you will easily be able to apply thicker layers of paint, even permanent white.
Another thing to keep in mind with gouache paint is that some of the colours can dry a little darker than when they are wet so you will need to account for this.
I paint the sky using a mix of ultramarine blue, permanent white and viridian. For the trees in the background, I used a mix of yellow ochre, cadmium yellow, ultramarine blue and a little permanent white. I also used the same colours for the grass in the foreground but I also added a little viridian and cadmium red into the mix.
Now I have applied a wash of colours to create the foundation for my painting I then begin to add details and use thicker paint. I begin by painting the branches of the paperbark trees as well as adding details and building up the texture in the gum tree stem on the left side of the painting.
I used varying mixes of ultramarine blue, burnt sienna, alizarin crimson and titanium white for the paperbarks, this includes painting the stems and branches. For the gum tree on the left, I used a mix of yellow ochre, burnt sienna and titanium white. I also mixed in a little ultramarine blue in order to desaturate the colour where required.
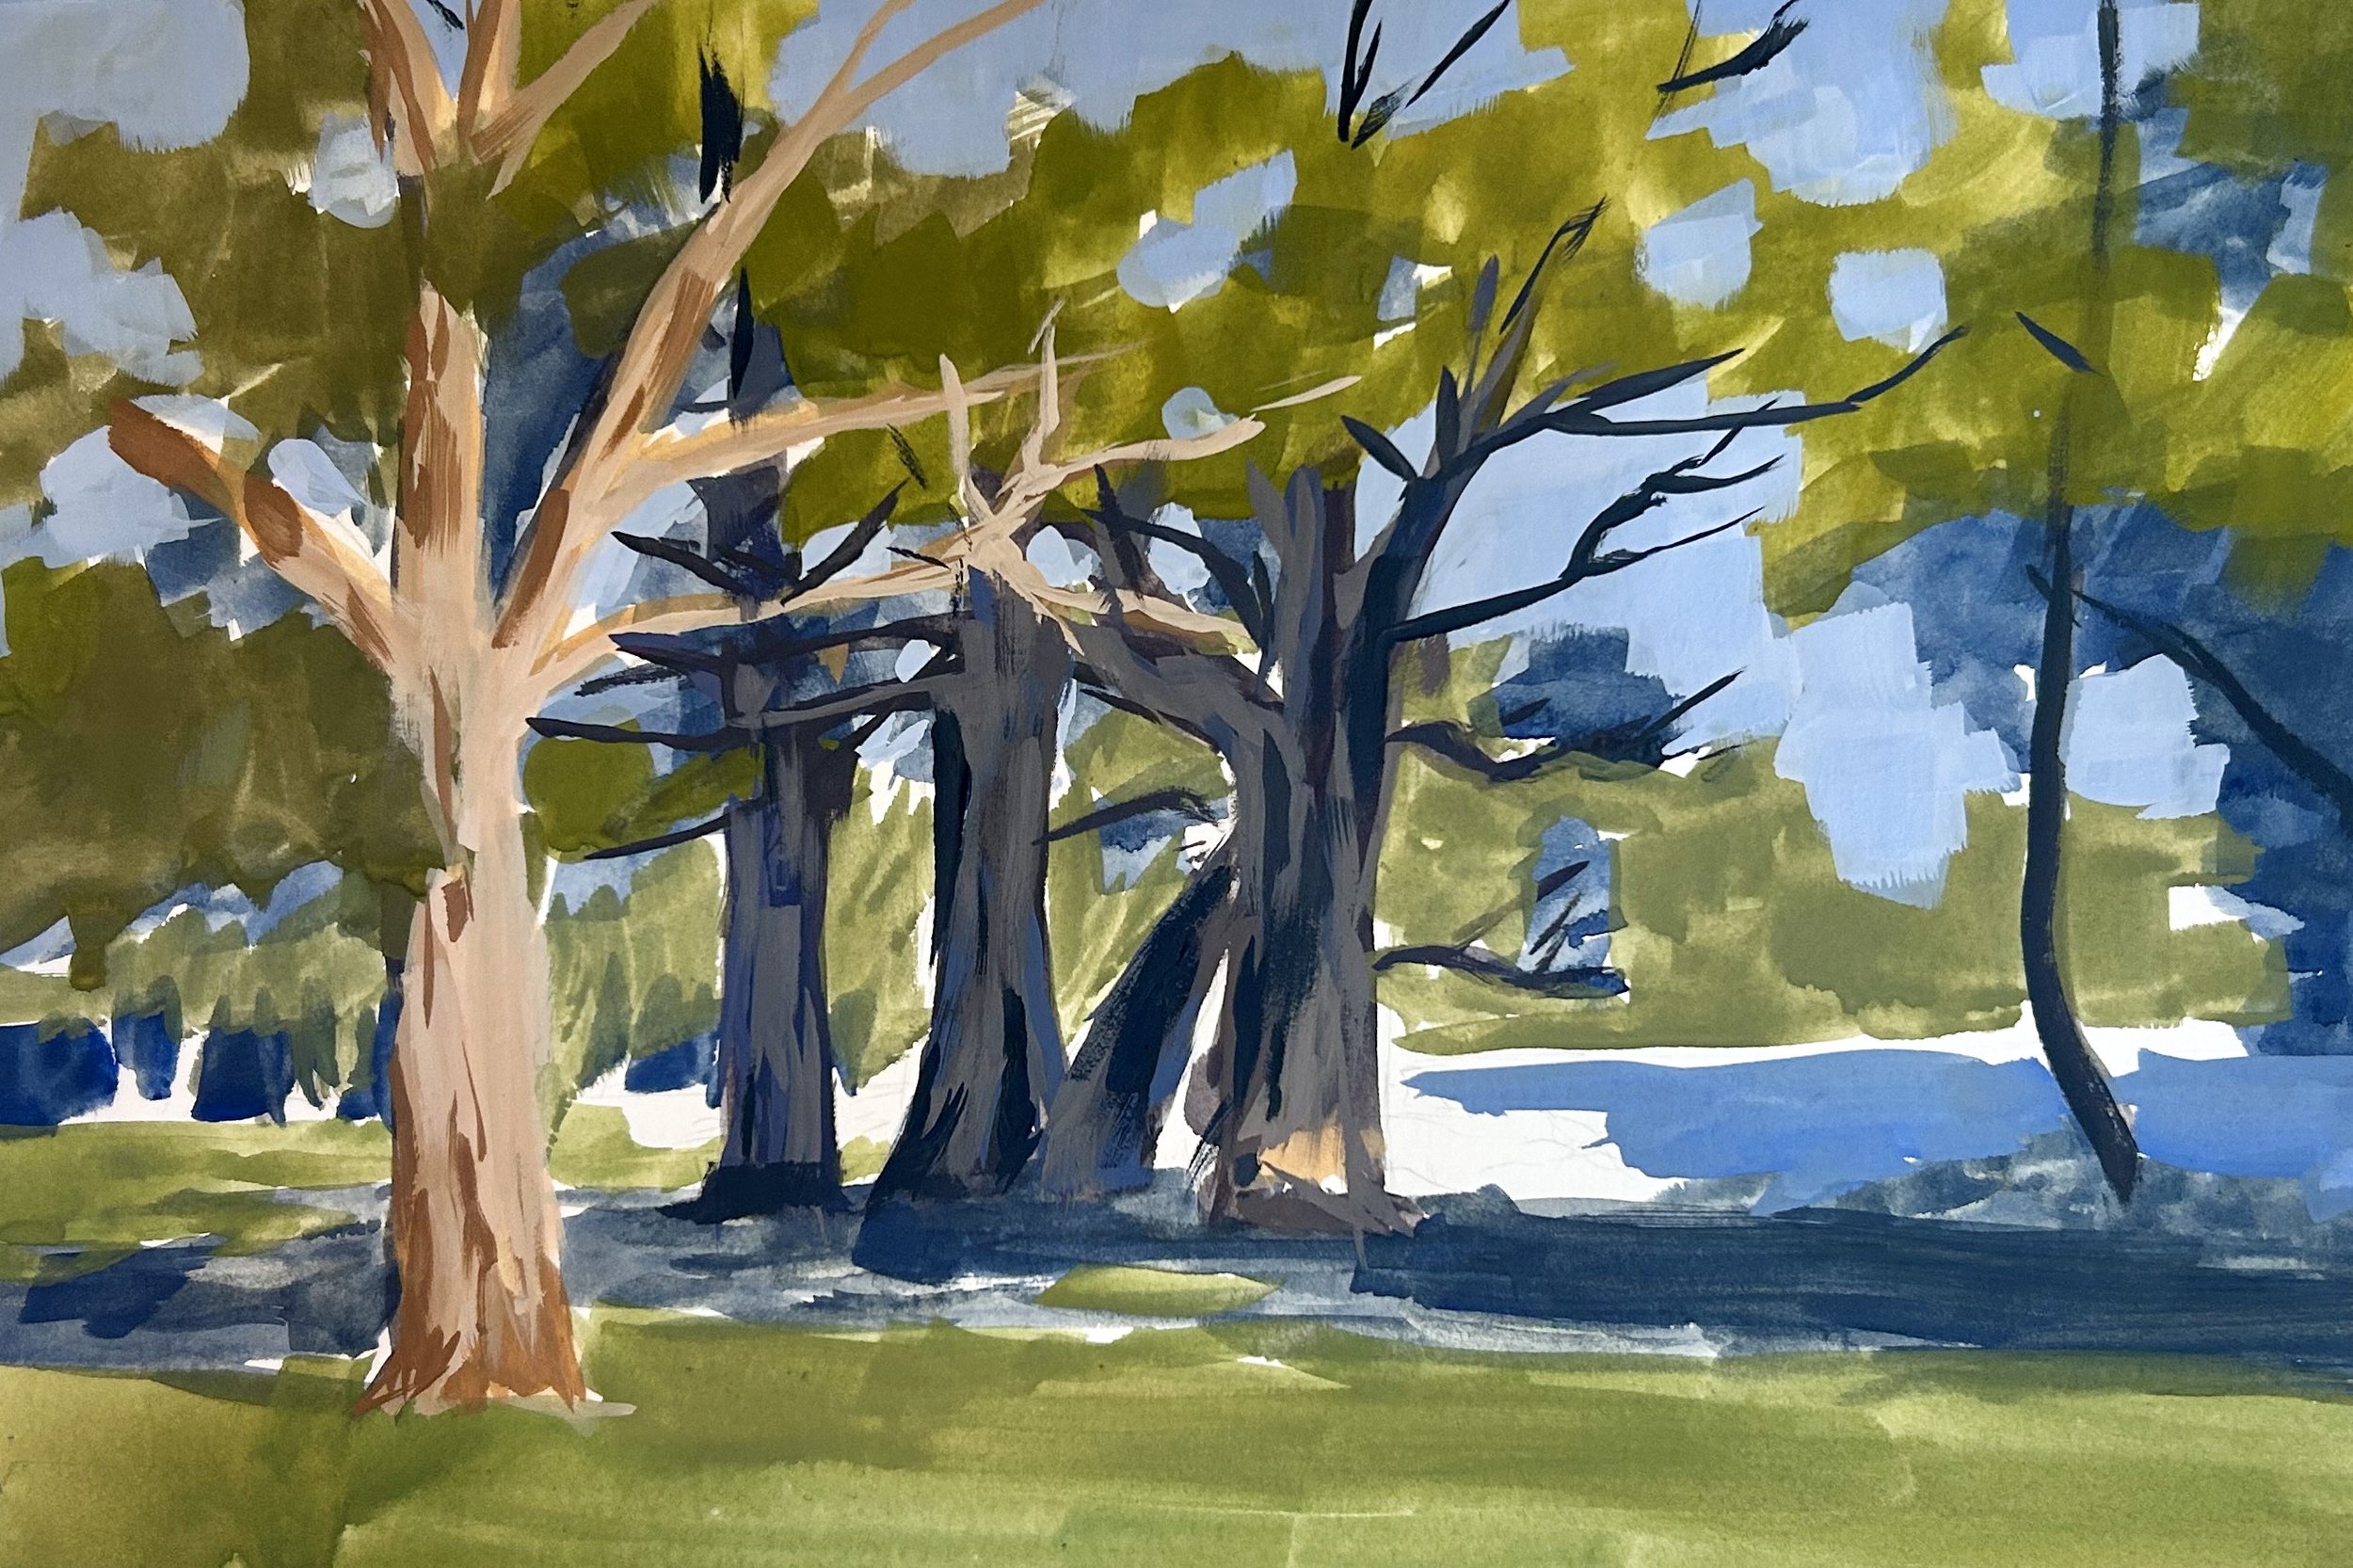
Once I started painting the stems and branches of the trees and adding details to them I then worked on the foliage of the tree canopies and here I was building up the shadow areas. I continued to use a mix of ultramarine blue and yellow ochre and as I was using thicker paint you can see the colour is a much darker value than compared with the initial layer.
I used a No.6 Evergreen Flat brush to apply the paint for the foliage.
At this point in the painting, I am well into building up the details within the tree canopies. I added more layers of paint to the tree foliage using varying mixes of yellow ochre, cadmium yellow, ultramarine blue, permanent white and viridian. I also mixed in a little cadmium red to desaturate the colour. Following this, I began adding more branches and stems to build up the structure of the trees.
I painted some reflected light in the paperbark trees and I still used the same colours as before, ultramarine blue, burnt sienna, alizarin crimson and permanent white but I have used more ultramarine blue and permanent white in my mix.
I added more layers to the grass using the same colours as I used initially, mostly a mix of cadmium yellow, ultramarine blue, and permanent white as my base mix and then adjusting the hue by adding cadmium red, yellow ochre and viridian to create some different grass tones.
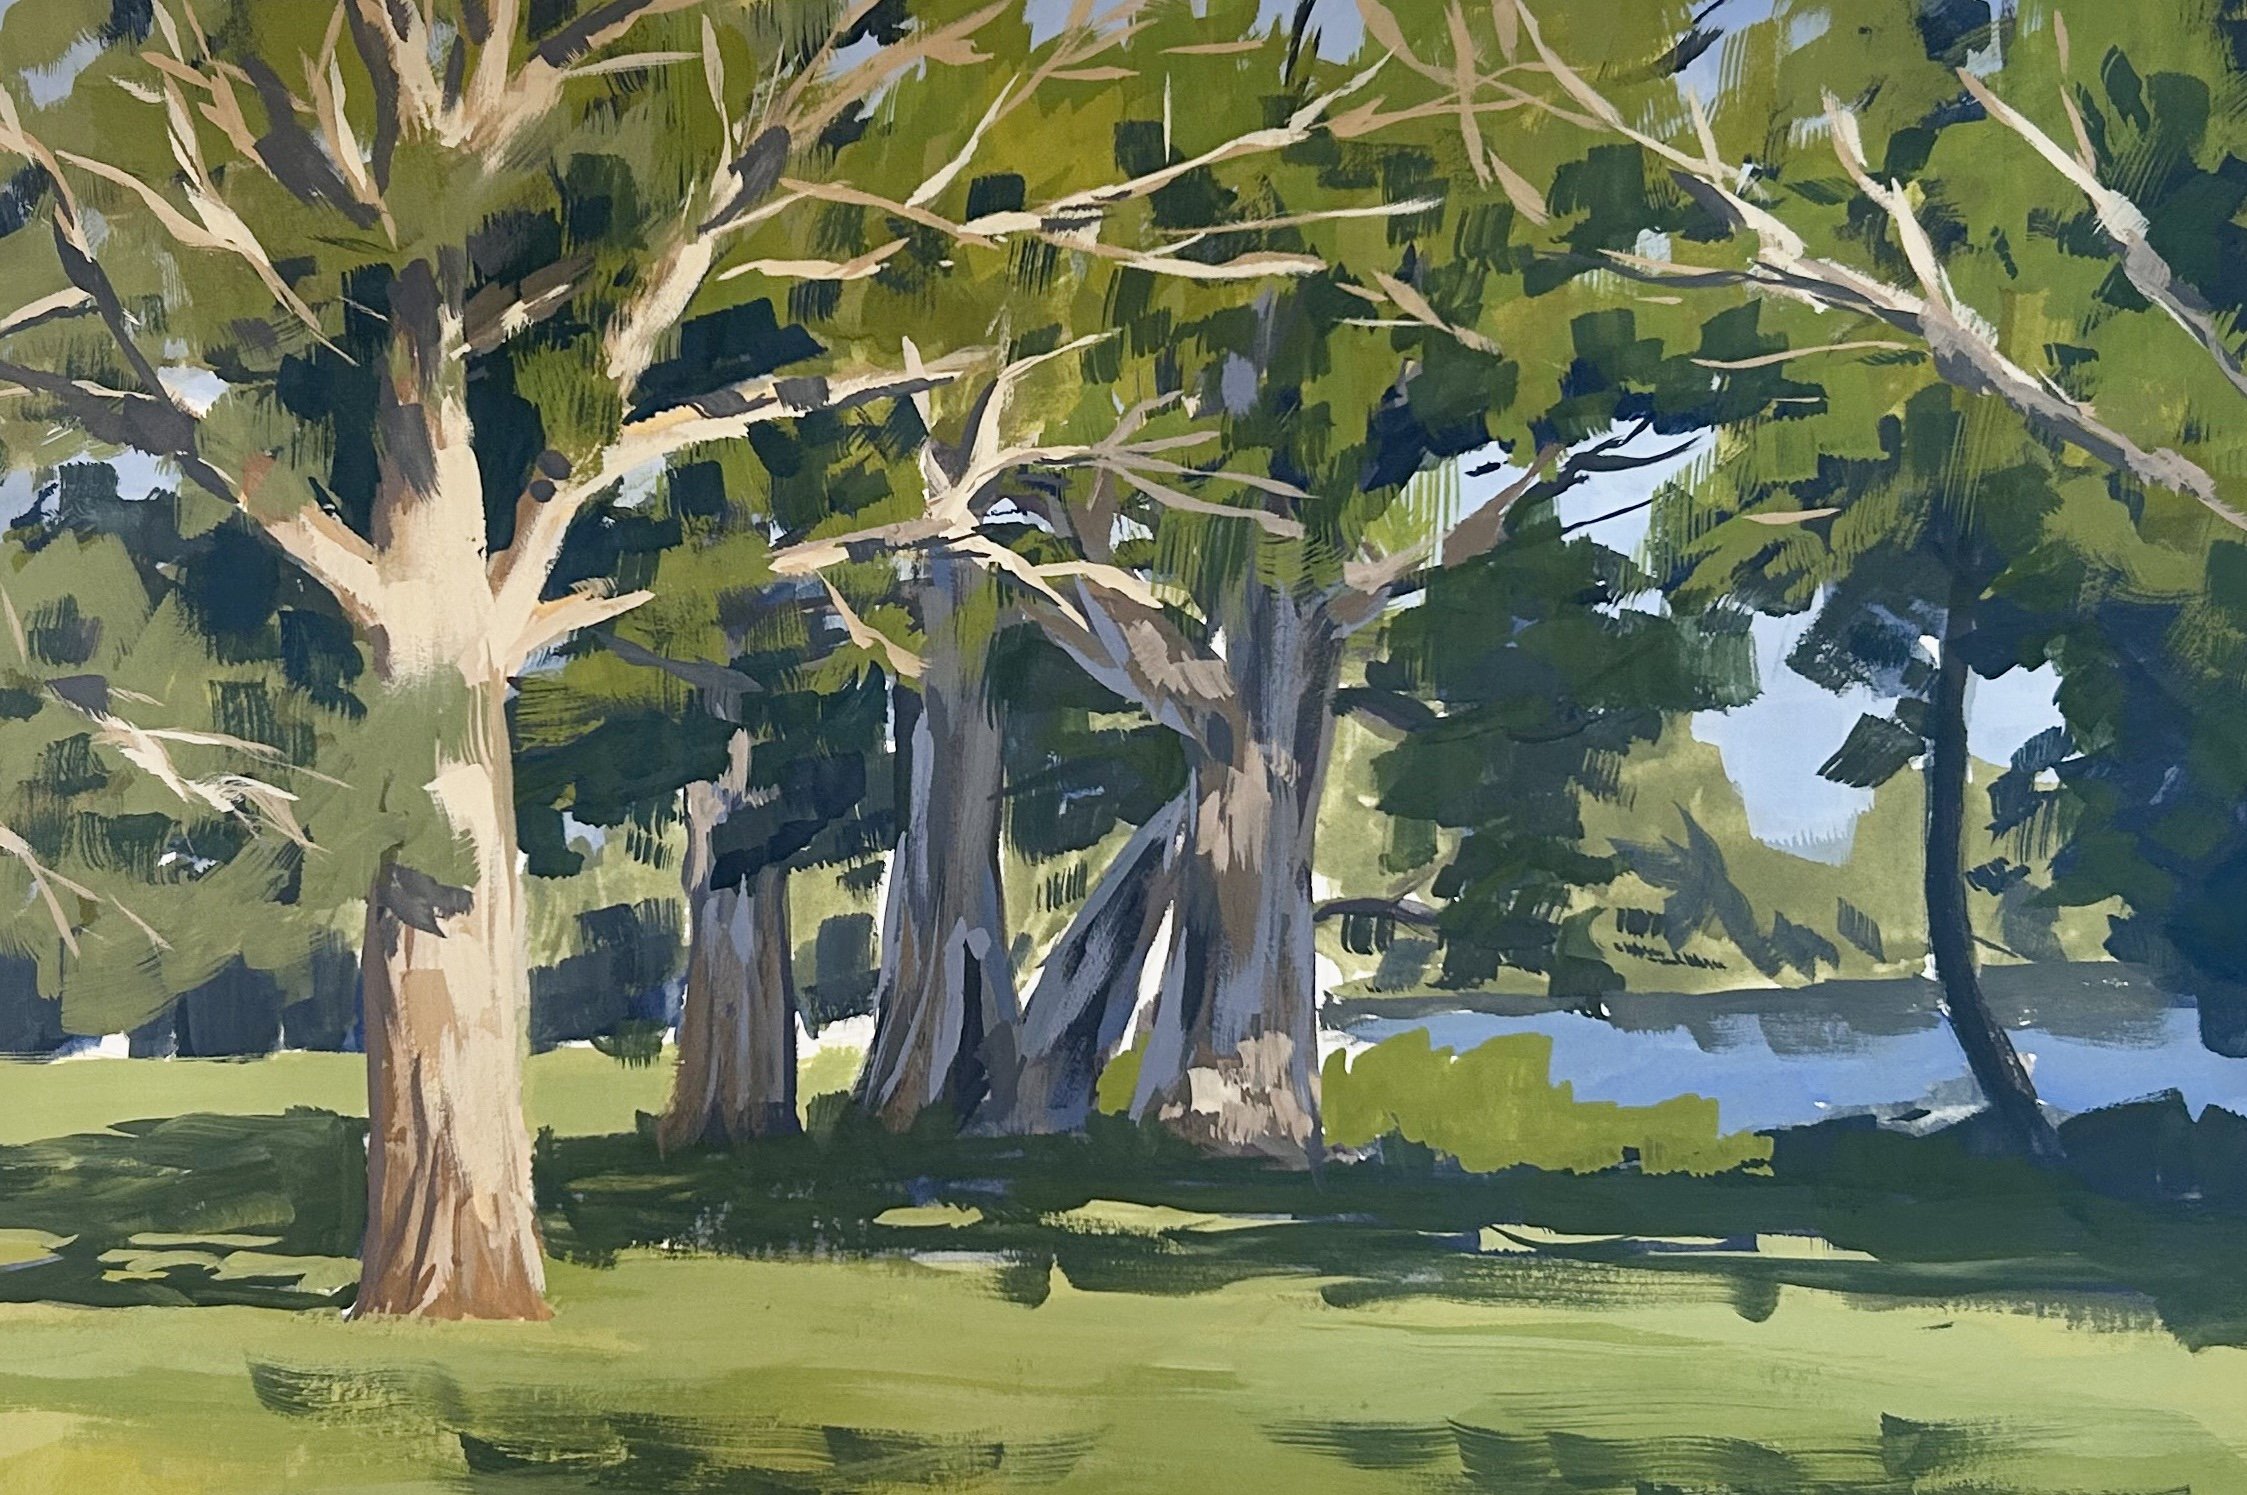
Finishing the Painting
The advantage of using gouache paint is its fast drying time, so at the final stage of the painting, it was very easy to add details and correct any mistakes since it was also easy to apply fresh paint over existing layers. I finish the painting by adding a few more branches here and there as well as the stems of the trees in the background.
Lastly, I added a few dark accents to the paperbarks and also some dappled lighting effects on the tree trunks using the same colour mix I used for the gum tree on the left.
Final Note
I hope you enjoyed this written painting demonstration, however, I have only scratched the surface as there is way more to this painting. Check out the painting tutorial video where I show you how to paint this scene, available on my Patreon channel.
