In this in-depth blog post, I’ll walk you through my exact 6-step process for painting gum trees, focusing on how to create realistic-looking bark, trunks, and atmospheric scenes inspired directly by the iconic Murray River in Australia. I’ll cover all the key techniques, color mixing tips, brushwork, and share the lessons I’ve learned from painting on location (plein air) and in the studio.
Whether you’re a beginner or an experienced artist looking to up your tree game, you’ll find loads of actionable advice you can apply to your own landscapes.
Let’s dive in!
Why Paint Tree Trunks and Bark?
Have you ever tried to paint a tree, but when you finished, the trunk just looked like a stick, or the bark didn’t have any depth or character? You’re definitely not alone! Painting convincing trees with realistic bark can transform an ordinary landscape into something truly special.
Capturing the gnarly, rough, and sometimes peeling nature of bark, especially on Australian gum trees, adds stories to your paintings. Each mark, each scar, and each patch of peeling bark tells the story of the tree’s life. If you learn how to capture that, your tree paintings will jump off the canvas—guaranteed.
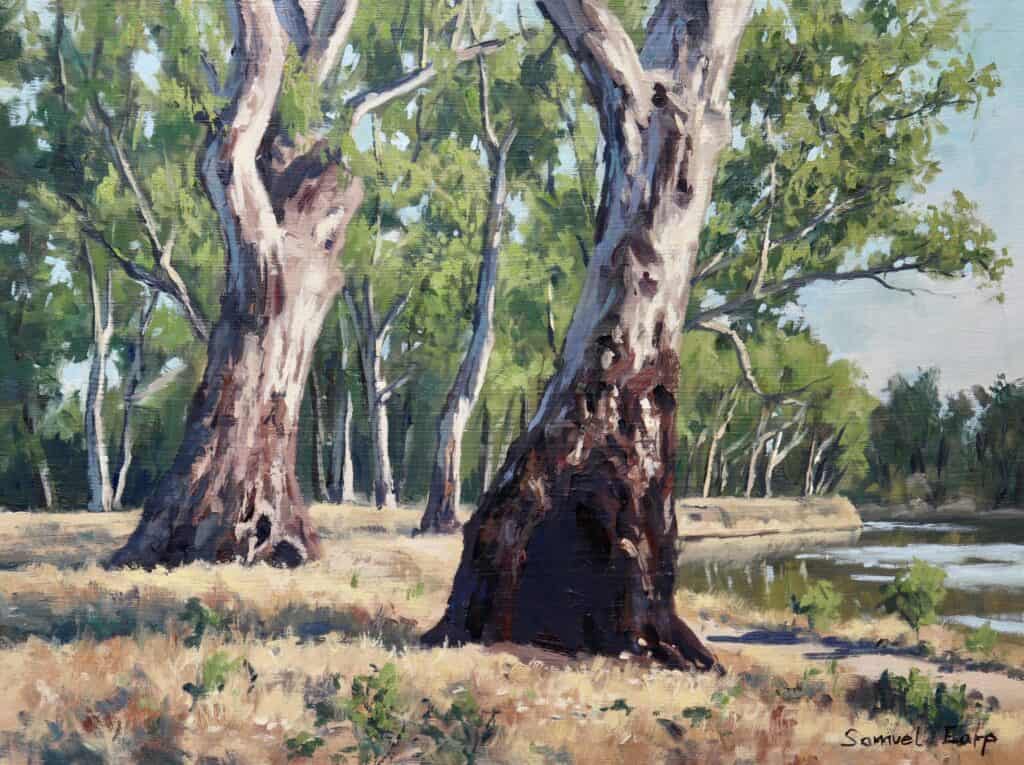
My Inspiration: The Murray River Gum Trees
About ten years ago, I took a plein air painting trip along the Murray River in Australia. The light, the endless Riverside forests, and, most of all, the majestic gum trees left a huge impression on me. After that trip, I did a large studio painting based on the scene.
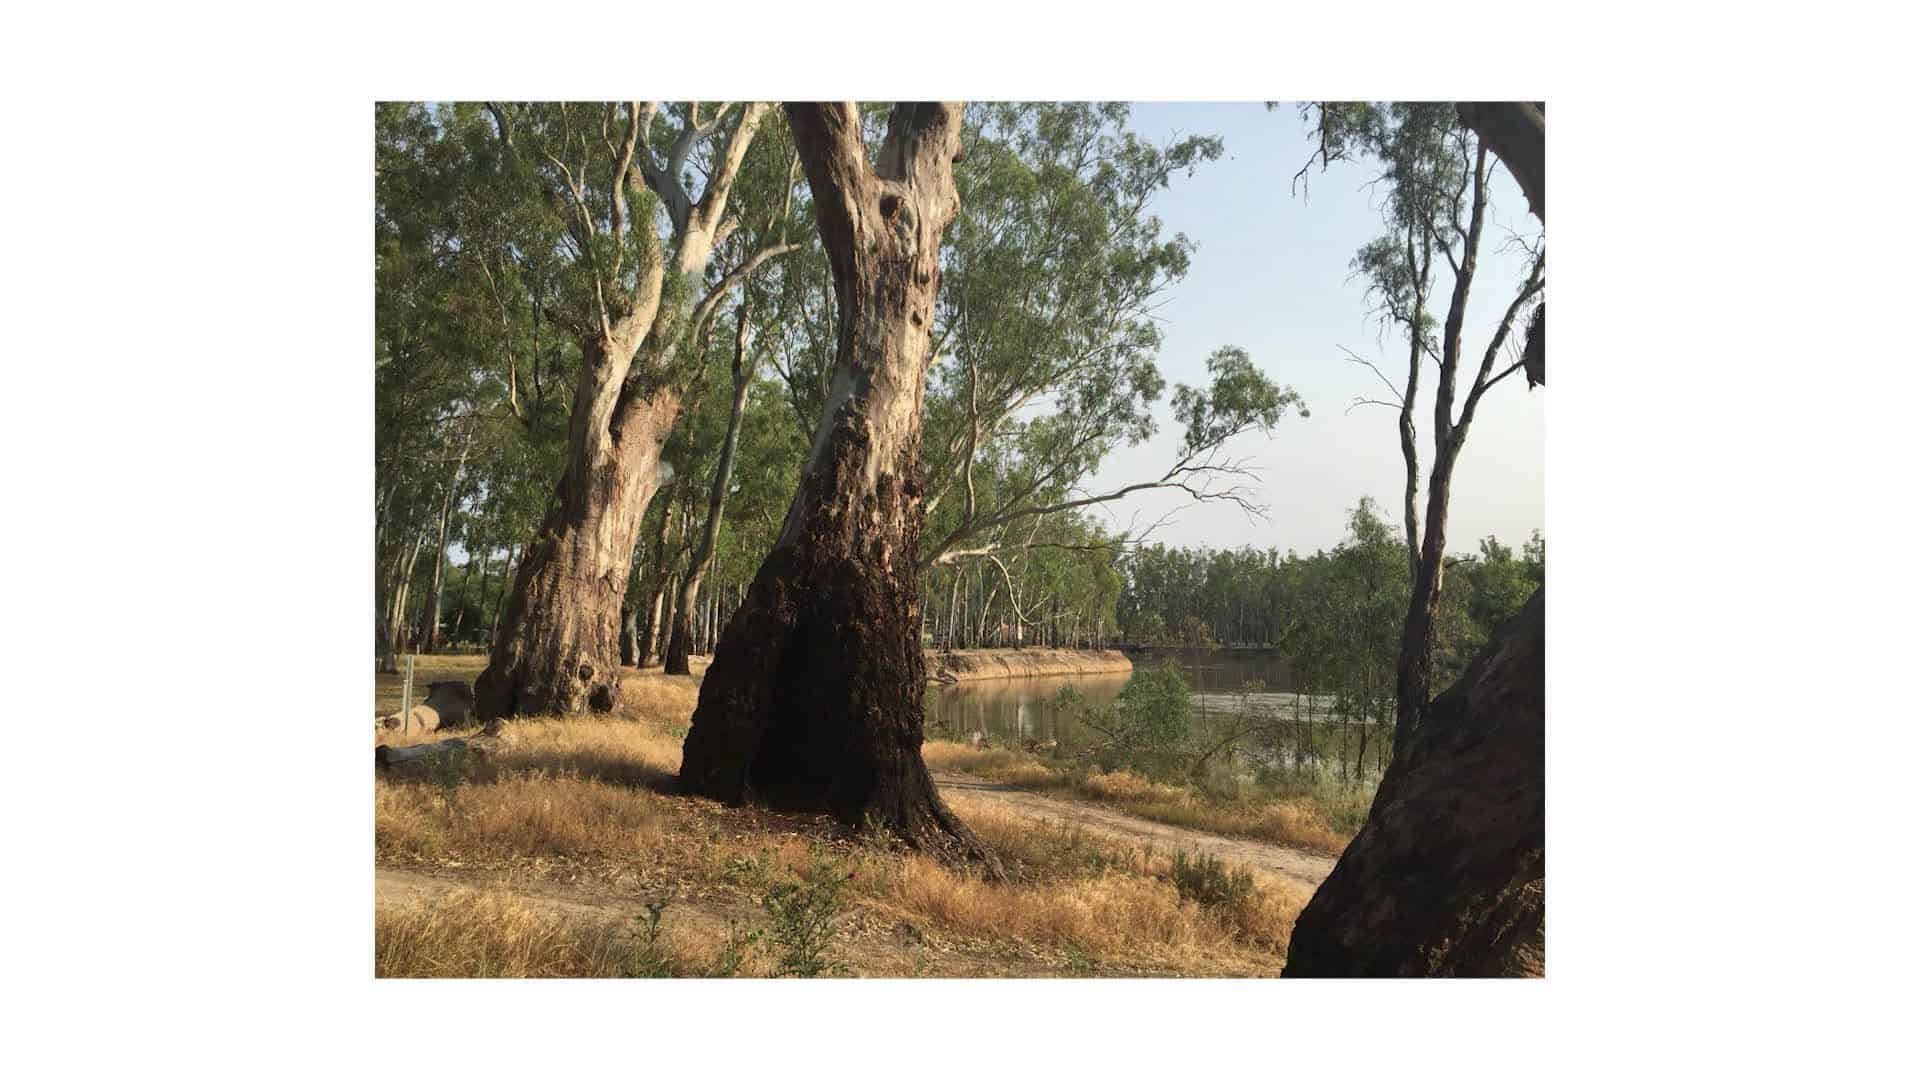
Location: By the banks of the Murray River, surrounded by gum trees—an artist’s dream!
Now, ten years on, I wanted to see how my skills had grown, so I revisited the same location and created a fresh painting—this time focusing on the trunks and bark rather than just the river itself. Looking back helps you see how far you’ve come as an artist. This blog post is all about sharing that journey and what I learned along the way.
Materials I Use
Before we get into the step-by-step process, let’s go over the materials I use. (Feel free to substitute with your own favorites, but these are my tried and true.)
- Paints: I use Blue Ridge Oils (highly recommend—link below), but any high-quality oil paint will do.
- Panel: 12″x16″ wooden painting panel
- Brushes: A mix of large bristle flat brushes, synthetic flats, and a synthetic rigger for fine details
- Medium: OLO gel for thinning oil paint
- Palette knife: For mixing and, occasionally, scraping for added texture
- Other Essentials: Rags, palette, easel (see my review of the Craft Geek tripod easel below!)
Top-down view of palette and brush setup. Remember, tools matter—but knowing how to use them matters even more!
My 6-Step Gum Tree Painting Process
Here’s the heart of my approach. Painting tree trunks that look alive and real is all about working in sensible stages. Let’s break down each step with detailed tips.
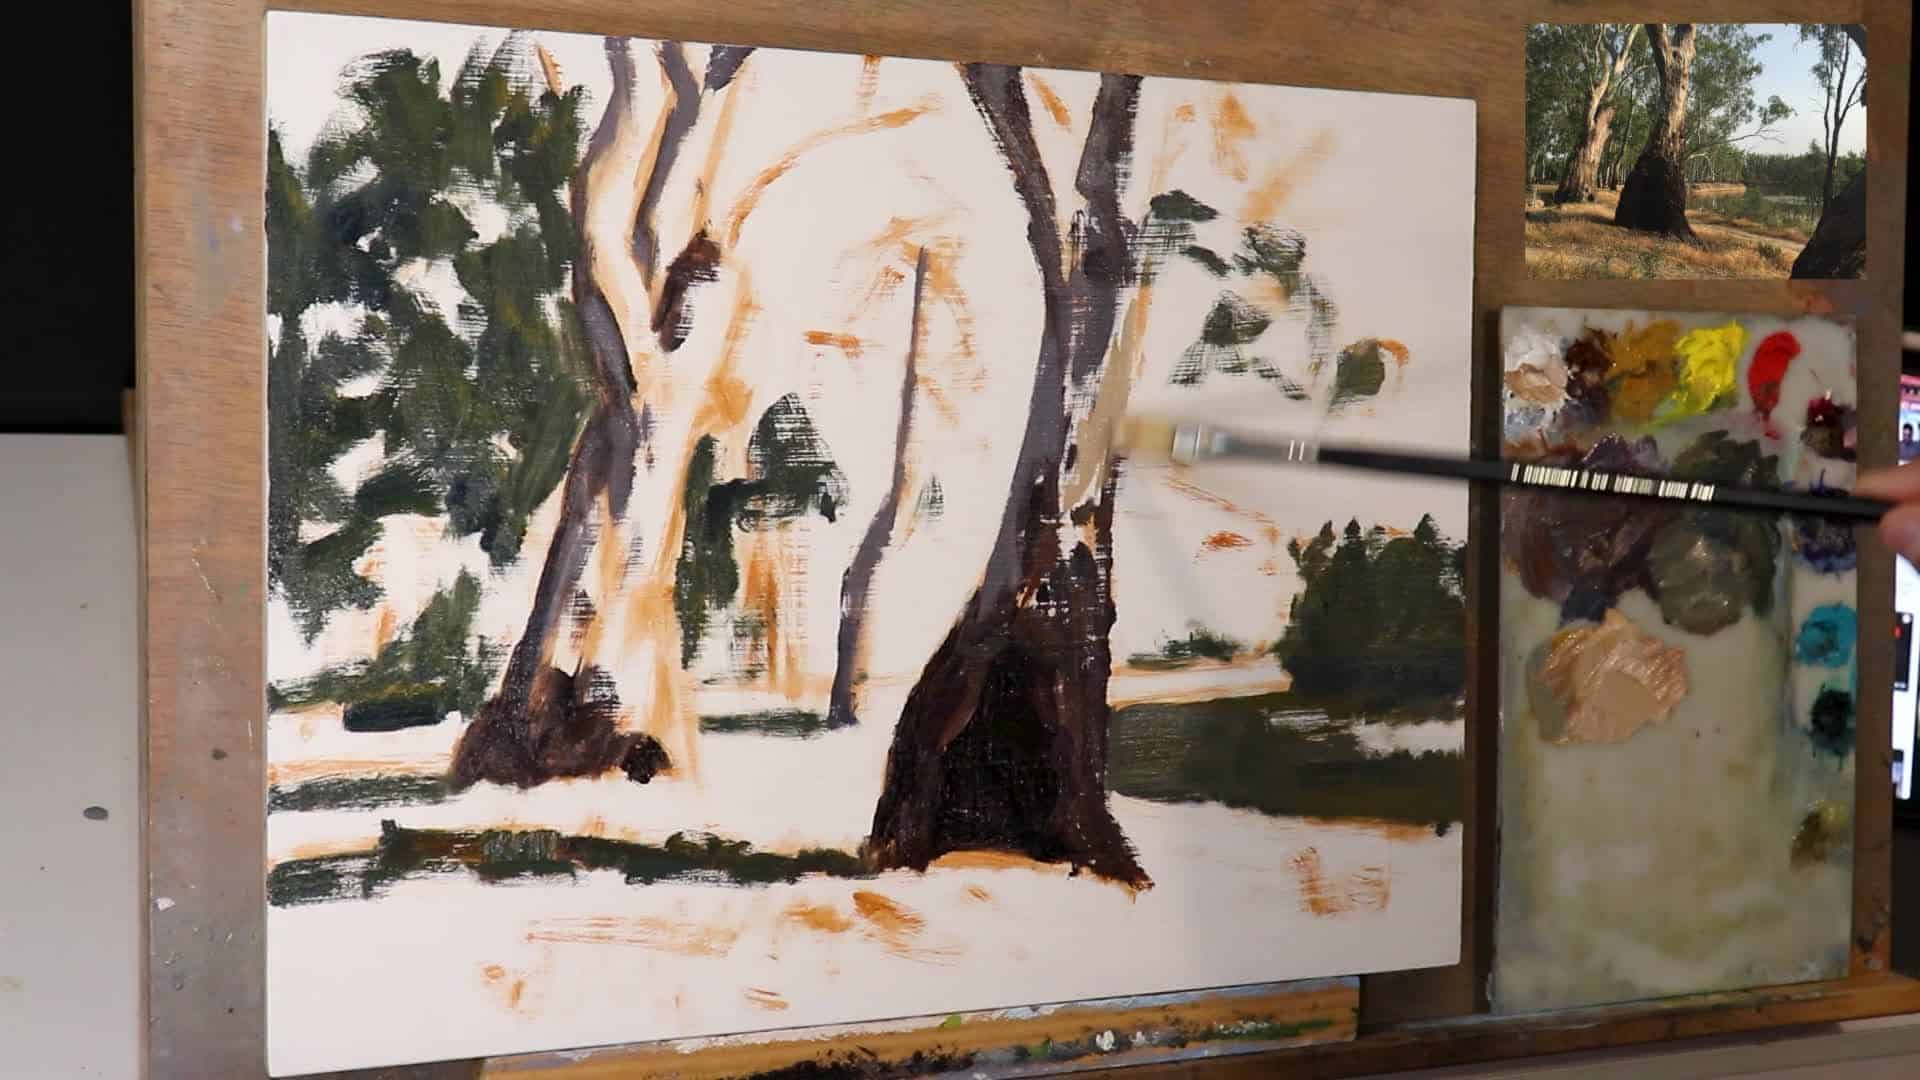
1. Paint Your Dark Values and Shadows First
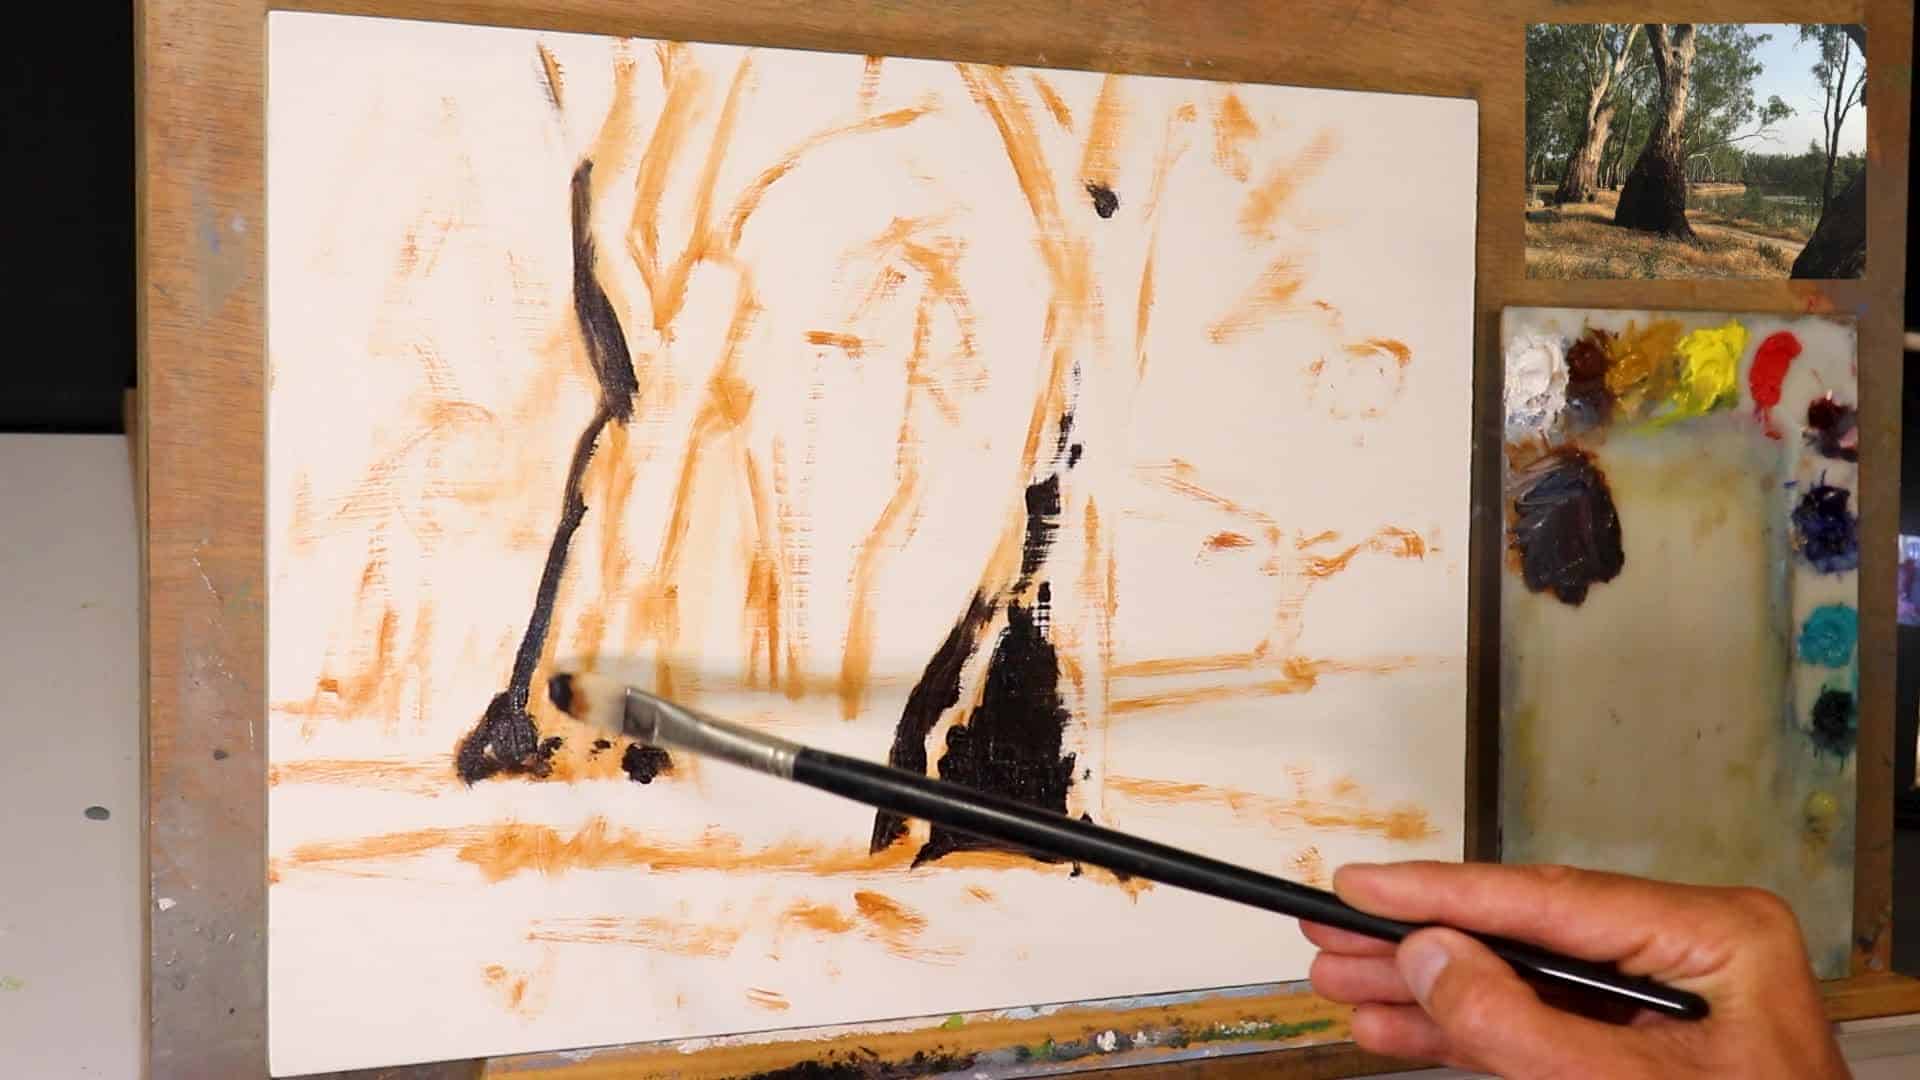
This step is absolutely crucial. Starting with the darkest darks anchors your whole painting and makes painting the lighter areas so much easier later on.
Why start with the darks?
- It helps set the value range for your painting.
- You can always cover a dark with a lighter mark, but it’s much harder to work the other way around.
How I Do It
- Mixes for Darkest Darks: Ultramarine blue, burnt sienna, and a little alizarin crimson.
- Medium: Add OLO gel to thin the paint for easy sketching and blocking in.
- Edges: Use a bristle flat brush to quickly lay in those heavy shadow areas, especially in the cracks and folds of gum tree bark or beneath dense foliage.
Pro Tip:
“If you paint your darks first, it makes it so much easier to paint all the areas in light afterwards.”
Specific Mixes I Use for Shadows
- Tree Trunks (shadow side): Ultramarine blue + burnt sienna + alizarin crimson + touch of titanium white
- Foliage (in deep shade): Ultramarine blue + yellow ochre + a touch of titanium white + cobalt teal + alizarin crimson
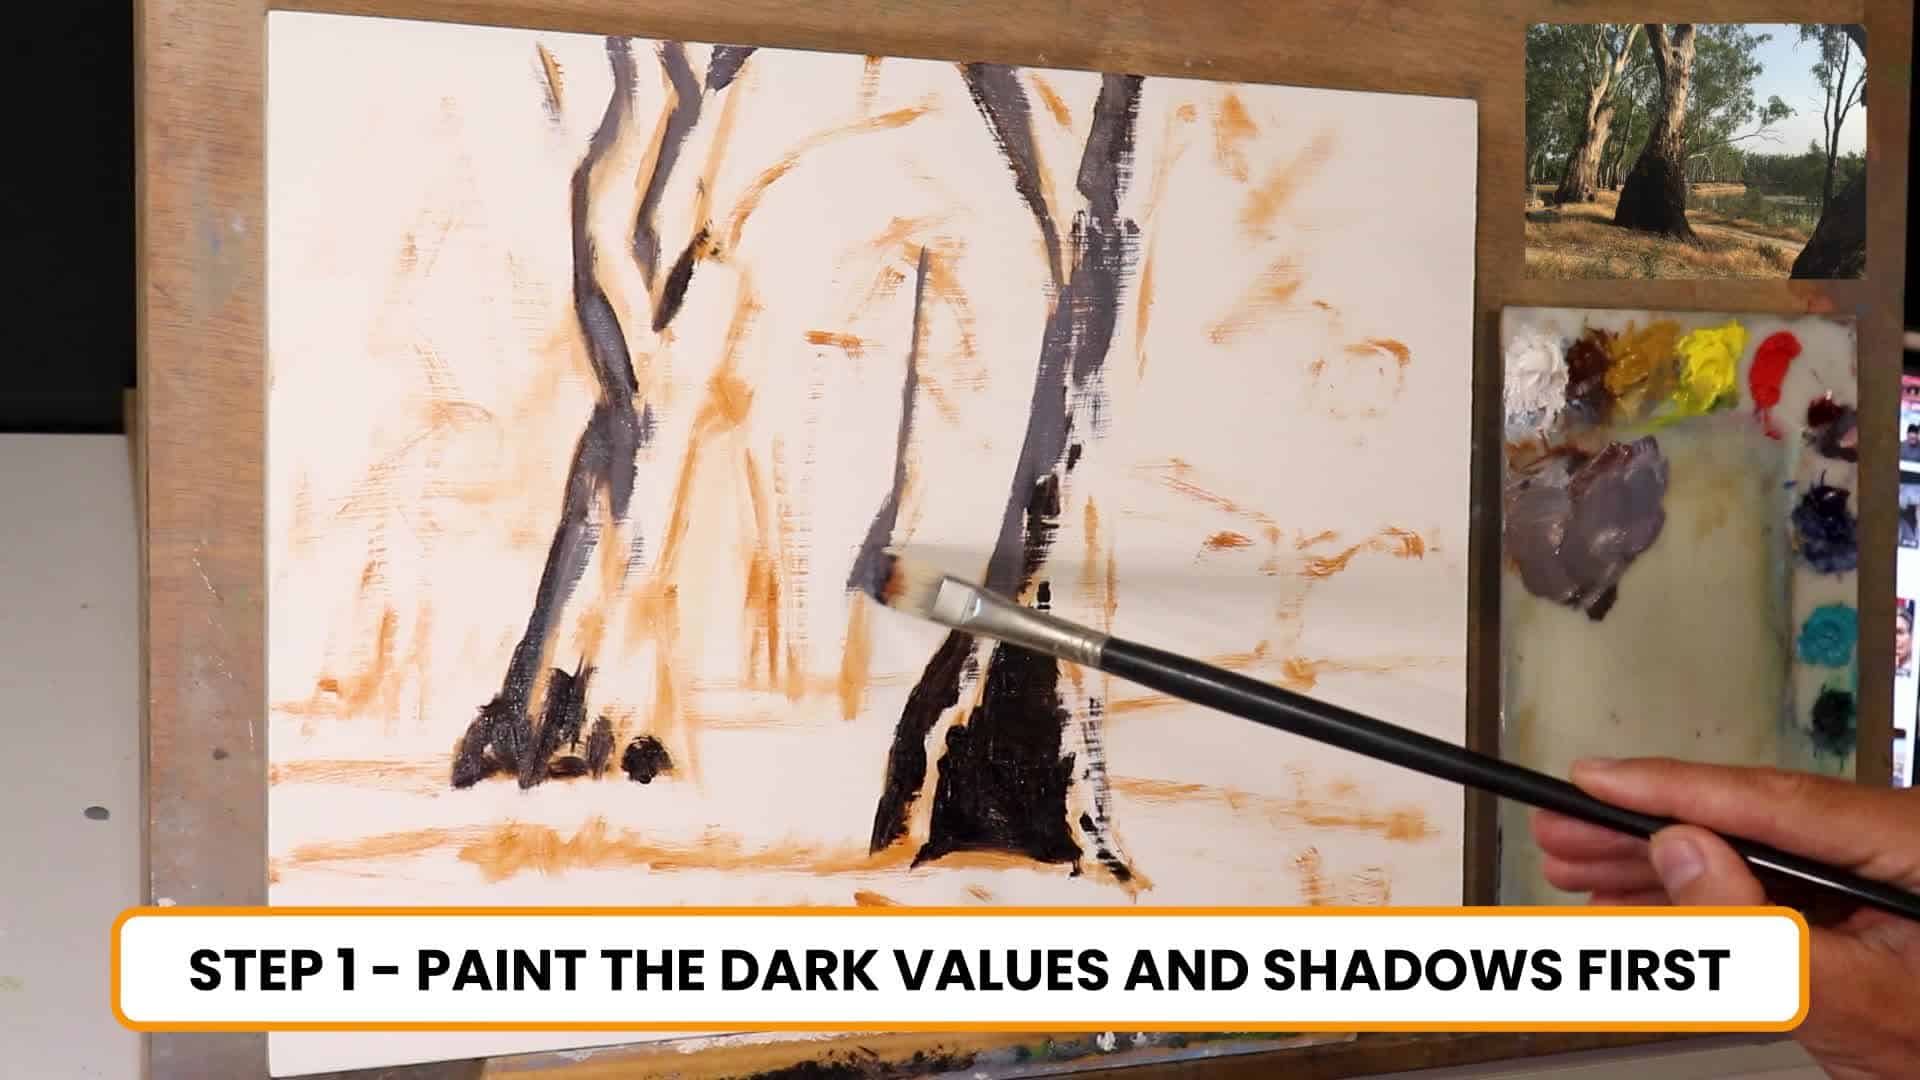
Lay in all the darkest shapes and patches of shadow on both trees and ground—don’t try to get it perfect yet!
2. Use Loose Brushwork with Big Brushes
One mistake a lot of us make is going in with tiny brushes too soon. Want your paintings to look lively and expressive? Grab the biggest brush you’re comfortable with and attack the canvas!
Why Loose Brushwork Matters
- Covers the canvas quickly, keeps you from overworking an area
- Lets you create painterly, gestural marks—think about the energy and movement of tree bark!
- Prevents your painting from looking stiff or over-detailed
My Approach
- Big Bristle Flats: Number 6 flat is my workhorse at this stage.
- I let the randomness of the bristle tips naturally create textures—especially handy for rough bark and leafy masses.
- Don’t worry about detail yet! You can always add it in the next layers.
Loose blocking in with large brushes: notice how the random brush marks hint at bark texture and foliage without fussing over individual details.
3. Block In the Areas in Light
Once the darks are established and the composition feels solid, it’s time to start dropping in your lighter mid-tones and highlights.
Steps in the Light Block-In
- Gradually begin working lighter mixes into the sunlit portions of tree trunks, upper grass, and the lit side of branches.
- Still use large brushes for a painterly feel.
- Use broken color and visible strokes for character.
Color Recipes for Light Areas
- Sunlit Tree Trunks: Yellow ochre + alizarin crimson + burnt sienna + titanium white (+ ultramarine blue if it’s too warm)
- Foreground Grass: Yellow ochre + titanium white + burnt sienna + ultramarine blue + a bit of alizarin crimson
- Foliage (lit areas): Yellow ochre + cadmium yellow medium + ultramarine blue + titanium white for base greens; tweak with cadmium red light or burnt sienna for those olive, dusty Australian gum leaf tones
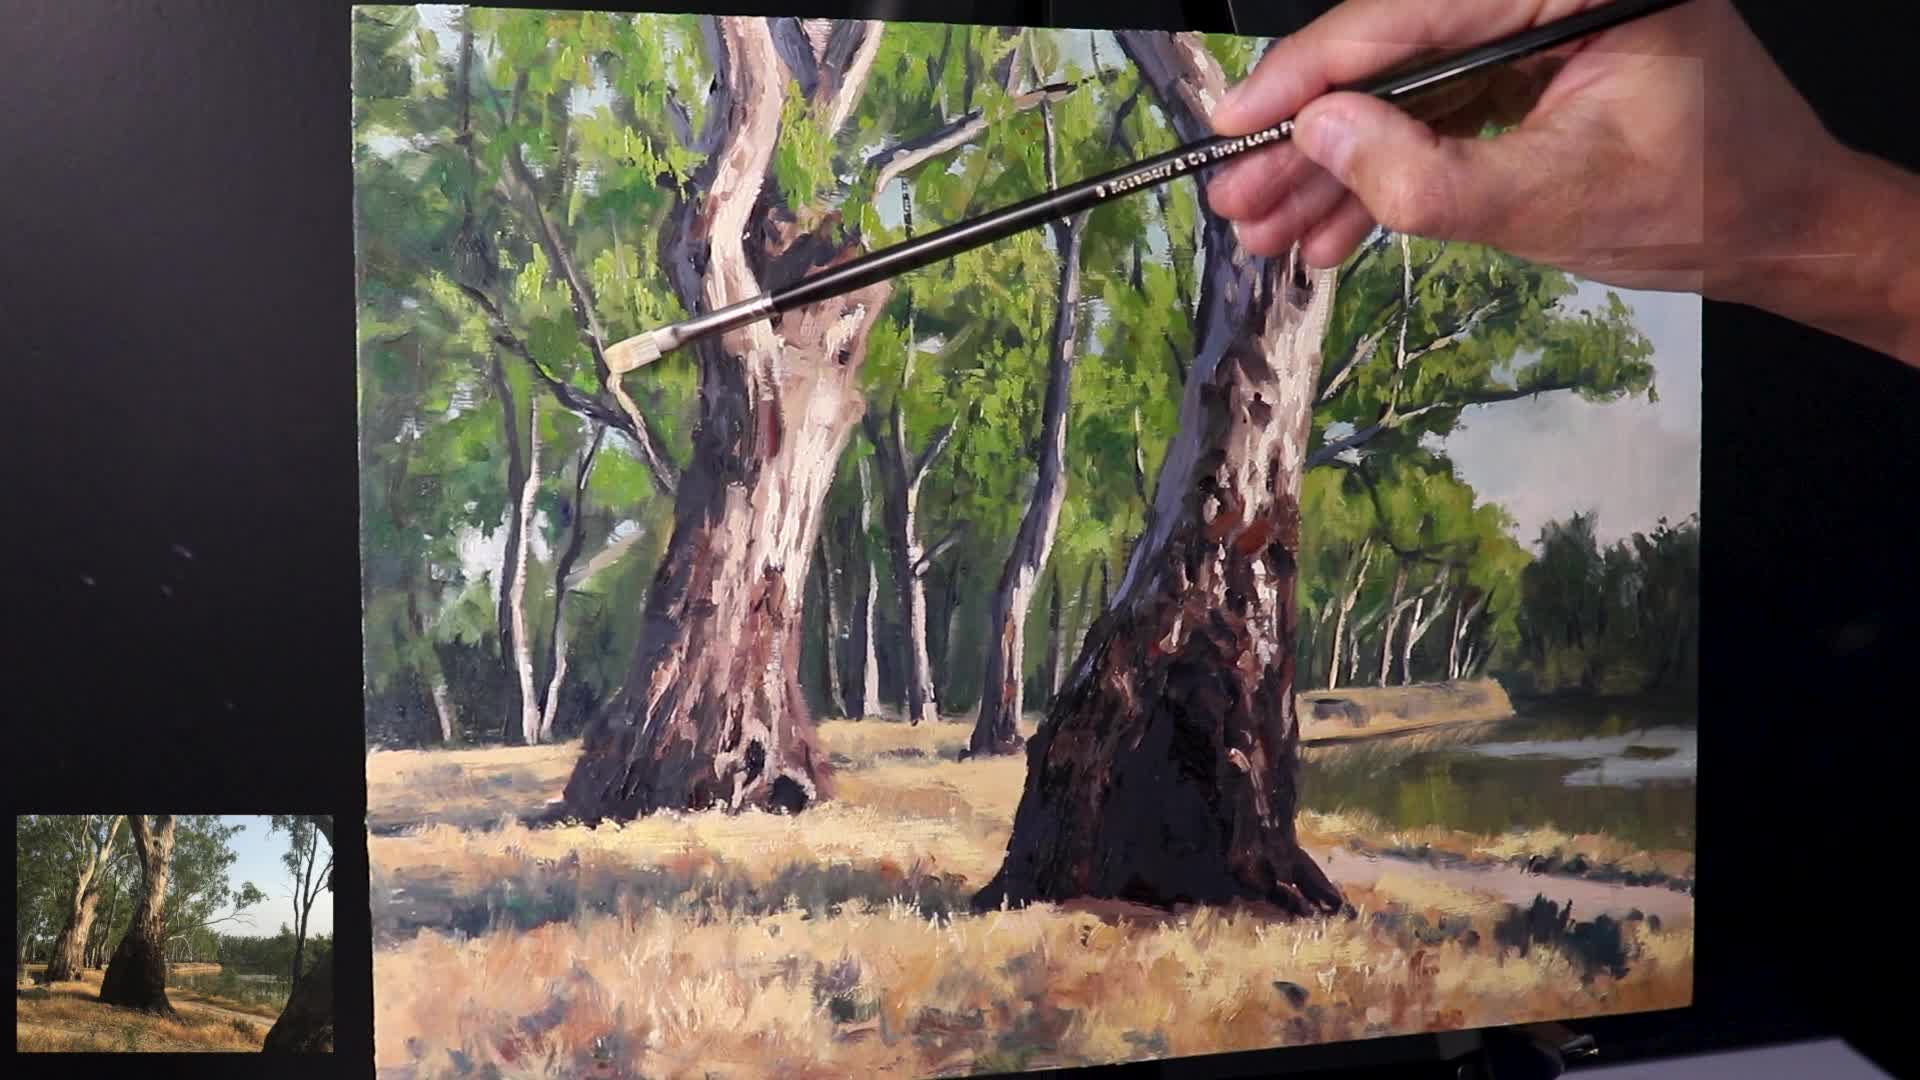
Capturing Texture in the Bark
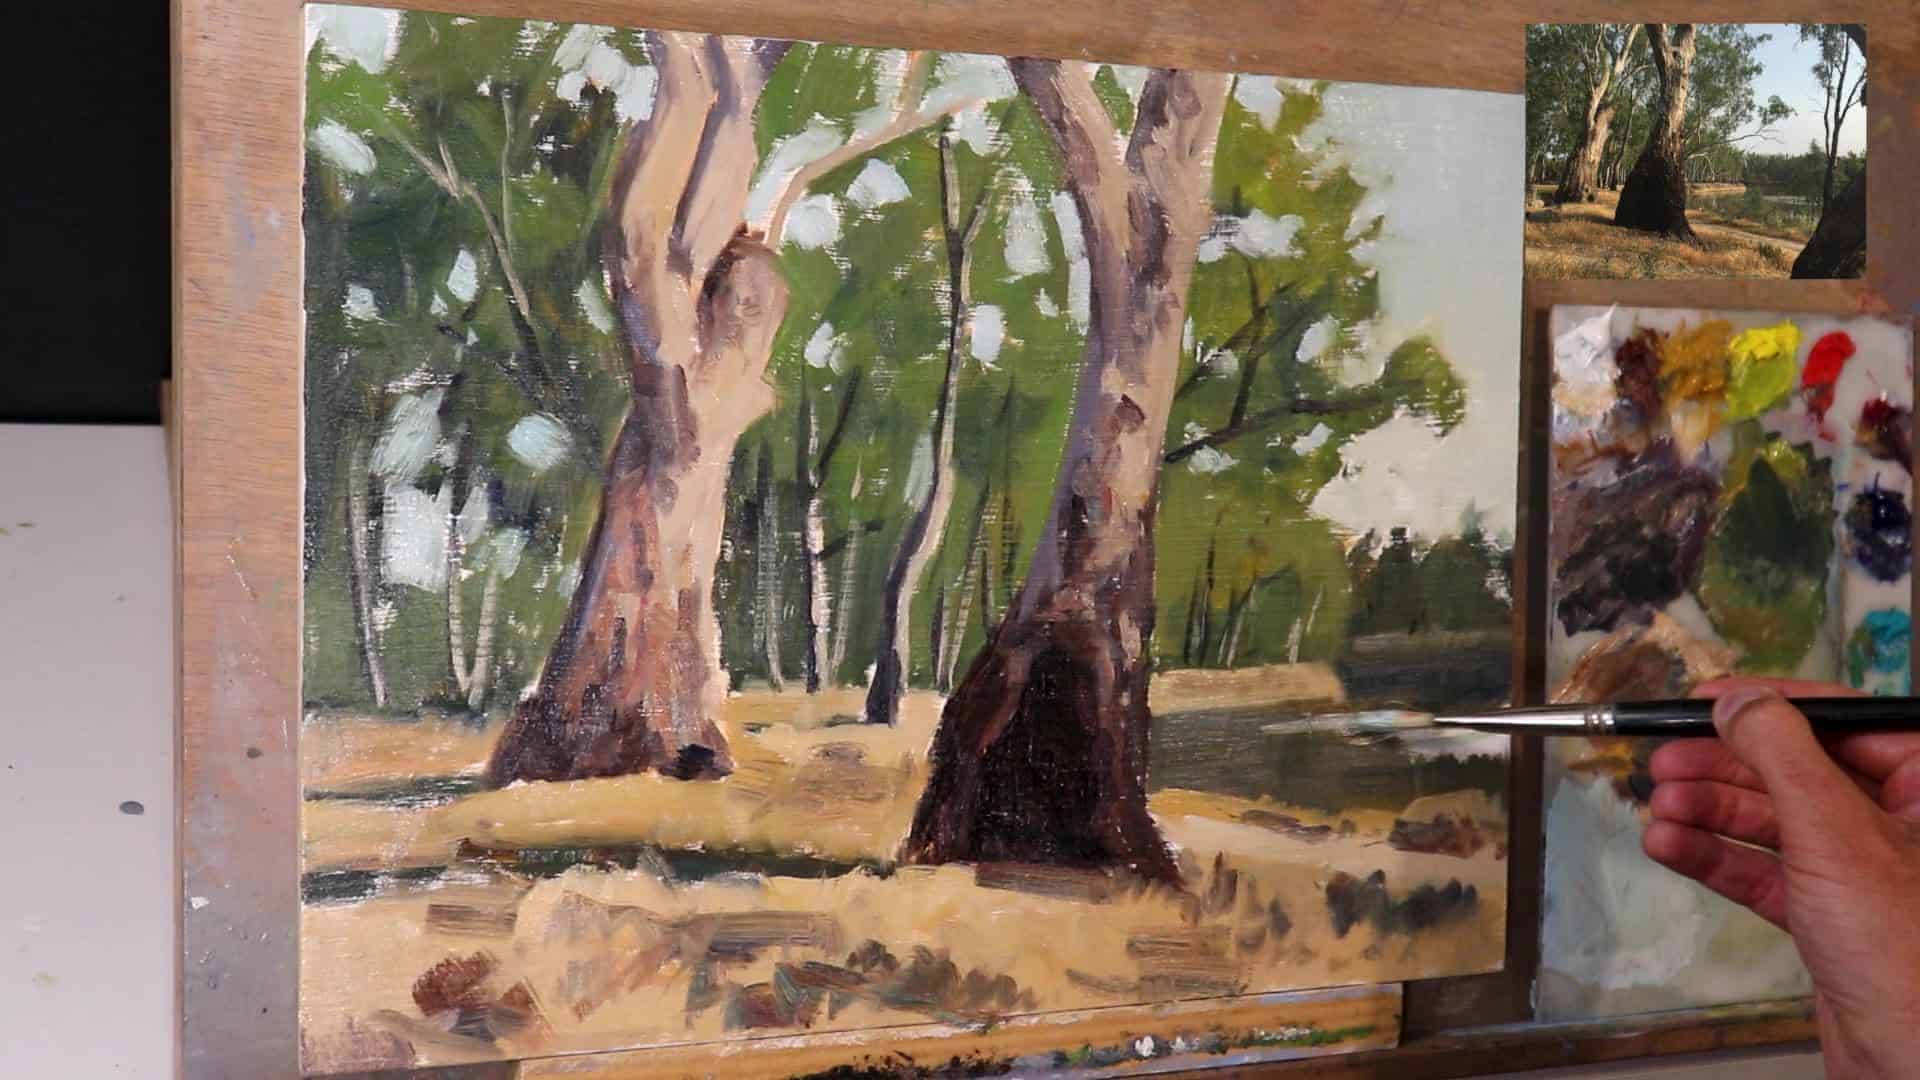
I use a bristle flat brush, laid almost flat, to “scrub” colors onto the trunks. This instantly creates the look of old, gnarly, peeling bark. Don’t try to be too neat—the more broken and rough, the better!
4. Model and Add Details
When your block-in is dry to the touch, you can really start to bring the painting alive by modeling (creating three-dimensional form) and adding detailed texture.
My Approach to Detailing
- Synthetic Flat Brushes: Great for more defined edges, especially for adding those fine strips of bark or subtle cracks.
- Zones: Tackle the hardest or most important part first—in this painting, that meant the gum trees.
- Peeling Bark: Use lighter and warmer colors to show the smooth, creamy wood underneath—gradually building up the illusion of peeling layers.
Tip: Work from Dark to Light
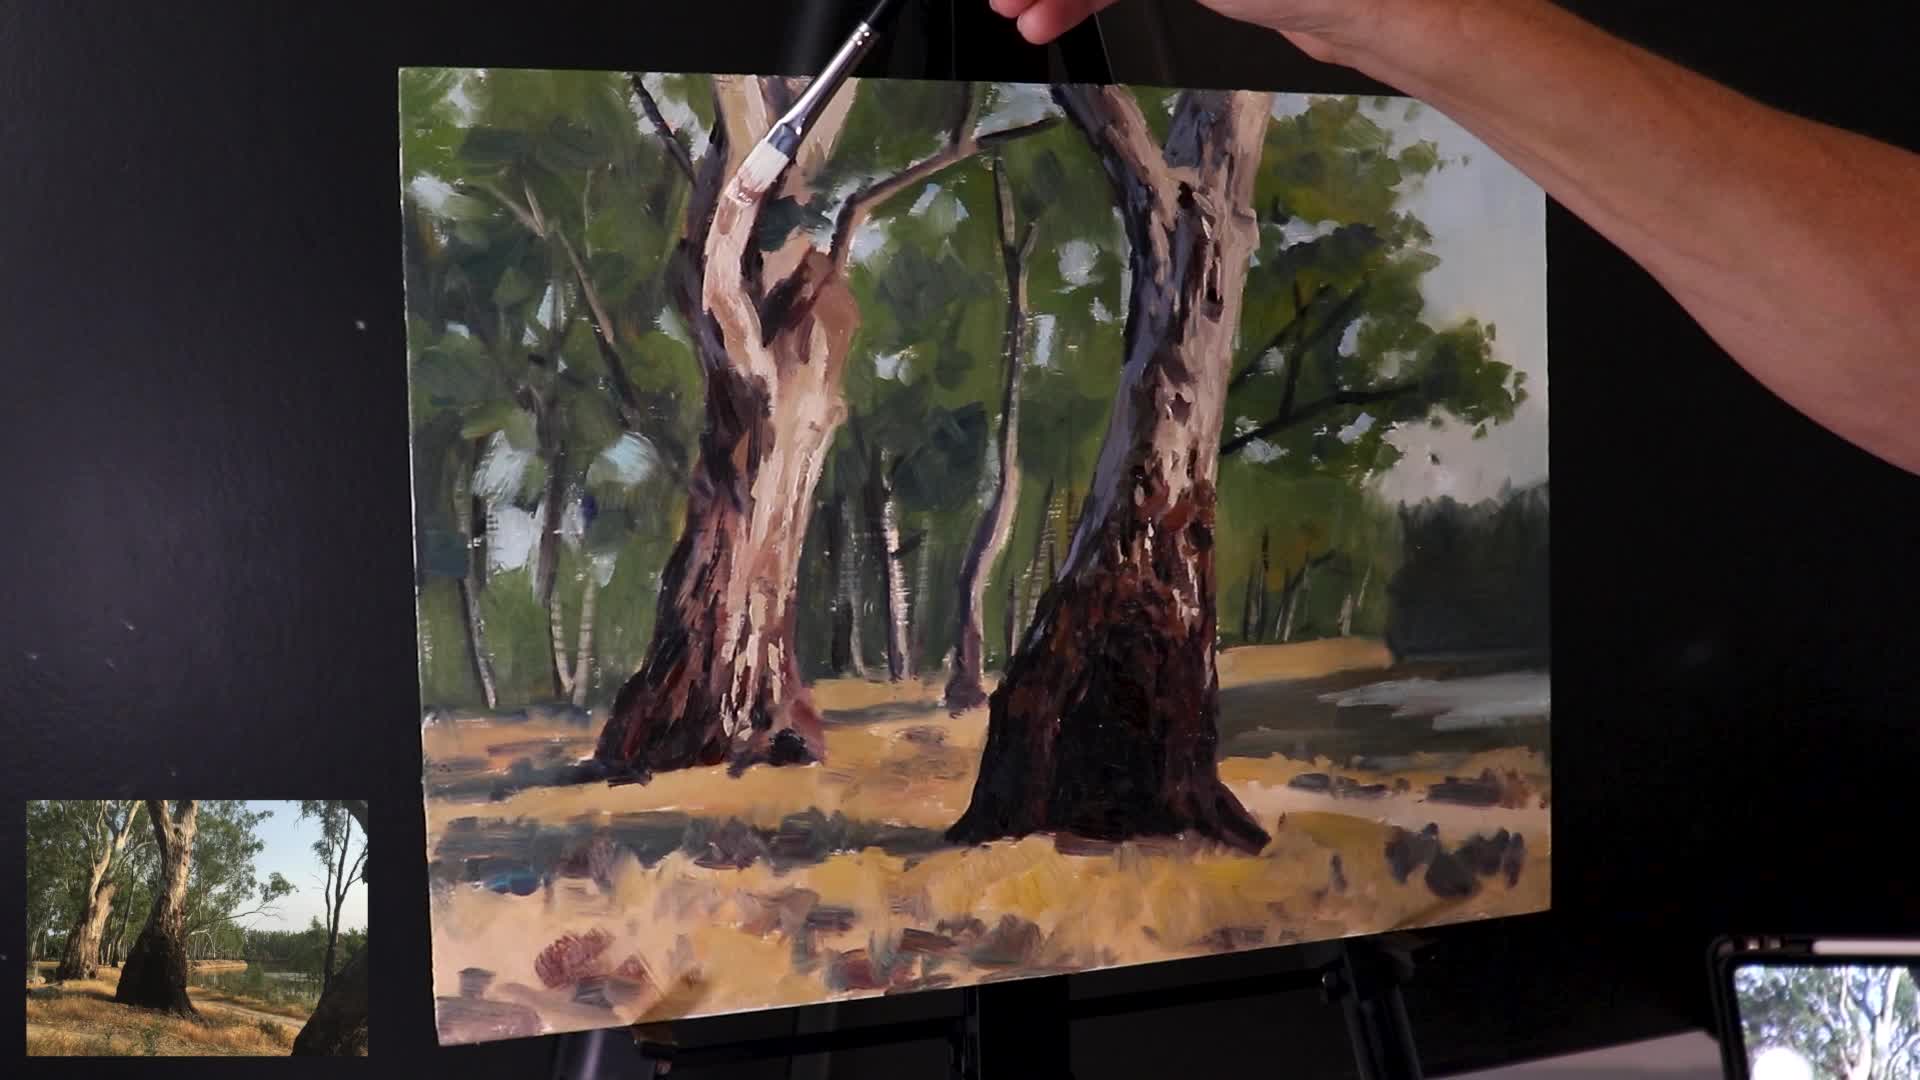
Keep your tones on the darker side at first, slowly building up lighter and lighter touches. This builds depth and lets the textured bark and highlights really shine.
Color Layering for Bark Highlights
- Highlights: Yellow ochre + lots of titanium white + touch of burnt sienna
- Save your lightest lights (purest, thickest strokes) for the final moments.
Key Advice
“It’s always best to keep your painting tonally darker to begin with and then build up those lighter layers.”
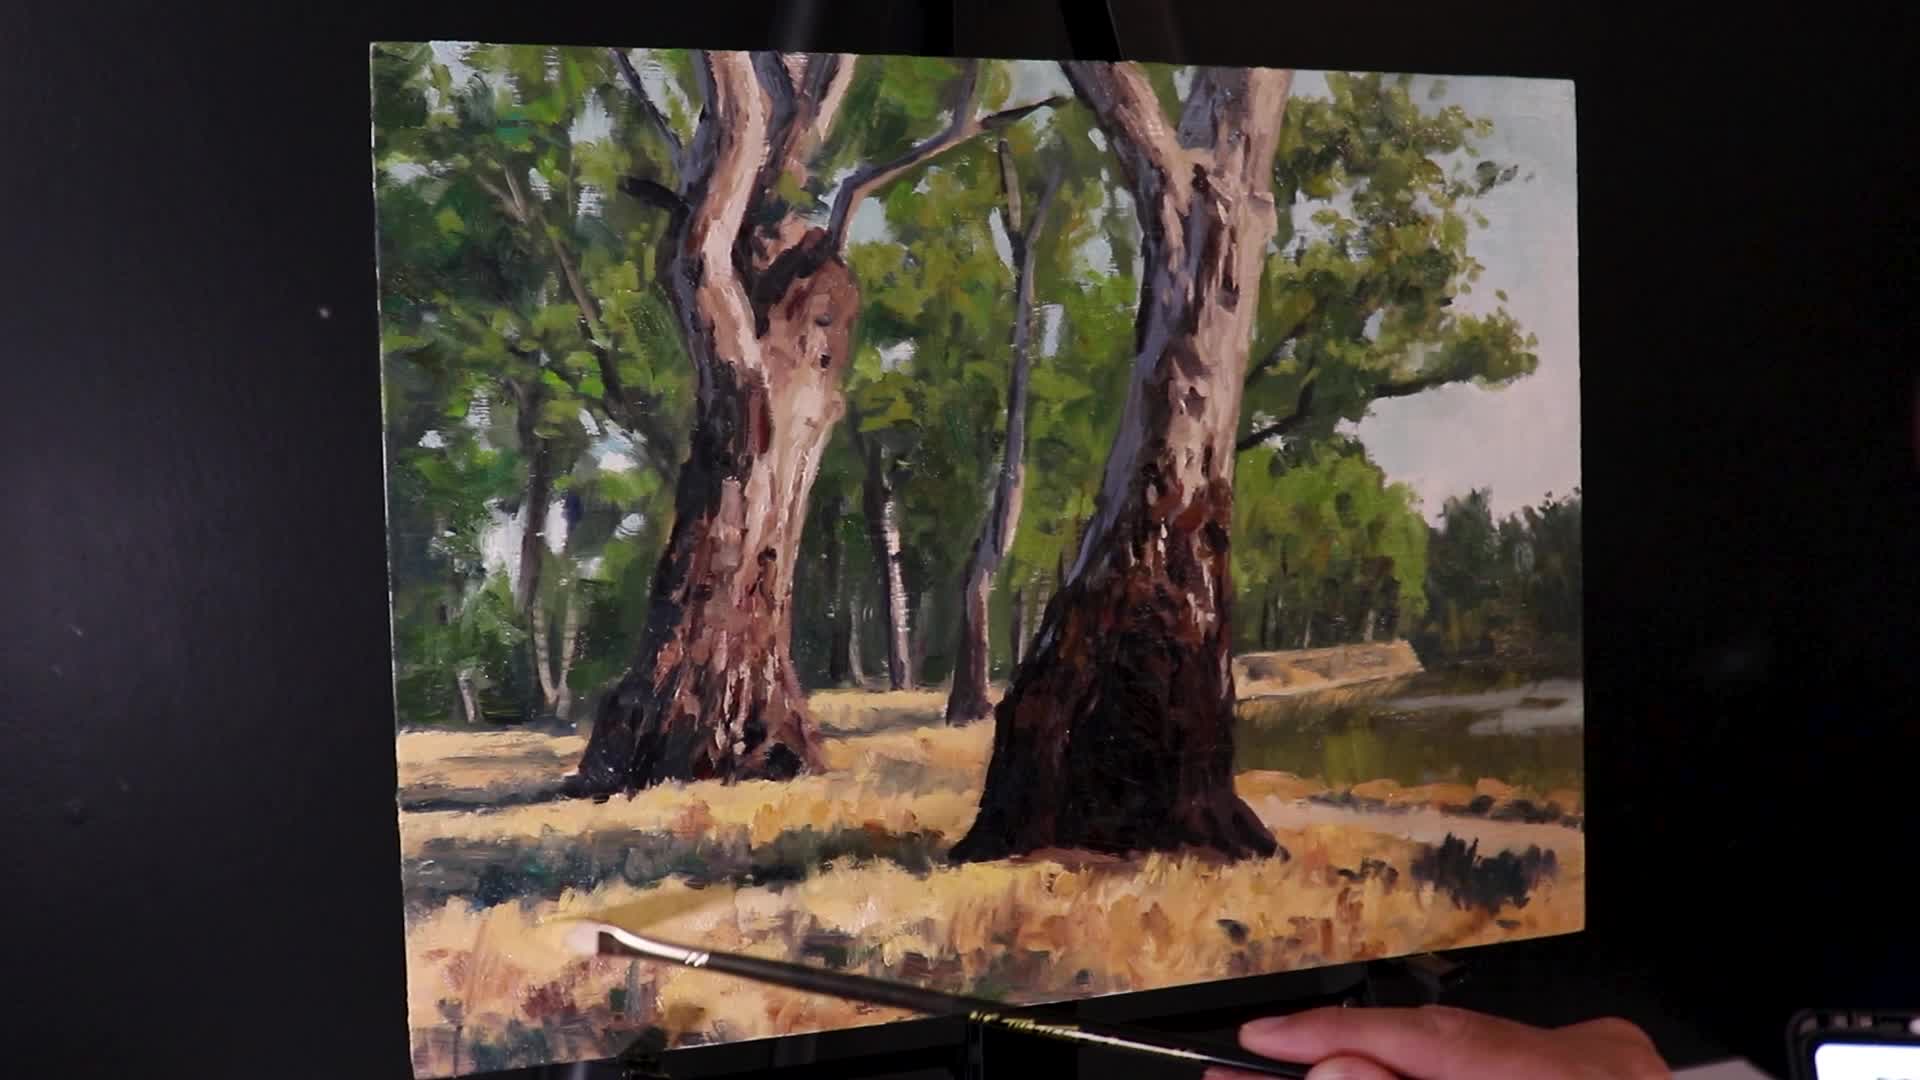
5. Refine the Painting
Now the fun part—refining and tidying up the whole scene.
What I Refine in This Stage
- Add lighter layers to grass, tree highlights, and bright branches.
- Restate dark values as needed for more contrast (sometimes your original darks get covered up).
- Pull out subtle halftones and color variations in bark and foliage (these make your scene come alive).
- Add a few more twigs and branches within the foliage, using a synthetic flat or rigger brush.
Color Handling
Be careful not to muddy your colors at this stage. If a section is wet and going mushy, let it dry and work over it later.
Sky Painting Tips
For a hot, dusty Australian sky:
- Titanium white + ultramarine blue + a touch of cobalt teal + a little yellow ochre
Adjust the mix until you have that sun-bleached, slightly hazy feel.
6. Save Your Lightest Values and Highlights for Last
This is where the painting really pops.
Final Details
- Lightest foliage highlights: Mix your palest, most saturated greens for the sunniest leaves
- Tree bark highlights: A thick, creamy mix of yellow ochre and titanium white—sparingly, just enough to catch the eye on the smoothest or light-catching bark areas
“Adding those last highlights to the tree trunk really adds depth and makes it look realistic.”
Don’t Overdo the Detail
You don’t have to paint every leaf or blade of grass to make the scene read. Instead, suggest a few and let the viewer’s eye fill in the rest.
Final Touches Checklist
- Add final leaves catching sunlight—don’t cover every inch, just a few here and there
- Restate any darkest darks (occlusion shadows) if they’ve faded
- Suggest a few bright grass blades in the foreground with a synthetic rigger brush
- Add subtle pops of reflected light on the bark using mixes of ultramarine blue, burnt sienna, titanium white, alizarin crimson, and cobalt teal
Color Mixing: Exact Paint Recipes
Getting the subtle colors right is huge, especially when painting gum trees:
Darks
- Tree Trunks (shadow): Ultramarine Blue + Burnt Sienna + Alizarin Crimson (+ Titanium White for lighter shadows)
- Foliage (shadow): Ultramarine Blue + Yellow Ochre + Cobalt Teal + Alizarin Crimson + Titanium White
Lights
- Sunlit Bark: Yellow Ochre + Lots of Titanium White + Touch Burnt Sienna
- Lit Foliage: Yellow Ochre + Cadmium Yellow Medium + Ultramarine Blue + Titanium White
Special Effects
- Reflected Light on Bark: Ultramarine Blue + Burnt Sienna + Titanium White + Alizarin Crimson + Touch Cobalt Teal
- Australian Sky: Titanium White + Ultramarine Blue + Cobalt Teal + Touch Yellow Ochre
” (Palette shot with labeled mixes)
My Favorite Trick
Don’t be afraid to tweak with reds (cadmium red light or alizarin crimson) in both the foliage and bark mixes for that signature warm, olive, “dusty” Australian landscape vibe.
Brushes and Techniques for Texture
The magic of bark—and really, any natural surface—comes from texture. Here’s how I approach it:
Brushes I Use
- Large bristle flat brushes: For big, gestural marks and blocking in
- Synthetic flat brushes: For modeling and sharper details on bark/branches
- Synthetic rigger (liner) brush: For grass, tiny twigs, and final lines
Techniques
- Dry-brush: Lightly drag a flat brush loaded with paint across the surface for broken color and rough textures
- Scrubbing: Push bristles into the canvas, great for rough bark areas
- Edge Variety: Use the flat and the corner of flat brushes for wider trunks vs. narrow branches
- Layering: Always work DARK to LIGHT, letting brushstrokes from earlier “peek through”
Pro Tip: For branches and stems, I find a flat brush actually gives more control and a more natural, variable line than a round—especially for the broken, multi-width look of gum twigs.
Finishing Touches and Knowing When to Stop
The hardest part about finishing any painting is… knowing when it’s finished! Here are a few strategies I use:
- Save your lightest lights for last.
- Walk away for a day or two. Come back fresh and see if anything jumps out that needs a tweak.
- Don’t fuss over every blade of grass or leaf—suggestion is your friend.
- Restate values: If highlights or shadows look dull or “lost”, go back in and re-emphasize them.

Blocking in the last highlights to make the bark really stand out.
Tips for Painting Tree Branches, Grass, and Foliage
Branches & Stems
- Use a synthetic flat for more organic, broken lines
- Don’t be too neat—gum tree branches are often twisty and a bit wild
- Imply clusters of branches rather than drawing every single one
Grass
- Suggest dense grass with a few blades indicated by a rigger brush
- Don’t try to paint every blade—it’ll look overworked
Foliage
- Build up in layers: start dark, add mid-tones, then place highlights
- For sunlit leaves, just dab on a handful of lighter dabs—let the rest feel a bit “lost in shadow”
- Use color variety: olive, dusty greens, and a touch of red for realism
Recommended Supplies and Tools
Paints
- Blue Ridge Oils (or similar high-quality oil paints)
- Key colors: Ultramarine Blue, Burnt Sienna, Alizarin Crimson, Yellow Ochre, Titanium White, Cadmium Yellow Medium, Cadmium Red Light, Cobalt Teal
Mediums
- OLO Gel (or your favorite oil medium)
Brushes
- Large bristle flats, synthetic flats, rigger brush
Panel/Surface
- 12″x16″ (or larger) primed wooden panel
Easel
My Favorite Studio Easel
Recently, I’ve been loving the Craft Geek tripod easel.
Why?
- Super compact
- Lightweight
- Easy to set up (even in my small studio)
- Holds large canvases no problem
“Now, I don’t often promote these types of companies in my videos, but… I’ve tried it out and I absolutely love it… Craft Geek are giving my viewers a 15% discount! Use code: Samuel Art for 15% off.”
Link to Craft Geek Tripod Easel:
Craft Geek Tripod Easel – 15% off with code Samuel Art
Setting up the tripod easel in a small studio space.
Final Thoughts & More Resources
Here’s a quick recap of my process for painting gum trees and bark in oils:
- Start with the darkest darks and shadows across the tree trunks, branches, and dense foliage masses.
- Work loosely and bravely with large brushes to capture gesture and texture.
- Block in the entire painting with core values (both darks and lights) but keep it tonally a bit darker in the block-in.
- Model the forms and add key details—especially the hardest/most complex elements like major trunks and textured bark.
- Refine individual zones, restate values, and add halftones and subtle detail.
- Finish with your lightest lights and the final, eye-catching details like highlight bark, bright grass, and sunstruck leaves.
Remember: don’t be afraid to experiment—every round of painting is a chance to learn and grow.
“Sometimes I find it difficult to know when to put my brushes down. But often I’ll just leave my painting for a few days, come back to it, and just see if it needs any more work doing to it.”
If you want to go deeper:
Check out my free landscape painting blueprint to get my full process, color recipes, and pro tips sent straight to your inbox.
And if you want more like this, be sure to check out my full tutorial on painting trees here.
Thanks for reading—see you in the studio, or out painting in the wild!
Questions or tips to share? Drop them in the comments—let’s paint better trees together!
This post contains affiliate links. As an artist, I only ever recommend materials and brands I use and love myself. Thanks for your support!
